Run Substratum Node on a $5 Raspberry Pi Zero and Enjoy Breakfast at Milliways
Repository
https://github.com/SubstratumNetwork/SubstratumNode
https://github.com/humicro/sub_node_pi_oled_ui.git
What Will I Learn?
- You will learn essential knowledge of Raspberry Pi Zero, Virtualbox, Xubuntu, Arch Linux and Substratum Node
- You will learn how to install Xubuntu inside a virtual machine
- You will learn how to install Arch Linux on a Raspberry Pi Zero, with a working Wi-Fi upon initial boot
- You will learn how to compile a Rust project under Xubuntu
- You will learn how to cross compile a Rust project for ARM-based devices
- You will learn how to run Substratum Node in Raspberry Pi Zero
- You will learn how to install a mini OLED screen on Raspberry Pi
- You will learn how to use Python to create a user interface for the OLED screen on Raspberry Pi to control Substratum Node
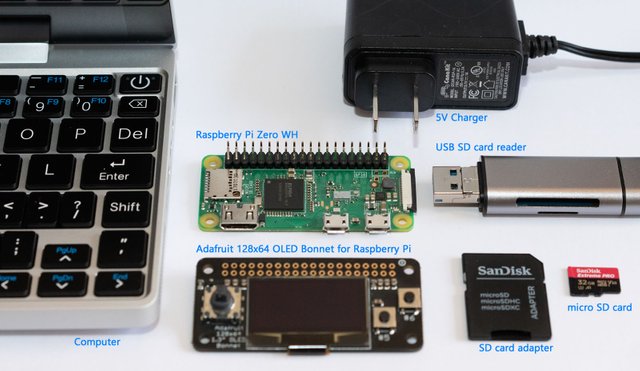
Requirements
- Raspberry Pi Zero W (or WH)
- Compatible charger (5V, at least 1A)
- Micro SD card with a capacity of at least 2 GB
- USB SD card reader, and an adapter for micro SD card
- Personal computer running Windows, Linux or MacOS
- Wireless router with internet access
- (Optional) Adafruit® 128x64 OLED Bonnet for Raspberry Pi
Difficulty
Intermediate
Tutorial Contents
Substratum, the foundation of the decentralized web, is under active development. Node 0.3.4, a new beta release featuring a refreshed UI, is just around the corner at the time of the publication of this article.
Substratum is developing an open-source foundation for the decentralized web, providing free, unrestricted, and uncensored access to content for a new Web 3.0.
The Substratum Network is a worldwide collection of nodes that uses industry-leading cryptography to deliver secure content anywhere, all without the need for VPNs or Tor.
-- Substratum
While waiting for the Node 0.5.0 enabling decentralization and monetization, as well as the launch of CryptoPay and the exciting "Project 3", why don't we do something interesting by using materials at hand? How about running a Node on the $5 Raspberry Pi Zero W, an extremely lightweight computer board?
By following this guide, you will be able to:
- Install Xubuntu inside a virtual machine
- Deploy Linux file system to SD card under Windows/Linux/MacOS
- Install Arch Linux on $5 Raspberry Pi Zero W
- Get the Wi-Fi working upon initial boot
- Cross compile Substratum Node for ARM-based devices
- Run and test Substratum Node on Raspberry Pi Zero W
- Install a mini OLED screen on Raspberry Pi Zero W
- Use Python to create a user interface on an OLED screen to control Substratum Node
As a sequel to the previous Hitchhiker's Guide to Substratum Node on Raspberry Pi, this guide introduces lots of new stuff:
- By using a universal way to deploy Arch Linux file system to SD card via a virtual machine, all three major systems (Windows, Linux and MacOS) are supported. You don't have to rely on a native Linux system any more to follow this guide.
- Wi-Fi on Raspberry Pi works upon the initial boot.
- Easier ways to find the IP address of Raspberry Pi.
- Instead of native compilation, Substratum Node is now cross compiled to support more ARM architectures - not only the 64-bit aarch64, but also 32-bit armv6 and armv7, and potentially even more systems. The compiled binary works on not only the 64-bit Arch Linux ARM operating system, but also the popular Raspbian, and any other Linux on ARM.
- Raspberry Pi Zero is much lighter weight than Raspberry Pi 3, and it costs only $5.
- It introduces a fun way to interact with Substratum Node via a mini OLED screen bearing physical buttons via a Python script.
"If you've done six impossible things this morning, why not round it off with breakfast at Milliways, the Restaurant at the End of the Universe."
-- The Restaurant at the End of the Universe, Douglas Adams
Don't panic! If you managed to follow this guide, you are overqualified to enjoy a breakfast at Milliways, the restaurant at the end of the universe (SUB accepted 🚀). Just relax and enjoy Abram's SUB & Coffee and Justin's Insights.
0. What hardware do you need?
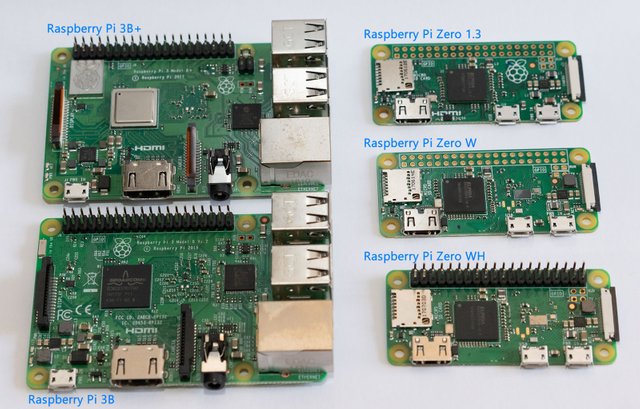
Raspberry Pi Zero W (or WH)
You need a Raspberry Pi Zero, which is the most lightweight computer board in the Raspberry Pi family. It comes with four flavors so far: Raspberry Pi Zero, Raspberry Pi Zero 1.3, Raspberry Pi Zero W, and Raspberry Pi Zero WH. Please note only the ones featuring a W have built-in Wi-Fi support, so make sure you have the W or WH version.
WH version is basically the same as W, except that it has pre-soldered headers, making it convenient to connect to an add-on board. If you'd like to use the mini OLED screen but don't want to solder the headers by yourself, go with the WH version, which is a little bit more expensive at $13.99.
The W version is truly $5. You can pick up one at this unbelievable price at Micro Center (pun intended).
Power cord
You need a 5V power cord bearing a micro USB connector compatible to the Pi Zero. Pi Zero is tiny and consumes very little power, so 1A is enough to support the board itself and the additional OLED display. If you happen to have the 2A or higher version for Raspberry Pi 3, no worries, it works, as long as it is 5V.Micro SD card
You need a micro SD card of at least 2G capacity. The Arch Linux ARM system takes less than 1G space. However, it might be quite a challenge nowadays to find an SD card smaller than 8 GB. 😂 I recommend getting the SD card of a reputable brand to avoid data loss.USB SD card reader, and a micro SD card adapter
For Xubuntu inside a virtual machine to access your SD card to deploy file system, you may have to use a USB SD card reader, since a native SD card slot embedded in a laptop may not be recognized by the guest system. (Of course, if you are running a native Linux instead of a virtual machine, as in my previous guide, the native SD card reader still works.)Personal computer running 64-bit Windows, Linux or MacOS
Anyone who has a personal computer running Windows, Linux or MacOS will be able to follow this guide, since all steps are done in the Xubuntu guest system inside a virtual machine. In addition to deploying Linux system to an SD card, and connecting to Raspberry Pi viassh, this computer will also be used for cross compiling, so make sure it's running a 64-bit system.
If you have a Linux running natively on your computer, that's even better. I'm sure you will also be able to follow this guide, with modifications at certain steps.Wireless router connected to internet
Raspberry Pi Zero W doesn't have an Ethernet port, so you have to use a Wi-Fi router.(Optional) Adafruit 128x64 OLED Bonnet for Raspberry Pi
This is a fancy add-on for your Raspberry Pi Zero W, but I promise you will like it once installed.
1. Install Xubuntu to a virtual machine
To deploy Linux system to an SD card, to connect to Raspberry Pi via ssh, and to cross compile, you'd better have a Linux system. But what if you don't have one at hand? Don't panic! You are covered by this guide. You will install and run an full featured Linux Desktop system inside a virtual machine on your computer.
For virtualization, there are various ways and tools, such as Cygwin, Hyper-V, VMware Workstation, Parallels Desktop, and the now famous Windows Subsystem for Linux. Here I choose the classic and free option: Virtualbox.
As of Linux distributions, I originally chose the most popular Ubuntu so even absolute beginners can catch up. However, during the writing of this tutorial, I found out Ubuntu 18.04 ran unbearably slow inside Virtualbox after the installation of the required Guest Additions package, possibly due to certain bug in Ubuntu that caused
GNOMEdesktop environment visuals extreamly slow. So I then chose the derived Xubuntu distribution, which uses the lightweightXFCEdesktop environment. It runs so much faster!
a. Install Virtualbox
Download Virtualbox for your operating system from here and install. In addition to the main package, you'd better also install the Oracle VM VirtualBox Extension Pack to support USB 2.0 & 3.0. Your USB SD card reader may not be recognized without the extension package.
The installation is trivial so I won't describe it here. Tutorial video in this section shows steps c - e only.
b. Download Xubuntu image file
Download the Xubuntu image file from the official website. Of course you want the newest version (18.04 Bionic Beaver at the time of writing) and 64-bit. The Desktop and LTS version is recommended for a user-friendly and stable system. Go to the download page and get the corresponding iso image file. At the time of writing, you should be able to get xubuntu-18.04.1-desktop-amd64.iso.
c. Create a virtual machine for Xubuntu
Let's create a new virtual machine.
- Open Virtualbox.
- Click "Machine" -> "New".
- Create a name for your virtual machine. If you use "Xubuntu" as the name, the software automatically chooses the correct Type (Linux) and Version (Ubuntu 64-bit) for you. Once done, click "Next".
- Allocate a suitable memory size according to your system availability. Make sure you leave enough memory for your host system. Once done, click "Next".
- Keep the default "Create a virtual hard disk now". Click "Create".
- Keep the default "VDI (Virtualbox Disk Image)". Click "Next".
- Keep the default "dynamically allocated". Click "Next".
- Set a suitable disk space. You don't have to worry about that it may occupy too much of your hard disk space. It only takes up what it needs and will dynamically expand over actual usage. I usually set a size large enough (like 500 GB) in case it is needed in future. Once done, click "Create".
- Ok, the virtual machine is now created and ready for use. In addition, I would suggest you to do more optimization in the settings.
Keep the "Xubuntu" virtual machine selected, and click "Machine" -> "Settings":- In "General" -> "Advanced", set "Shared Clipboard" and "Drag 'n Drop" both to "Bidirectional", so you can easily share clipboard and files between guest and host.
- In "System" -> "Motherboard", uncheck "Floppy". Who still uses floppy?
- In "System" -> "Processor", allocate multiple CPUs for guest system according to your system availability. I have a quadcore CPU with Hyper-Threading (meaning 8 virtual cores), so I allocate 4 virtual cores for guest system. Since you will be doing cross compilation in the guest system, this parameter may greatly affect your compilation speed.
- In "System" -> "Acceleration", make sure you have "VT-x/AMD-v" enabled if your CPU supports. This can make the guest system run much faster.
- In "Display" -> "Screen", allocate enough "Video Memory" for your guest system according to the availability of your video card, and check "Enable 3D Acceleration".
- [Required] In "Storage" -> "Storage Devices" -> "Controler: IDE", select "Empty", and load your Xubuntu image file (xubuntu-18.04.1-desktop-amd64.iso) by clicking the disk icon. This loads the Xubuntu CD image into the virtual CD drive.
- In "Audio", uncheck "Enable Audio" to disable audio, because you don't need it...
- [Important] In "USB", select the correct version (1.1, 2.0 or 3.0) matching your physical USB ports.
- Click "OK" to save the setting.
d. Install Xubuntu inside the virtual machine
Your physical computer is the HOST, and we are going to install a GUEST operating system inside the virtual machine.
- By double clicking the "Xubuntu" virtual machine, or by selecting "Xubuntu" virtual machine and click "Machine" -> "Start" -> "Normal Start", you start the installation process of Xubuntu guest.
- It boots into the Xubuntu live system on the CD. Click "Install Xubuntu" when available.
- Keep the default "Keyboard layout", and click "Continue"
- Keep the default "Download updates while installing Xubuntu". Mostly you don't need any additional third-party software. Click "Continue".
- Keep the default "Erase disk and install Xubuntu" and click "Install Now". A warning message pops up, confirming that the disk will be formatted. Don't panic! It will only erase the content of the virtual disk file, not your physical disk. Click "Continue".
- Set the time zone. Click "Continue".
- Provide your "Name", "Computer's name", "Username" and "Password". In future, you will login using your "User name" and "Password". "Computer's name" is the name of your virtual machine that others in the network can see. Click "Continue".
- The automatic installation process begins. Be patient.
- Once the installation is complete, Click the "Restart Now" button.
- It gives you a message "Please remove the installation medium, then reboot". So, let's check if the installation medium is still in the virtual CD drive. Click "Devices" -> "Optical Drives". None of the medium is selected in my case, since the system has already ejected the image. Now click "Machine" -> "Reset" to reboot.
- Guest system restarts, and boot into your newly installed Xubuntu.
- Click user name, enter password, and log in.
e. Essential settings of Xubuntu
Important programs
We will use mainly the "Terminal Emulator" in this guide. You may also want to use "File Manager" and "Mousepad" text editor. Click topleft icon to open the start menu. You can clean up your favorates, by removing unnecessary icons and placing the most important applications.Update system
Open Terminal Emulator, and run the following commands to update your systemsudo apt update sudo apt upgrade(Important) If a new kernel is installed, you need to reboot Ubuntu.
Install Guest Additions
If you open up a text editor inside and outside the virtual machine, and try copying & pasting between host and guest, you will find out that it doesn't work yet. To make clipboard sharing work, and more importantly to get USB devices work, you need to install "Guest Additions".First, install required packages for building kernel modules.
sudo apt install build-essential module-assistant dkmsSecond, prepare your system to build kernel module.
sudo m-a prepareThird, insert Guest Additions Image.
Click "Devices" on virtualbox toolbar, and click "Install Guest Additions Image". The "VBox_GAs" image will be mounted, and the "VBox_GAs" folder is automatically opened.Fourth, install.
Right click in the folder, and choose "Open Terminal Here". Then in the terminal, enter the following command to start the installation.sudo ./autorun.shWait till it's done. Press ENTER key to exit.
Finally, eject the image, and reboot
Right click the CD icon on your desktop, click "Eject Volume" to eject the installation image. Open start menu to "Restart".
Clipboard sharing and other features should be working after boot up.
Trivial Settings
- Terminal Emulator
Open the Terminal Emulator, click "Edit" -> "Preferences" -> "Appearence", and set a larger font size. - Mousepad
Open the Mousepad, click "View" and check the "Line Numbers", making it convinient to identify lines in the editor. In "View" -> "Select Font", you can set a larger font size.
- Terminal Emulator
2. Deploy Linux system to SD card under Xubuntu in a virtual machine
Now let's deploy Arch Linux (ARMv6 version) to your micro SD card, which will be used as system drive by Raspberry Pi Zero. It is based on the instruction from archlinuxarm.org. The steps are mostly the same as in my previous guide. Make sure you download the correct version of Arch Linux (according to the specific hardware architecture of your Raspberry Pi), and perform the additional Wi-Fi setting.
Here are the detailed steps for Raspberry Pi Zero W:
a. Insert micro SD card
While running Xubuntu in Virtualbox, plug the USB reader (containing micro SD card) into your computer.
b. Make SD card available to Xubuntu
On the status bar at the bottom of your Virtualbox, right click the USB icon, and select the "reader" to make it available to Xubuntu.
If you encounter an error, USB setting is possibly wrong. In this case, power off Xubuntu, click "Machine" -> "Settings" -> "USB", and select the USB version matching the USB port connecting to the reader. Then redo steps a - b, and Xubuntu system should be able to detect the SD card reader.
c. Deploy Arch Linux ARM system to SD card
Open up the Terminal application. Time for commands!
Create partitions on SD card
lsblkRun this command to list the drives on your computer (the guest system inside virtual machine, precisely), and find the disk name corresponding to your SD card. In my case, it's labeled as
sdb. Yours can be different. Double check the displayed capacity to make sure it matches your micro SD card.Let's use
fdiskto work on your SD card's partition. Make sure you use the specific disk name (instead ofsdb) corresponding to your SD card for the following command.sudo fdisk /dev/sdbAs instructed, at the fdisk prompt, do the following:
Type
o. This will clear out any partition on the drive.Type
pto list partitions. There should be no partition left.Type
n, thenpfor primary,1for the first partition on the drive, press ENTER to accept the default first sector, then type+100Mfor the last sector.Type
t, thencto set the first partition to type W95 FAT32 (LBA).Type
n, thenpfor primary,2for the second partition on the drive, and then press ENTER twice to accept the default first and last sector.Write the partition table and exit by typing
w.Format and mount the two partitions
Make sure you uselsblkto find the names for the newly created partitions on SD card. Replacesdb1andsdb2in the following commands with these actual names accordingly.lsblk sudo mkfs.vfat /dev/sdb1 mkdir boot sudo mount /dev/sdb1 boot sudo mkfs.ext4 /dev/sdb2 mkdir root sudo mount /dev/sdb2 rootDownload Arch Linux
wget http://os.archlinuxarm.org/os/ArchLinuxARM-rpi-latest.tar.gzGain root status
From now on, you need to run the commands as root, but not viasudo. However, before a root account can be used in Xubuntu, a root password needs to be set first via the following command:sudo passwd rootChoose your root password wisely. Note it's a new password different from your user password. (You will use this root password mostly for
sucommand. You still use your user password forsudo)Now you can run
suand enter root password to acquire root status.suExtract the filesystem
For this step, you needbsdtar, which is not installed in Xubuntu by default. Run the following command to install it.apt install libarchive-toolsTo extract the filesystem:
bsdtar -xpf ArchLinuxARM-rpi-latest.tar.gz -C rootAnd to make sure everything is written into SD card:
syncSetup Wi-Fi
Copy the following multiline commands, and run it in Terminal in one shot. It basically creates a wireless network interface that obtains IP automatically from router.cat << EOF >> root/etc/systemd/network/wlan0.network [Match] Name=wlan0 [Network] DHCP=yes EOFUse your own Wi-Fi access information in following commands, by replacing WIFI_ACCESS_POINT and WIFI_PASSWORD with the actual strings. This command stores your encrypted Wi-Fi password in a configuration file.
wpa_passphrase WIFI_ACCESS_POINT WIFI_PASSWORD > root/etc/wpa_supplicant/wpa_supplicant-wlan0.confCreate a system service so the wireless network interface is enabled on boot.
ln -s /usr/lib/systemd/system/[email protected] root/etc/systemd/system/multi-user.target.wants/[email protected]Double check the host name of Arch Linux ARM system
cat root/etc/hostnameThe default name
alarmpi(standing for Arch Linux ARM Pi) should show up. If not, please remember the actual name. This will be the host name of your Raspberry Pi Zero. (Theaarch64system in my previous guide usesalarmas the default host name)Get
bootpartition ready, unmount and exitmv root/boot/* boot umount boot root exitYes,
exitas soon as you don't need root privilege, to be safe :)
d. Disconnect SD card from Xubuntu
Right click the USB icon at the bottom of Virtualbox, and unselect the "reader" to make it completely unmounted from Xubuntu.
3. Connect to Raspberry Pi Zero W
a. Boot up
Insert micro SD card to your Raspberry Pi Zero W, and connect the power cord. Your Pi Zero should boot up within half a minute.
b. Find IP address of your Pi Zero
You need to find out the IP address of your Pi Zero for connection. There are various ways to do so. Try any one of the following methods:
(Option 1) Get the host name resolved by your router
If both of your host and guest systems' DNS were automatically obtained, you may be able to get your Pi's IP address by simply asking your router :)
From the Terminal in your Xubuntu, run the following command to search for the IP address of a computer namedalarmpi(or the actual hostname you recorded in section2.c.7):host alarmpiIf you are lucky enough, you may find the desired IP address in the form of x.x.x.x from the returned result. This is the simplest way that I know to find the assigned IP address of a Raspberry Pi! No more guessing, external display, or peeking in the wireless router page! The mighty power of a Linux command!
(Option 2) Peek in router's setting page
Read router's user manual, and you will know how to get into your router's setting page. For example, it can be like visitinghttp://192.168.1.1from a browser and logging in with a specific pair of username and password. The information is different for each brand. The page may list all the devices connected to the router. Find the device namedalarmpi(or the actual name if different) and record the IP address.(Option 3) The powerful
nmap
If you know that your host computer is assigned with an IP of192.168.1.x, then your Pi connected to the same router is probably assigned with an IP address in a similar form:192.168.1.y. In the Terminal of Xubuntu, simply usenmapcommand to scan a range of IPs.nmap 192.168.1.*(Option 4) 3rd party tools
You can try a 3rd party tool like Angry IP Scanner, though I still recommend using native commands whenever possible.(Option 5) Manual
Well, you can still guess the IP address out by manually try the addresses one by one:192.168.1.2,192.168.1.3, ...
c. Connect to your Pi from Xubuntu
From the Terminal in your Xubuntu, run following command using the actual IP_ADDRESS of your Raspberry Pi Zero, and enter password alarm.
ssh alarm@IP_ADDRESS
In the Arch Linux ARM system of your Raspberry Pi Zero, the default user is alarm with password alarm, which stands for Arch Linux ARM. The root user is root with password root.
You need to type yes and hit ENTER key upon initial connection.
Now you are remotely controlling your Raspberry Pi Zero from Xubuntu Terminal. The command line prompt has changed to [alarm@alarmpi ~]$, indicating user alarm at home path (~) on host alarmpi. Make sure you always keep an eye on this part to know whether you are running the command for Xubuntu, or for Raspberry Pi Zero.
4. Essential configuration of Arch Linux on Raspberry Pi Zero W
Now that you are logged in as user alarm (password alarm) via ssh from Xubuntu, several configurations are needed for your newly installed Arch Linux on Raspberry Pi Zero.
First you need to run su and enter password root to acquire root privilege. sudo is not available yet.
su
Second, Initialize the pacman keyring and populate the Arch Linux ARM package signing keys, per Arch Linux ARM instruction.
pacman-key --init
pacman-key --populate archlinuxarm
Third, install sudo
pacman -S sudo
Fourth, allow sudo
EDITOR=nano visudo
You are now reading the text via nano editor. Find the line # %wheel ALL=(ALL) ALL. Delete the # at the line head. Ctrl+O to save the file, press ENTER key to confirm, and Ctrl+X to exit the editor.
Now you can quit the risky root account, and go back to the normal account alarm.
exit
From now on, you can run sudo as user alarm. So, let's update the system.
sudo pacman -Syu
Yes, this is the first time you run sudo in this system. You get a friendly warning :)
Reboot.
sudo reboot now
In the next section, we will go back to run commands in Xubuntu locally. To exit from remote Raspberry Pi Zero, run:
exit
The command line prompt should have changed back to YOUR_USER_NAME@YOUR_COMPUTER_NAME:~$.
5. Compile Substratum Node under Xubuntu
Before performing the anticipated cross compilations, let's first test the regular native compilation of Substratum Node in a 64-bit Xubuntu system. You can of course use any 64-bit Linux operating system, as long as you've installed all the corresponding packages.
Please run following commands step by step in the Terminal of Xubuntu. Note: The commands are for Xubuntu itself, not the remotely controlled Raspberry Pi Zero! If you happen to be still in a ssh session, use command exit to disconnect from the remote Raspberry Pi Zero.
a. Development requirements
First, make sure the system is up-to-date. You may want to reboot afterward if there is a kernel update.
sudo apt update
sudo apt upgrade
Second, install essential development packages for Substratum Node compilation.
sudo apt install build-essential git libssl-dev pkg-config cmake curl
Third, install Rust via the following command:
curl https://sh.rustup.rs -sSf | sh
when asked, type 1 and hit ENTER to choose the "Proceed with installation (default)" option.
Once done, log out and log back in.
Rust is now ready to use.
b. Get source code of Substratum Node
Download Substratum Node source code from official repository on GitHub by following command:
git clone https://github.com/SubstratumNetwork/SubstratumNode.git
And get into the directory.
cd SubstratumNode
c. Modify source code
The compilation will be done sequentially for multiple components - TEST_UTILS, SUB_LIB, ENTRY_DNS, NEIGHBORHOOD, HOPPER, PROXY SERVER, PROXY CLIENT, NODE, DNS UTILITY and NODE UI. In this guide, we will setup DNS manually, and run Node in a headless mode, so we don't really need DNS UTILITY and NODE UI.
Modify file ci/all.sh to skip the compilation of the two components.
Use either nano ci/all.sh in command line, or a Text Editor to comment out the lines corresponding to DNS UTILITY & NODE UI by appending # at the head of each line.
The modified lines will appear as follows:
...
...
...
#echo "***                                           DNS UTILITY HEAD                                        ***"
#cd "$CI_DIR/../dns_utility"
#ci/all.sh "$PARENT_DIR"
#echo "***                                           DNS UTILITY TAIL                                        ***"
#echo "*********************************************************************************************************"
#echo "*********************************************************************************************************"
#echo "***                                             NODE UI HEAD                                          ***"
#cd "$CI_DIR/../node_ui"
#ci/all.sh
#echo "***                                             NODE UI TAIL                                          ***"
#echo "*********************************************************************************************************"
#echo "*********************************************************************************************************"
Save the file.
d. Compilation
Now, go back to Terminal, under path ~/SubstratumNode, start the compilation.
ci/all.sh
(You may be asked to enter your password for the integration test in the end.)
Your compiled SubstratumNode binary will appear at ~/SubstratumNode/node/target/release/SubstratumNode
OK, it worked, proving that our compilation setup is functional. I won't perform any test run here. Go straight ahead to the exciting cross compilation in the next section!
6. Cross compile Substratum Node under Xubuntu
From 64-bit Xubuntu system on x64 architecture hardware, you can compile a Rust project to not only the same architecture target (x64), but also others, including ARM systems. You can read more about cross compilation of Rust projects at rust-cross.
a. List supported targets
By running the following command in Terminal, you can get a list of supported compilation targets:
rustc --print target-list | pr -tw100 --columns 3
The ones that may interest you include arm-unknown-linux-gnueabihf, armv7-unknown-linux-gnueabihf and aarch64-unknown-linux-gnu. hf stands for hard-float, which makes use of hardware for faster computation.
Arch Linux ARM website lists supported platforms, where you can find architectures of different flavors of Raspberry Pi.
Pi and Pi Zero are
ARMv6, corresponding to thearm-unknown-linux-gnueabihftarget.Pi 2 is
ARMv7, requiringarmv7-unknown-linux-gnueabihf.Pi 3 is
ARMv8, supporting both 32 and 64-bit. Based on the installed operating system, it needs either the 32-bitARMv7(armv7-unknown-linux-gnueabihf) or the 64-bitAARCH64(aarch64-unknown-linux-gnu).
Great! We now know that we need to compile Substratum Node to the arm-unknown-linux-gnueabihf target for Raspberry Pi Zero!
b. Skip tests
Substratum Node source code contains lots of unit and integration tests, which doesn't work natively on your 64-bit Xubuntu, due to different hardware architectures. We'd better skip those tests during cross compilation.
In Terminal, under ~\SubstratumNode path, run following command to list all the files containing test commands.
grep -r "cargo test --release"
You will see those commands come in different flavors, in the result output as follows:
-- --nocapture _integration
-- --nocapture --skip _integration
-- --nocapture
-- --nocapture _integration
-- --nocapture --skip _integration
...
You need to replace each line with "cargo build --release".
You can either do it manually, file by file, or simply use the following one-line command:
grep -rl "cargo test --release" ./ | xargs sed -i "s/cargo test --release.*/cargo build --release/g"
You can double check the result:
grep -r "cargo test --release"
grep -r "cargo build --release"
Again, the mighty power of a Linux command!
c. Cross compile Node for Raspberry Pi Zero
We have learned that Raspberry Pi Zero has ARMv6 architecture. You may check it by yourself by login to your remote Raspberry Pi Zero, and run uname -a. It will show you armv6l.
In Xubuntu Terminal, do the following preparation:
Install GNU C cross-compiler for the armhf architecture
sudo apt install gcc-arm-linux-gnueabihfInstall Rust target
rustup target add arm-unknown-linux-gnueabihfConfigure compilation target
Edit file~/.cargo/configto tell Rust compilation what target and linker to use.nano ~/.cargo/configAdd the following text:
[target.arm-unknown-linux-gnueabihf] linker = "arm-linux-gnueabihf-gcc" [build] target = "arm-unknown-linux-gnueabihf"Ctrl+Oto save the file, pressENTERkey to confirm, andCtrl+Xto exit the editor.
Again, under ~/SubstratumNode path, start the compilation:
ci/all.sh
Your compiled SubstratumNode binary for ARMv6 should appear at path ~/SubstratumNode/node/target/arm-unknown-linux-gnueabihf/release/SubstratumNode
You may use file command to confirm it's for 32-bit ARM.
file ~/SubstratumNode/node/target/arm-unknown-linux-gnueabihf/release/SubstratumNode
[Important] Please see part e for troubleshooting if you encounter any issue.
d. (Optional) Cross compile for other systems
You can keep the cross compilation carnival going on.
For
ARMv7(Raspberry Pi 2, or Raspberry Pi 3 bearing a 32-bit operating system, or 32-bit Android Tablet/Phone)
You use the same GNU C cross-compiler for the armhf architecture, but need to add a new Rust target:rustup target add armv7-unknown-linux-gnueabihfEdit the
~/cargo/configfile to the following:[target.armv7-unknown-linux-gnueabihf] linker = "arm-linux-gnueabihf-gcc" [build] target = "armv7-unknown-linux-gnueabihf"And run the compilation.
ci/all.shFor
AARCH64(Raspberry Pi 3 bearing a 64-bit operating system, or new 64-bit Android Tablet/Phone)
Install GNU C cross-compiler for the arm64 architecturesudo apt install gcc-aarch64-linux-gnuInstall Rust target
rustup target add aarch64-unknown-linux-gnuEdit the
~/cargo/configfile to the following:[target.aarch64-unknown-linux-gnu] linker = "aarch64-linux-gnu-gcc" [build] target = "aarch64-unknown-linux-gnu"And run the compilation.
ci/all.sh
From one single system (64-bit Xubuntu), you've compiled Substratum Node to multiple ARM-based systems. That's what we call AWESOME.
e. [Important] Troubleshooting
A. The compiled Substratum Node binary doesn't run on Raspberry Pi
The cross compilation procedure above uses the toolchain provided by Ubuntu/Xubuntu, which is supposed to work! However, according to my experience, it may fail. The above compilation succeeded weeks ago when I tried it, but suddently stopped working. The compiled Node claimed "segmentation failure" when running on Raspberry Pi Zero. It's possible that some recent update breaking the toolchain. So you may succeed or fail, purely depend on what version of packages you get from Ubuntu's repository at the time.In case the compiled binary doesn't work, please use the following procedure:
First, remove the SubstratumNode directory.
sudo rm -r ~/SubstratumNodeSecond, repeat what you've done before to get Substratum Node source code ready:
Download source code:git clone https://github.com/SubstratumNetwork/SubstratumNode.gitEnter directory:
cd SubstratumNodeModify
ci/all.sh, and comment out the lines corresponding to DNS UTILITY & NODE UI by appending#at the head of each line.nano ci/all.shSkip tests:
grep -rl "cargo test --release" ./ | xargs sed -i "s/cargo test --release.*/cargo build --release/g"Third, download Raspberry Pi toolchain to $HOME
cd ~
git clone https://github.com/raspberrypi/tools
Fourth, make Raspberry Pi toolchain available for the following cross compilation instance
export PATH="$(pwd)/tools/arm-bcm2708/gcc-linaro-arm-linux-gnueabihf-raspbian-x64/bin:${PATH}"Fifth, make sure you have
~/.cargo/configmodified, and Rust arm target installed, as previously describedSixth, compile
cd ~/SubstratumNode
ci/all.sh
B. Some compilation error related to
sccache
Modifyci/all.sh, and comment out the lines corresponding to sccache by appending#at the head of each line.nano ci/all.shThe result should look like the following:
# Remove these two lines to slow down the build
#cargo install sccache || echo "Skipping sccache installation"  # Should do significant work only once
#export RUSTC_WRAPPER=sccache
7. Run Substratum Node on Raspberry Pi Zero W
a. Transfer Substratum Node binary from Xubuntu to Raspberry Pi Zero W
Use scp command to send cross compiled Node binary to user alarm's $HOME path on Raspberry Pi Zero W. Run the following command in Xubuntu Terminal by replacing x.x.x.x with the actual IP address of Pi Zero W.
scp ~/SubstratumNode/node/target/arm-unknown-linux-gnueabihf/release/SubstratumNode [email protected]:~
b. Log into Raspberry Pi Zero
Use the actual IP address of Pi Zero W.
ssh [email protected]
You may check if the Node file exists:
ls
c. Install a browser for testing
We will use lynxbrowser that runs in terminal for testing, as we did in the previous guide.
sudo pacman -S lynx
Try browsing the famous httpbin.org
lynx https://httpbin.org
It works!
Press q to exit, and y to confirm.
d. Close port 53
Substratum Node uses port 53, so we need to make sure it's not occupied by others.
Use ss to list all opened ports. (FYI, the netstat command has been deprecated in favor of the faster, more human-readable ss command.)
ss -lntup
You see the port 53 in use? Don't panic! Not an issue in Arch Linux. Run the following command to stop the resolving service.
sudo systemctl stop systemd-resolved
The 53 port is gone. See it for yourself.
ss -lntup
e. Set DNS
"Serving" and "consuming" features could be set to on/off indivudually prior to Node version 0.3.4. Node 0.3.4 simplifies the UI into three modes: "off", "serving", and "consuming". When "serving" or "consuming", Node routes network requests from/to neighbors as designed. Note that neighborhood hasn't been fully implemented yet as of version 0.3.4. When "consuming", Node in addition routes local requests through itself so that you can enjoy "VPN" feature. We will use "consuming" mode to test if Node can route local network traffic through itself. Again, "VPN" feature isn't implemented yet. All the tests we are going to perform have nothing to do with any remote Node.
"DNS Utility" component is officially designed to switch the "consuming" mode on/off. On Linux, we have a simpler straightforward way to do so, by directly changing the DNS address to localhost.
In Arch Linux, you can simply edit resolv.conf
sudo nano /etc/resolv.conf
Change the IP address to 127.0.0.1
Basically, the only functional line should be nameserver 127.0.0.1
Ctrl+O save, ENTER confirm, and Ctrl+X exit.
f. Run and Test Node
Open up two Terminal windows on Xubuntu, both remotely logged into Raspberry Pi Zero. We use one to run Substratum Node (Terminal 1), and the other one for testing (Terminal 2).
With the Node off, run
lynxandssin Terminal 2.ss -lntupTake a look at the opened ports
lynx https://httpbin.orglynx cannot get to the webpage without Node
Turn on Node, and do tests
Run Node on Terminal 1 by the following command. You can use any DNS server address for testing.sudo ./SubstratumNode --dns_servers 1.1.1.1Awesome, node is up and running. Every time you run, Node generates a new public address. That's for clandestine routing in future.
Now in Terminal 2, run
lynxandssagain for testing.ss -lntupYes, Node opened up several ports.
lynx https://httpbin.orgYes, lynx can view webpage now. Request is routed through Node.
Congratulations, you have a Substratum Node running smoothly on your $5 Raspberry Pi Zero W!
Turn off Node
You can kill Node byCtrl+Cin Terminal 1 where Node is running in.To set DNS back to normal, you can simply turn the resolving service back on:
sudo systemctl start systemd-resolvedYou can see default DNS is back in
/etc/resolv.confcat /etc/resolv.conf
8. Install a mini OLED screen on Raspberry Pi Zero W
So far, we've been controlling Node on Raspberry Pi Zero in a headless way, without any locally installed screen. It would be cool to have a tiny screen attached to display Node status. In the following sections, I will show you how to install an Adafruit® 128x64 OLED Bonnet for Raspberry Pi to achieve this. What's more exciting? You will be able to use physical buttons to control Node!
In this section, we will get the OLED screen installed on and recognized by Raspberry Pi Zero. You may refer to the official guide for this screen, as well as the I/O setup for Pi on Arch Linux ARM (you need to click "Wiki" tab on the page).
Here are the specific steps for Arch Linux ARM on Raspberry Pi Zero.
a. Setup I2C
I2C (Inter-Integrated-Circuit) is a multi-device bus used to connect low-speed peripherals to computers and embedded systems. This interface is available on Raspberry Pi's GPIO header.
To enable the I2C interface, do the following:
Install i2c-tools and lm_sensors packages.
sudo pacman -S i2c-tools lm_sensors
Configure the bootloader to enable the i2c hardware, by editing file /boot/config.txt:
sudo nano /boot/config.txt
Append the following line to the end of the file:
dtparam=i2c_arm=on
Ctrl+O save, ENTER confirm, and Ctrl+X exit.
Configure the i2c-dev and i2c-bcm2708 to be loaded at boot in /etc/modules-load.d/raspberrypi.conf:
sudo nano /etc/modules-load.d/raspberrypi.conf
Append the following lines to the end of the file:
i2c-dev
i2c-bcm2708
Ctrl+O save, ENTER confirm, and Ctrl+X exit.
b. Physically install the screen to Pi
Shut down the Raspberry Pi Zero
sudo shutdown -h now
Disconnect the power cord.
Physically connect the OLED screen to Raspberry Pi Zero W.
c. Continue I2C setup
Reconnect the power cord to power on Pi Zero.
Log back in to Pi Zero via Xubuntu Terminal:
ssh [email protected]
Issue the following command to get the hardware address:
sudo i2cdetect -y 1
You should see 3c. That's the default hardware address of this OLED screen. In case it's not 3c, use the actual address found.
To instantiate the device, use hardware address found in the previous step with '0x' as prefix (0x3c for this screen) and choose a device name (I'm calling it OLED_128x64 here). Note you need root status here for the operation.
su
echo OLED_128x64 0x3c >/sys/class/i2c-adapter/i2c-1/new_device
exit
Check dmesg for a new entry:
dmesg
It shows a message i2c i2c-1: new_device: Instantiated device OLED_128x64 at 0x3c. Success!
d. Setup GPIO
To use Python programming language to control the GPIO on Raspberry Pi, you need to install Python and the RPi.GPIO library. Packages installed here include the programming language python, Python's library manager python-pip, base-devel for compilation, and git for downloading git repositories.
sudo pacman -S base-devel git python python-pip
When asked Enter a selection (default=all):, simply press ENTER key to select the default.
The RPi.GPIO library is installed via pip instead of pacman.
sudo pip install rpi.gpio
e. Install libraries for the OLED screen
You also need to install a specific library for the SSD1306 chip controlling the OLED display.
git clone https://github.com/adafruit/Adafruit_Python_SSD1306.git
cd Adafruit_Python_SSD1306
sudo python setup.py install
(BTW, now you have seen three different methods of installing Python library packages: pacman, pip and setup.py )
f. Light the screen up
You can now run several demos for this screen, existing at ~/Adafruit_Python_SSD1306/examples:
cd ~/Adafruit_Python_SSD1306/examples
ls
These demos require an additional Python image library python-pillow
sudo pacman -S python-pillow
Pick any demo, animate.py for example, and run in Python under path ~/Adafruit_Python_SSD1306/examples
sudo python ./animate.py
Awesome animation, right?
To stop, use key combination Ctrl+C. Then you can try another demo.
These official demos from Adafruit are not optimized for our specific setup, so you may see some bugs. If you know how to program in Python, you can easily modify them. You can learn more about Python at official tutorial, learnpython and other resources. You may also read useful comments in demo files to make use of your OLED screen.
9. Create a user interface on OLED screen for Node
a. Write a Python script
To save time, I've created a script for you, otherwise you will have to spend time in learning Python, libraries and more to be able to do this.
Download the script and related files from my GitHub repository via git, and copy the needed files in home path.
cd ~
git clone https://github.com/humicro/sub_node_pi_oled_ui.git
cp sub_node_pi_oled_ui/node.py ./
cp sub_node_pi_oled_ui/sub_logo_128_64.ppm ./
rm -r sub_node_pi_oled_ui
b. Download a font
I use a pixel font called PixelMix in my script, 8 px in size. Due to licence matter, you have to download it from https://www.dafont.com/pixelmix.font by yourself for personal use. You can download via a browser in Xubuntu. Once downloaded, extract out the font file pixelmix.ttf from the downloaded pixelmix.zip.
Still in Xubuntu, place the file in home folder, and use scp to send the font file to Raspberry Pi Zero.
scp ~/pixelmix.ttf [email protected]:~
You can actually find lots of pixel fonts at dafont. You can download and display these fonts on OLED screen with simple modification of the script.
(If you really love those fonts or would like to use for commercial, please donate or purchase to support the font authors.)
c. Install freetype2
To be able to handle the font, you need to install freetype2 in Arch Linux ARM system
sudo pacman -S freetype2
d. Run
Now you can simply run the script to start the OLED interface of Substratum Node. You need to run it with sudo.
sudo python node.py
10. Auto-start Substratum Node on boot
a. Requirements for node.py:
Make sure each file path inside
node.pyis absolute path (instead of relative path), because it will be run by root instead of the regular useralarm.Set
node.pyas executablechmod +x node.py
b. Setup a system service
Create a node.service inside /etc/systemd/system/
sudo nano /etc/systemd/system/node.service
Add the following text
[Unit]
Description=Substratum Node Service

[Service]
ExecStart=/home/alarm/node.py
Type=simple

[Install]
WantedBy=multi-user.target
Ctrl+O save, ENTER confirm, and Ctrl+X exit.
Enable this service so it will be started on boot
sudo systemctl enable node.service
c. Reboot
sudo reboot now
If you have done it correctly and you are lucky, you should be able to see Substratum Logo and then Node status on OLED screen upon boot.
Use the three buttons to switch between "off", "serving" and "consuming" modes.
Now the Pi Zero Node can live by itself. No need for remote control from Xubuntu.
Hooray! Enjoy your Pi Zero Node, and a breakfast at Milliways!
Curriculum
- Hitchhiker's Guide to Substratum Node on Raspberry Pi
- Run Substratum Node on a $5 Raspberry Pi Zero and Enjoy Breakfast at Milliways
- Substratum Node, the Phone and Everything (Coming soon)
Proof of Work Done
https://github.com/humicro/sub_node_pi_oled_ui.git
Credits
Substratum Network
Raspberry Pi
Arch Linux ARM
Xubuntu
Oracle VM VirtualBox
Adafruit Industries
Python
Bastiaan's original video guide for Substratum
Rust-Cross
PixelMix Font by Andrew Tyler
The Restaurant at the End of the Universe by Douglas Adams
Dislaimer
- This is a fan-made project for educational purpose. The author is not affliated to Substratum, Adafruit, or any mentioned companies.
- The guide intentionally avoids providing any unofficially pre-compiled binaries. You will have to double check the source code, and compile them by yourself. It's a fun and safe process. I suggest that you never ever download or run any unofficial Substratum Node binary provided by 3rd party!
- At the time of writing, Node doesn't have the clandestine routing feature implemented yet, and you cannot make any earnings by running a Node. This guide doesn't enforce any specific treatment of security. Please practice on a safe network.
License

This work is licensed under a Creative Commons Attribution-ShareAlike 4.0 International License.
Hi @microoo, thank you for introducing us to Substratum in your previous tutorial. After investigating what Substratum is, I have an impression Substratum is more like next-gen Tor powered by blockchain technology. It also gives me an idea for creating IoT gateway that shipped with Substratum and decentralize CI (not sure if exist), though not sure if it's a good idea 😆
Anyway, I have some technical question and suggestion about this tutorials:
Question:
The suggestion is more directed toward Substratum Developer rather than hobbyist like us. Anyway here is what I think:
Hey @drsensor
Here's a tip for your valuable feedback! @Utopian-io loves and incentivises informative comments.
Contributing on Utopian
Learn how to contribute on our website.
Want to chat? Join us on Discord https://discord.gg/h52nFrV.
Vote for Utopian Witness!
Thank you, @drsensor! I'm impressed by what you have done!
Is it possible to test it on QEMU? If possible then maybe it can help cross-test Substratum on another platform that supported by QEMU.
I think it's a great idea and definitely possible. I thought about setting up a QEMU to simulate ARM system so the compiled ARM binaries can be tested. In current tutorial, the test is done only for x64 system.
Is there any possibility to setup Substratum on OpenWrt? If yes then maybe someone can create a WiFi router that connects directly to Substratum Network
It must be quite challenging to natively run on OpenWrt. I have to learn more about the hardware and system to see if it's feasible. My intuition is the system resource is highly limited on a router. Again, I'm not familiar of this category. There might be powerful router available for development.
Seems the installation process of Substratum Node still take a lot of process and time. Maybe creating a Docker image that has many tools necessary for building Substratum Node would help in the long run, including tools to do cross-compilation. Something like this maybe.
It's actually quite simple and straight forward: cross-compile on a Linux system, and run it on Pi 3 or Zero. I intentionally expanded the multi-step tutorial so even those who have never used Linux or have no Linux system at hand can catch it up, by installing a complete Linux virtual machine on their own computer, setting up a compilation tool-chain, and manually configure and test most of the procedures. I believe people can learn a lot during the process.
I intentionally avoid providing any binaries, because I believe people should never download any unofficial or unverified binary. As far as I know, SUB team really focuses on making easy-to-use products, such as running Node by one click, which is key for mass adoption. I'm sure the actual installation process will be much easier when Pi is officially supported. It is actually doable now, by creating an automatic installation script, but it may ruin the fun of the whole process :)
Docker is a great idea. Currently I'm not very familiar with it. I suppose there are available images for the tool-chain.
I am eager to try this tutorial! Thanks!
Thank you for your contribution.
Thank you for your good work and effort in completing the tutorial.
Your contribution has been evaluated according to Utopian policies and guidelines, as well as a predefined set of questions pertaining to the category.
To view those questions and the relevant answers related to your post, click here.
Need help? Write a ticket on https://support.utopian.io/.
Chat with us on Discord.
[utopian-moderator]
Hey @microoo
Thanks for contributing on Utopian.
Congratulations! Your contribution was Staff Picked to receive a maximum vote for the tutorials category on Utopian for being of significant value to the project and the open source community.
We’re already looking forward to your next contribution!
Want to chat? Join us on Discord https://discord.gg/h52nFrV.
Vote for Utopian Witness!
Good information bro.
Congratulations @microoo! You have completed the following achievement on Steemit and have been rewarded with new badge(s) :
Click on the badge to view your Board of Honor.
If you no longer want to receive notifications, reply to this comment with the word
STOPCongratulations @microoo! You received a personal award!
You can view your badges on your Steem Board and compare to others on the Steem Ranking