How to Cartoonize Photos in Photoshop
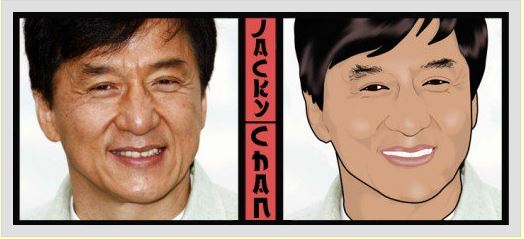
Cartoons are famous for their vibrant colors, lovable personalities, and humorous acts. Who in the world don’t know Bugs Bunny or Mickey Mouse? Their fans worldwide are not only limited to kids since most adults find them very entertaining as well. Years ago, cartooning was just for experts and artists who dedicated most of their time harnessing the art. Luckily for us today, numerous design tools are at our disposal which provides us a faster and easier way to create works of art including cartoons. Have you ever wondered what you look like as a cartoon? Do you want to surprise your kid with a cartoonized version of his photo? Unlike what most of us assume, cartooning a photo does not require excellent design skills. All you need to have is a reliable design program such as Photoshop, some time, and bottomless inspiration. With these three elements, anyone can cartoonize Photos in Photoshop. If you are clueless as to how to start or what tools to use for this endeavor, this article can help you. Just keep in mind that I am far from being called a Photoshop expert. I simply manipulate photos and create digital art as a hobby and to have a break from my stressful job so please bear with me.
Requirements:
Photoshop CS4 - You can also use the newest version or even older ones since this guide won’t require external plugins or graphic tools)
A Model – I picked Jackie Chan for the sole reason that I love him! I’m probably his biggest fan here in the Philippines. I’ve watched not only his new movies but the classic ones as well. My favorite is the Drunken Master series. He is so funny in the film that I still laugh even after watching it for the nth time. You can pick anyone as a model. Just make sure that the photo you’ll choose has excellent quality. Your model’s face should be clear including the shadows and lightings so you won’t find it hard to work on its details.
At most 2 Hours – I managed to finish this one in more or less two hours. I’m not an expert so it’s likely that we’ll have share the same experience. Having a faster PC and excellent hand and eye coordination will hasten this task. Moreover, those who have prior experience in manipulating photos through Photoshop can do better compared to inexperienced individuals.
*For your convenience, important steps and tools are Bolded in the guide while the layer names are all Italic.
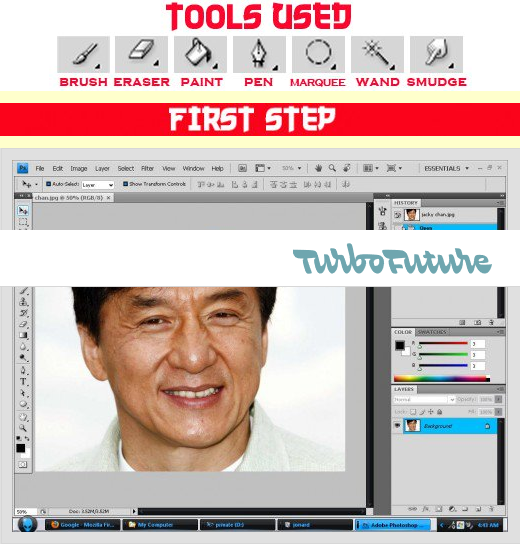
First, is to create a new Photoshop document. You can do so by clicking File->New...A window will appear where you can edit the dimensions and other important characteristics of your work. At least 500px of width and height is good enough to make sure your work is of high quality. I know what’s on your mind. I want a super high quality image so I’ll have its width and height in thousands. You can do that but you’ll have a problem editing it with a slow computer. The images’ size will also increase so uploading will cost you more time.
After deciding about your images’ dimensions, press OK. You’ll be given a fresh canvas with a white background. Bring forth your model’s image by clicking File->Place…Locate the photo and press Place. If the photo is too small, simply use the Select Tool and drag its end points while holding the Shift button so you can maintain its proportions. You can also open the photo directly with Photoshop like what I did but make sure it already has good dimensions.
Setting up your model’s photo is probably the easiest part. Let’s get to the most time-consuming one which is tracing the outlines. First, you’ll need to create a new layer and name it outline. To rename a layer simply double-click its current name and it’ll turn into an editable field. We’ll be using the pen tool for tracing. Those who have a stylus can also use the Brush Tool. Otherwise, the utilizing the pen tool is the most efficient method to trace a photo. What to trace depends on your style. In this example, I traced Jackie Chan’s face, ears, eyes, and nose. Constant practice is required for you to be an expert in using the Pen tool. You can first trace simple shapes or graphics to familiarize the process. Once you’re done tracing, right click, while the pen tool is still active and the outline layer selected, and then press Stroke Path… A small window will appear with a dropdown field. Choose Brush if it’s not the preset value and press OK. You’ll observe that the path you’ve created with the pen tool a while ago will be traced. Make sure you edit your Brush Properties like its color and size before going through the process so you’ll end up having the output you desired. In this example, my Brush Color is Black with a size of 7 px.
Let’s do the mouth this time. Create a new layer and name it lips. Make sure it is above the skin color layer. Trace Jackie Chan’s lips with the Pen Tool and fill it up with color using the Paint Bucket Tool just like what we a while ago. Create a new layer below the lips and name it teeth. Color the model’s teeth by simply using the brush tool. Given the teeth layer is below the lips, you don’t need to worry about overlapping so just stroke until all the teeth portions are filled with white. Use the brush tool to trace each tooth. Use a light gray color and a very small brush size. In this example it’s just 1 px. Its main purpose is just separate one teeth from the other it may not be clearly visible but it does the job perfectly.
Next up are the eyes. It’s not so complicated in this example since Jackie Chan’s eyes are barely seen. Create a new layer and name it eyes. Use the Elliptical Marquee Tool to trace Jackie Chan’s pupil. Once you got the right size, fill the selection with color by using the Paint Bucket Tool. Arrange your layers so that the eyes layeris below skin color. Use the Brush Tool to color the eye’s white portion. Don’t worry about overlapping since it will be hidden beneath the skin color layer.
The hair will make Jackie Chan’s cartoonized version look a lot better. Create a new layer and name it hair. Make sure it’s the topmost layer. Just trace your model’s hair using the Pen tool. Fill it with base color, preferably black, through the Paint Bucket Tool. Highlights are done by stroking certain portions of the hair with Brush Tool and using the Smudge Tool to achieve the desired effect. It may sound complicated but trust me, it’s very easy. Create a new layer for the eyebrows and simply use the Brush Tool for tracing. Make sure the eyebrow layer is above the skin layer so it will be visible.
Shadowing and lighting comes last. Create a new layer can call it shadow. It should be above the skin color layer and below the eyes. Look at your model and find portions where his skin is darker. To do so, simply hide the skin color layer by pressing the eye icon in the layer panel which corresponds to it. Simply use the Brush Tool for this matter. Once you colored all the shadowed part, use the Soft Round Eraser Tool to achieve a fading effect. You can also adjust the shadow layer’s opacity if you think what you’ve done is too dark. The same process goes with lighting. The only difference is that you’ll use white instead of a dark color.
There you have it! Jackie Chan’s cartoon version! This is not the only way to cartoonize photos in Photoshop. However, it’s the easiest and the most convenient for me since you don’t need to install foreign plugins and other stuffs in Photoshop just to achieve such kind of effect. It’s true that you’ll end up investing a lot of time and effort but all of these won’t matter if your work of art would mean the happiness of someone close to your heart. Good luck and have fun cartooning photos in Photoshop!


Congratulations @louismata! You have completed some achievement on Steemit and have been rewarded with new badge(s) :
Click on any badge to view your own Board of Honor on SteemitBoard.
To support your work, I also upvoted your post!
For more information about SteemitBoard, click here
If you no longer want to receive notifications, reply to this comment with the word
STOP