[$5!] Concealable homemade Wi-Fi jammer/deauthenticator - How safe are we really?
Hello Steemians!
I have something different today, something I'm sure a lot of individuals would find rather interesting to understand and specifically because of the little amount of money that needs to be invested into the hardware needed (even those without malicious intent!). Why? Because we have to constantly ask ourselves the worrying question: "How safe are we really?" on a day to day basis; in a world filled with an ever-growing database of vulnerabilities and exploits, we have to understand and educate ourselves on how these 'attacks' actually work and why individuals may want to conduct these attacks or how will we ever learn how to defend ourselves against them? I hope you enjoy this little piece I've put together, remember to post your opinions below as I'm very interested in seeing what you all think, also if you have a question, please do post it, I'll be certain to respond!
Disclaimer: This article is PURELY for educational purposes, you should always seek permission and review your local laws before attempting anything presented in this article; if you wish to test this upon another network, you should always seek WRITTEN permission giving you absolute authorisation to do so (whether this is by a company/person). I do not recommend anyone recreates the steps I have displayed here straight away, rather they should aim to educate themselves on how to mitigate such an attack before attempting to conduct it with authorisation and also how the attack itself works.
Getting started
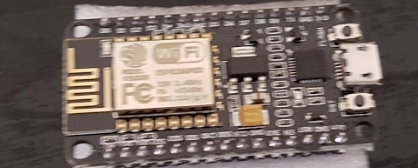
I've been browsing around looking at various exploitation and forensic tools and came across this little beauty also known as the ESP8266. The ESP8266 is rapidly becoming more aware by more members of the public as days go on, it's essentially a very cheap Wifi chip with transmission control protocol/IP (TCP/IP) and microcontroller unit (MCU) capability which will grant the ability to allow any microcontroller access to your Wifi network; it works by exploiting the 802.11 'deauth frames' (https://mrncciew.com/2014/10/11/802-11-mgmt-deauth-disassociation-frames/) to then disconnect a client from a network. It's increasingly growing popular for its very cheap price in comparison to other chips, which is a very low cost of: $5/£3-4 along with its malicious capabilities. (https://en.wikipedia.org/wiki/ESP8266) - I would also like to state with growing popularity, the prices of these chips may increase and potential bans may be put on purchasing such hardware in the future if it becomes a global issue also.
I'd like to stress however, the ESP8266 is not only used for Wifi deauthentication and penetration testing, it can be used for many other things and you should definitely consider these examples before purchasing this hardware as it does not have to be used for malicious intent.
- Wifi range extender
- Burglar alarm
- Creating a web-server
- Incubator controller
- Power meter
- Many more examples can be found with a quick Google.
The possibilities are quite literally endless and it's a very interesting piece of technology. Below I'm going to show you how easy it is to set up a wifi deauthenticator, otherwise more popularly known as the 'cheap wifi jammer' below. Remember, this is a discussion rather more than a tutorial, however if you get more of an idea how easy this is to actually set up, then it'll help towards the overall discussion along with understanding how to mitigate such an attack, should it arise against you in the future.
Requirements
- An ESP8266 - Most information you find regarding the ESP8266 you'll find online recommend getting the NodeMCU as do I, I've purchased two, I've owned mine for a long period of time but I have not given them much attention, but both are very solid and I'd recommend going for it as you're still only looking at an extra $1-2/£1-2 for buying more quality. I won't post any promotional links here but you can check them out on Ebay, Amazon and Google.
- A computer - in this demonstration I will only cater for Windows, however, you can find tutorials online for Linux and Macintosh users also.
- Micro USB cable (preferably two) - for flashing the ESP8266 and keeping it powered to your smartphone/tablet/computer afterwards.
- Anti-static wristband - Completely optional, as you'll be handling a very, small and fragile chip however it's better to be safe than sorry, but in this case, we're only handling roughly $5s worth of hardware, but it's never bad to have good practice.
Installation (a - preparation)
So to start off with, it's also best to check for the most updated binary file from the author's Github to avoid any possible issues
You'll then need the NodeMCU flasher which can be acquired here:
I'll also leave below a link to a pack of all the compiled tools below I've compiled. I cannot guarantee the complete safety of the supplied files, but they are of course, uploaded and verified by the original creator on Github.
- Software pack I have compiled: [Download removed for now as links have been supplied to the original author]
- Virus scan: https://www.virustotal.com/en/file/2a4db6ffebba951104f6ada0f22d4205ef06178aa2b40c22d822e250667cc8db/analysis/1499708503/
MD5: 30fa8ff6c7e5126a25f65b285f67a196 *Esp8266 Flash Files.rar
Installation (b - nitty gritty)
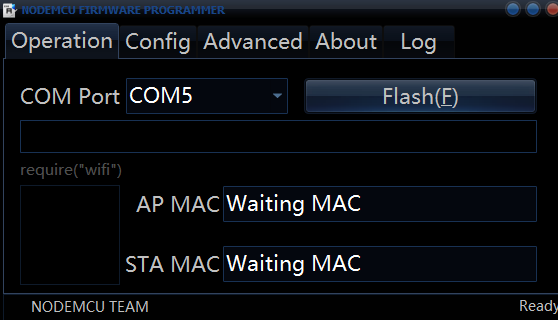
- Connect the Micro-USB cable to both your computer and your ESP8266 device. Once you've done that, open the flasher executable as an administrator (right click>run as administrator) and the first thing you'll need to do is select your COM port. If you're on Windows 10, chances are you may only have one COM port, however if you have 2 or more, it's usually the second COM port you'll want to use, if you only have one, it should already be automatically selected.
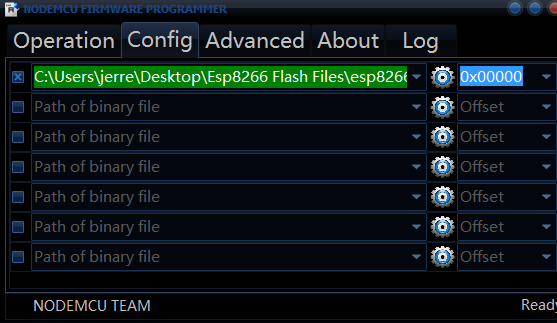
- After you've selected the COM port, click the 'Config' tab at the very top and on the first row then click the 'cog' icon and begin to search for and select the .bin (binary) file you had just downloaded earlier from the Github repository. Once again, make sure you check for any updates as using an outdated version may lead to unwanted issues.
- Now select the 'Advanced' tab, everything should be at its correct automatic setting other than the 'Flash speed' setting. If it isn't change the 'Flash speed' from 40Megahertz to 80Megahertz. These settings should work for most modern NodeMCU chips, however as time goes on, different settings may need to be altered as technology is always updating and growing.
- Head back to the 'Operation' tab and hit 'F' or simply click the 'Flash' button. If you've made any mistakes you can simply press 'S' or 'Stop' to disrupt the flash and return to it later. During the flash you should see different shades of Blue LEDs light up on your chip, don't worry if not as you'll find a lot of these Esp8266 chips can vary with the type of hardware that has been soldered onto them. Once the flash is complete, you should get something like this.

- (ref 1.1) Unplug and re-plug the device back into your computer, tablet, smartphone or even a suitable portable charger if you have one to essentially act as a power source. Congratulations, you're now ready to find out what this device is REALLY capable of.
Demonstration
Please note you'll need a phone or tablet if you'd like to follow this demonstration - ensure your ESP8266 is connected to an acceptable power source, refer to reference 1.1 if you're having trouble following this demonstration.
This is where things get to be slightly more worrying, it honestly should be worrying that such a cheap device, at $5/£3-4 nevermind, is available to the general public that can cause some serious grief or disruption to home or small-scale business networks. For this I'll use my older Samsung S7 Smartphone as the device I'll be demonstrating on and I'll show you how you can spam access point names and also disconnect devices on a network or how the said device can disrupt a whole network itself.
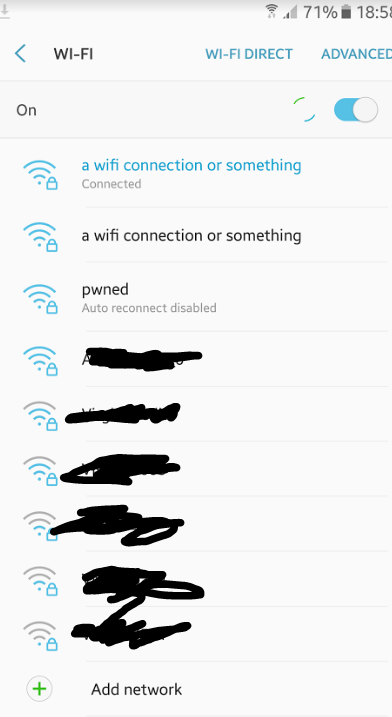
First thing's first, head to your settings > Connections > Wifi to get a list of all the available Wifi connections, you should see a network there named 'Pwnd'. Connect to this network, the default password is 'deauther'. Remember, this network won't show up until you actually unplug and re-plug the Micro-USB cable into the device after flashing, refer to reference 1.1 if you're having issues.
Once you have connected, head to the browser on your smartphone and input the following address in your address bar and hit your search button: 192.168.4.1, this will bring up the control panel. I highly suggest you read and understand the disclaimer that you are first greeted along with over-viewing the disclaimer I have displayed on this article if you have not done so already, it could mean the difference of education or a prison cell.
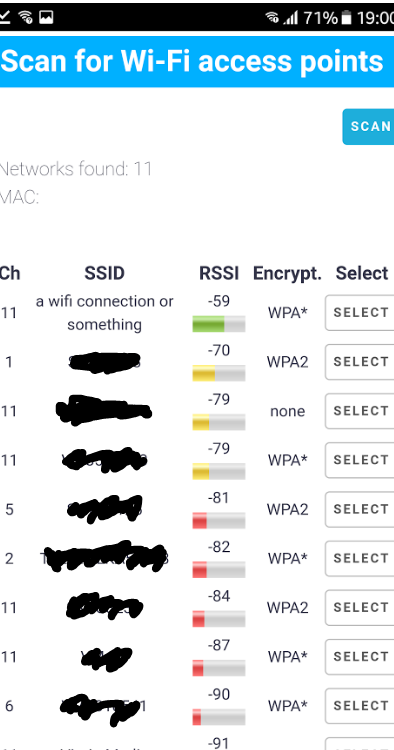
Click 'Scan' on the page for a list of vulnerable access points and select your own access point or one you have been given written permission/authorisation by the owner to potentially conduct a penetration test. Selecting another access point that ISN'T yours could breach laws within your country and could be deemed as a criminal offence, I accept not responsibility if you fail to heed the multiple disclaimers and warnings given here. Also check your local laws or gain WRITTEN permission (very important) from the owner of the network before you attempt to penetration test it in any way, shape or form as stated above.
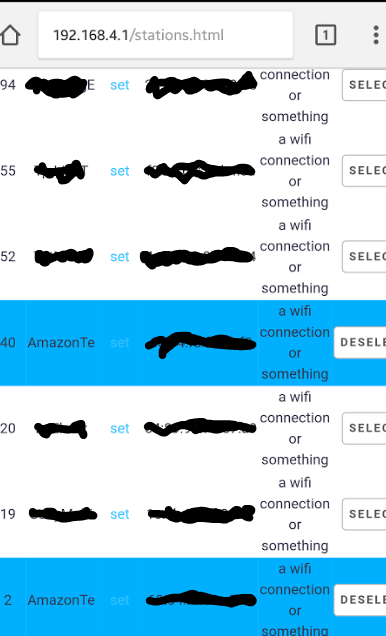
- Once you've selected a specific access point, click 'Stations' at the top. Leave the scan at 15 seconds, however you can generously increase the amount if you want a more accurate scan. The 'pwnd' access point will disconnect upon searching, however if you've selected to automatically reconnect in the Wifi settings, it'll do so after 15 seconds. Here's a list of most of the devices connected to my network otherwise known as 'Clients'.
+ My aim of this demonstration is to deauthenticate my Kindle Fire device from my network, however I also have an Amazon Echo hence the two different 'Amazon' devices. I'll go ahead and select them both just for the sake of it as I did not link the MAC addresses back to said devices during this tutorial.
Once you've select the devices you want to deauthenticate from the network, you can then go to 'attacks' and press 'Start' under the 'deauth' tab to kick them off the network. If you want to deauthenticate a whole network, simply do the same minus the process of selecting specific devices/clients. Once you've pressed 'start' the process should then begin.
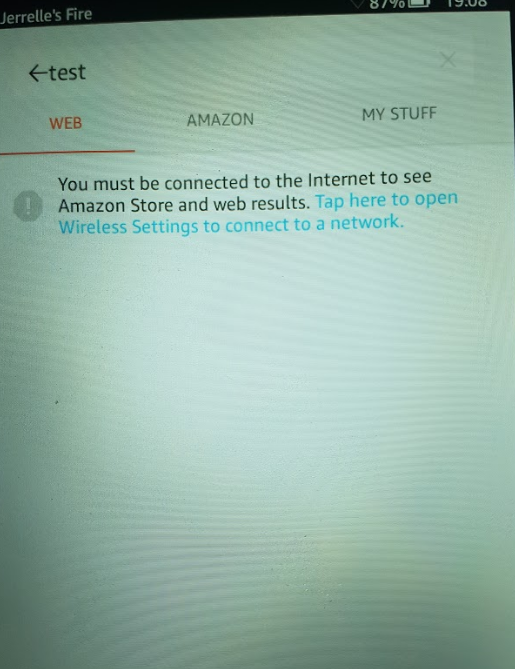
As you can see from the picture below it has been successfully deauthenticated from the Wifi connection and (un)fortunately, my Amazon Echo as well. You can stop this attack by simply tapping the 'stop' button a few times, disconnecting from 'Pwnd' or simply unplugging the device to your chip.
What else can we do?
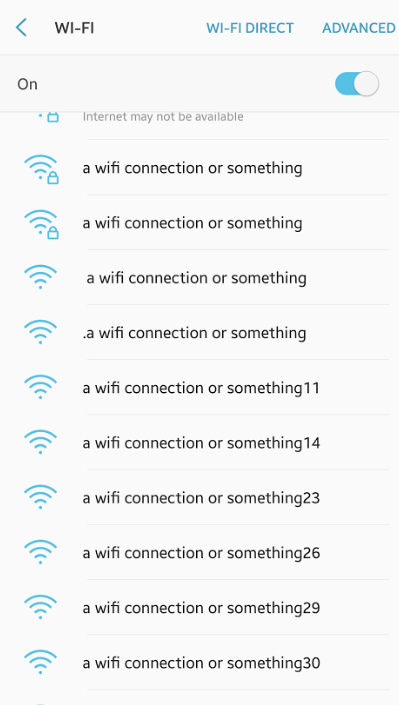
Another unique feature is the ability clone and spam access points which may confuse owners or individuals wanting to actually connect to the network. They disappear quickly however they reappear shortly after disappearing, if this happens to you, I'd highly recommend disconnecting from any wifi network and also toggling/disabling the functionality for wifi as it could be an attempt to draw individuals into a 'honeypot' which leaves your device(s) vulnerable, specifically this has been done recently to attack those with mobile/portable device cryptocurrency wallets upon their devices with various man in the middle (MiTM) attacks when transporting data.
Conclusion
And there you have it. A $5 device that can pretty much 'shut down/jam' a network/clients for several hours. The only cons are of course, you have to be near the connection and have a power source for the chip. However if you get a suitable portable charger with enough output, you could quite literally leave one of these cheap chips outside near someones house and going for hours, endlessly. It's only $5 so you could quite literally just buy another without a care in the world.
As said near the start, for us to learn how to mitigate these attacks and provide better risk assessment, we have to break down these attacks, understand how they work and also understand how to conduct one, once we've got this knowledge under our belt we can then work towards combating such vulnerabilities and also offer better preparation for ourselves/companies also. I should also stress not EVERY network is vulnerable to an attack such as this.
Questions to focus on for potential discussion below
What are your opinions on this? Do you think the prices should rise on these chips? Do you think the access to them is too easy? Has this convinced you to go and buy one yourself?
How safe are we really?
All credits go to the creator of the software/releases - https://github.com/spacehuhn
Remember to post your opinions below along with any questions if necessary!
Very interested in getting everyone's opinions on the easy availability of the hardware displayed in this piece along with the cheap start up cost to create something so exploitable literally in minutes.