Make Your Own Web Server using NodeMCU devkit v1.0
What Will I Learn?
- You will learn how to configure a web server using NodeMCU devkit v1.0.
- You will learn basic applications of web server requests like controlling the state of its general purpose input/output pins or gpio pins.
- You will learn the practical application of this tutorial in electronic projects, studies or in the industry.
Requirements
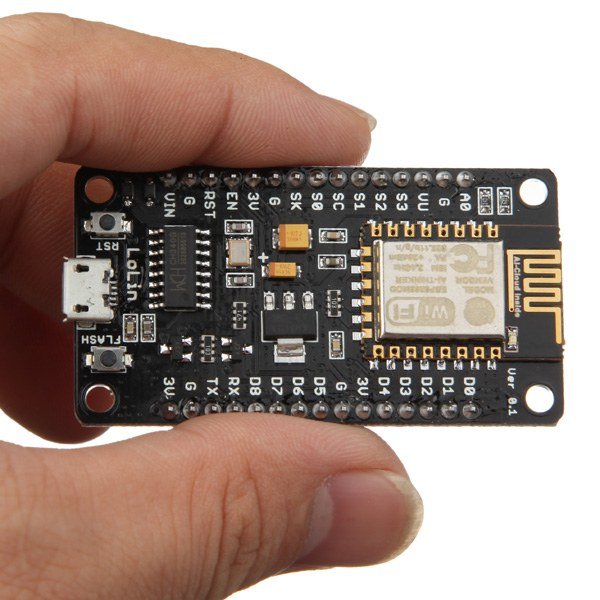
Materials Needed- NodeMCU devkit v1.0
- LED
- 220 ohms Resistor (1/4 W)
- USB Cable (Type A to Mini B)
- Junction Wires
- Computer
Software Applications- Open-Source Arduino Software (IDE) / Arduino IDE
Difficulty
- Basic
Description:
Aside from being a microcontroller, the NodeMCU devkit v1.0 has also a built-in wifi module. On my previous tutorial, I have discussed that the NodeMCU is an established open source IoT platform.Thus, it eliminates the need to use an another Wi-Fi module and an Arduino board, like Arduino UNO, to establish a web server.
A web server is a PC framework that process demands by means of Hyper Text Transfer Protocol. It is the conventional fundamental system that is used to disseminate data on the World Wide Web. You are actually using HTTP/HTTPS always without being aware of it. As the matter of fact, I am using HTTPS while I am writing this tutorial.
Moreover, using NodeMCU devkit v1.0, you don't have to implement softserial communication anymore between modules because you are using a single board.
Softserial allows serial communication using software on the digital pins of the Arduino to mimic its functions from a Wi-Fi module, as an example.
For further research about NodeMCU devkit v1.0. Here is its official website
In this tutorial, we will use the microcontroller and wifi module capabilities of the NodeMCU devkit v1.0 board to implement wireless infrared communication.
Tutorial Contents
"Make a Web Server Inside a Single Board using NodeMCU devkit v1.0"
Step 1: "Downloading the ESP8266 Boards and its Necessary Files"
Open Arduino IDE. And create a new sketch.Make sure that you have already downloaded and installed the boards and the necessary files to make the NodeMCU devkit v1.0. If you haven't install or download them, kindly click here. And follow the first step of my tutorial there.
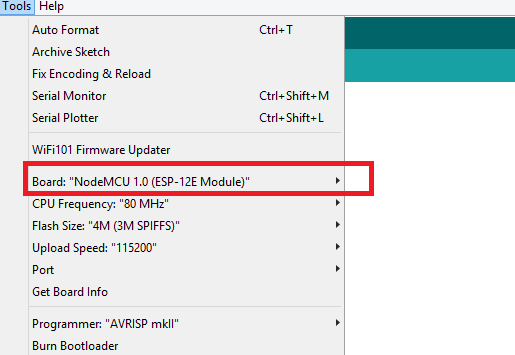
After the installation of ESP8266, go to the Tools tab and change the board to NodeMCU 1.0 (ESP-12E Module)
Step 2: "Programming Your Board"
In order to control the test if your web server is working and is able to send request, I will use an LED connected to GPIO4.
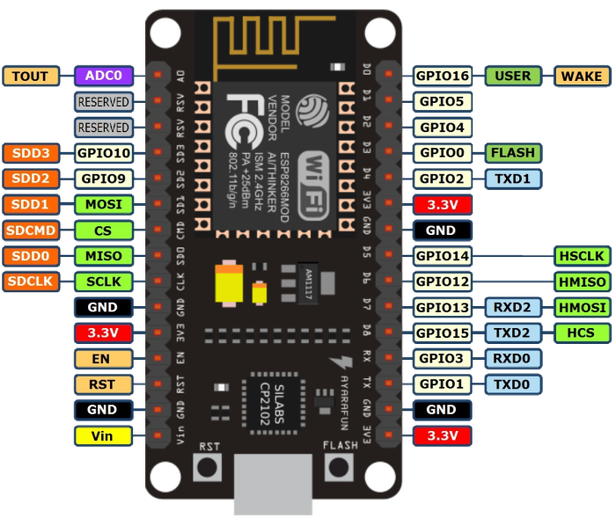
Pin Configuration of NodeMCU devkit v1.0 Don't forget to use resistor to couple your LED. To prevent the LED from burning out when current flows exceed its limit. It is a good practice for safety. To do this,
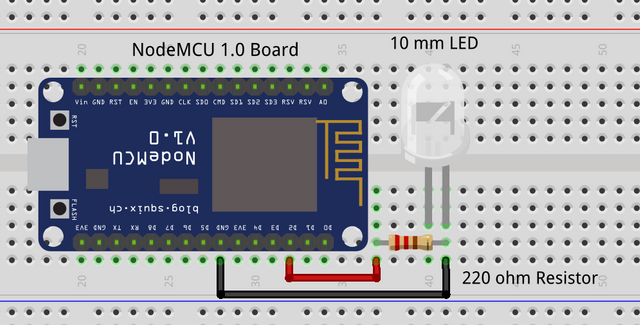
assemble this circuit:I used Fritzing Beta to make these
circuits and models.
Then, open a new sketch in the Arduino IDE and input this code:
#ifndef UNIT_TEST

#include <Arduino.h>

#endif

#include <ESP8266WiFi.h>

const char* ssid = "my wifi SSID";

const char* password = "my wifi password";

//For testing web server request.

int LED = D2;

WiFiServer server(301);

IPAddress ip(192, 168, 43, 67);

 gateway(192, 168, 43, 1);

IPAddress subnet(255, 255, 255, 0);

IPAddress dns(192, 168, 43, 1);

void setup(void) {

Serial.begin(115200);

delay(10);

//For the output pins

pinMode(LED, OUTPUT);

//Initially turning off the LED

digitalWrite(LED, LOW);

// Connect to WiFi network

Serial.println();

Serial.println();

Serial.print("Connecting to ");

Serial.println(ssid)

//Static IP Setup Info Here...

WiFi.config(ip,dns,gateway,subnet);

WiFi.begin(ssid, password);

while (WiFi.status() != WL_CONNECTED) {

delay(500);

Serial.print(".");

}

Serial.println("");

Serial.println("WiFi connected");

// Start the server

server.begin();

Serial.println("Server started");

// Print the IP address

Serial.print("Use this URL to connect: ");

Serial.print("http://");

Serial.print(WiFi.localIP());

Serial.println("/");

}

void loop()

{

// Check if a client has connected

WiFiClient client = server.available();

if (!client) {

return;

}

// Wait until the client sends some data

Serial.println("new client");

while(!client.available()){

// delay(1);

client.setNoDelay(1);

}

// Read the first line of the request

String request = client.readStringUntil('\r');

Serial.println(request);

client.flush();

// Match the request for each of the appliances,lights and lock.

// For turning on the LED

 {

digitalWrite(LED,HIGH);

}

// For turning off the LED

if (request.indexOf("/turn off LED") != -1)

{

digitalWrite(LED,LOW);

}

// Set ledPin according to the request

// Return the response

client.println("HTTP/1.1 200 OK");

client.println("Content-Type: text/html");

client.println(""); // do not forget this one

client.println("");

client.println("<html> ");

client.println("<title>My AWESOME Web Server!!</title>`");

client.println("<H1>My AWESOME Web Server!!");

client.print("<h4>LED SWITCH:</h4>`");

client.print("<br>");

client.println("<a href=\"/turn on LED\"\"> TURN ON LED ");

client.println("<a href=\"/turn off LED\"\">TURN OFF LED");

delay(1);

Serial.println("Client disconnected");

Serial.println("");

}
The program simply let your NodeMCU devkit v1.0 board to connect ot your local access point or your Wi-Fi hotspot
Now, connect your NodeMCU devkit v1.0 to your computer using the USB cable (Type A to Mini B). Go to the device manager then, identify its port number if it is your first time to use this board. Now, go the Arduino IDE and click Tools > Port and look for the port of your NodeMCU dekit v1.0.const char* ssid = "my wifi SSID"and use the passwordconst char* password = "my wifi password"to authenticate. I have set the port, ip, default gateway, subnet mask and the dns addresses of the web server as static in the program. This is to make sure that when your server shuts down, it will still have the same ip address when it is establish again.I am using GPIO4 as as output pin since it is where I connect the LED.And on the codes ` client.println<> `, I am just simply writing an html program for web server. To give my web server, an awesome content.Upload the program above. Make sure to input it properly. (I have already compiled this program and it has no errors)
Step 3: "Test Your Web Server"
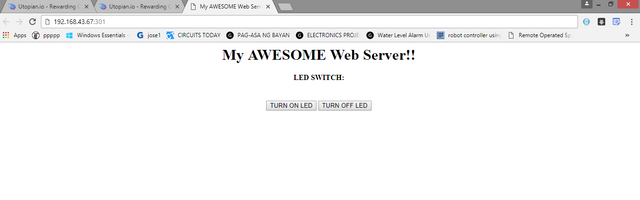
After uploading your program to your board, you can test your web server by using your web browser. But make sure that your computer or device is connected on the same local access point or Wi-Fi hotspot. If you do, you are on the same local area network now and you can access your web server already.To access your web server, just type the ip address you set like in my case, it is
192.168.43.67:301Your web page must look like this.
Step 4: "Do Web Server Request by Switching the LED"
Press the button, Turn on LED and the LED connected to GPIO4 of the NodeMCU board should glow.Then, press the button, Turn off LED and the LED should turn off now.
Curriculum
This tutorial is useful if you want to implement wireless communication between devices in a local area network using the internet. Internet of Things is now a technological trend. And this tutorial will help you have a nice start in IoT technology.
I hope you enjoy this tutorial. Till next time!
Your contributor, @japh
Posted on Utopian.io - Rewarding Open Source Contributors
Another worthy contribution indeed @japh . Will be following your tutorials more :) Steem On!
Thank you for following my tutorials @leryam12.
I will try to improve more. Sharing my knowledge is something I love.
Thank you for the contribution. It has been approved.
You can contact us on Discord.
[utopian-moderator]
Thank you, @deathwing. My efforts paid off.
Hey @japh I am @utopian-io. I have just upvoted you!
Achievements
Suggestions
Get Noticed!
Community-Driven Witness!
I am the first and only Steem Community-Driven Witness. Participate on Discord. Lets GROW TOGETHER!
Up-vote this comment to grow my power and help Open Source contributions like this one. Want to chat? Join me on Discord https://discord.gg/Pc8HG9x
Congratulations! This post has been upvoted from the communal account, @minnowsupport, by Japh from the Minnow Support Project. It's a witness project run by aggroed, ausbitbank, teamsteem, theprophet0, someguy123, neoxian, followbtcnews, and netuoso. The goal is to help Steemit grow by supporting Minnows. Please find us at the Peace, Abundance, and Liberty Network (PALnet) Discord Channel. It's a completely public and open space to all members of the Steemit community who voluntarily choose to be there.
If you would like to delegate to the Minnow Support Project you can do so by clicking on the following links: 50SP, 100SP, 250SP, 500SP, 1000SP, 5000SP.
Be sure to leave at least 50SP undelegated on your account.