Building Stories for Others
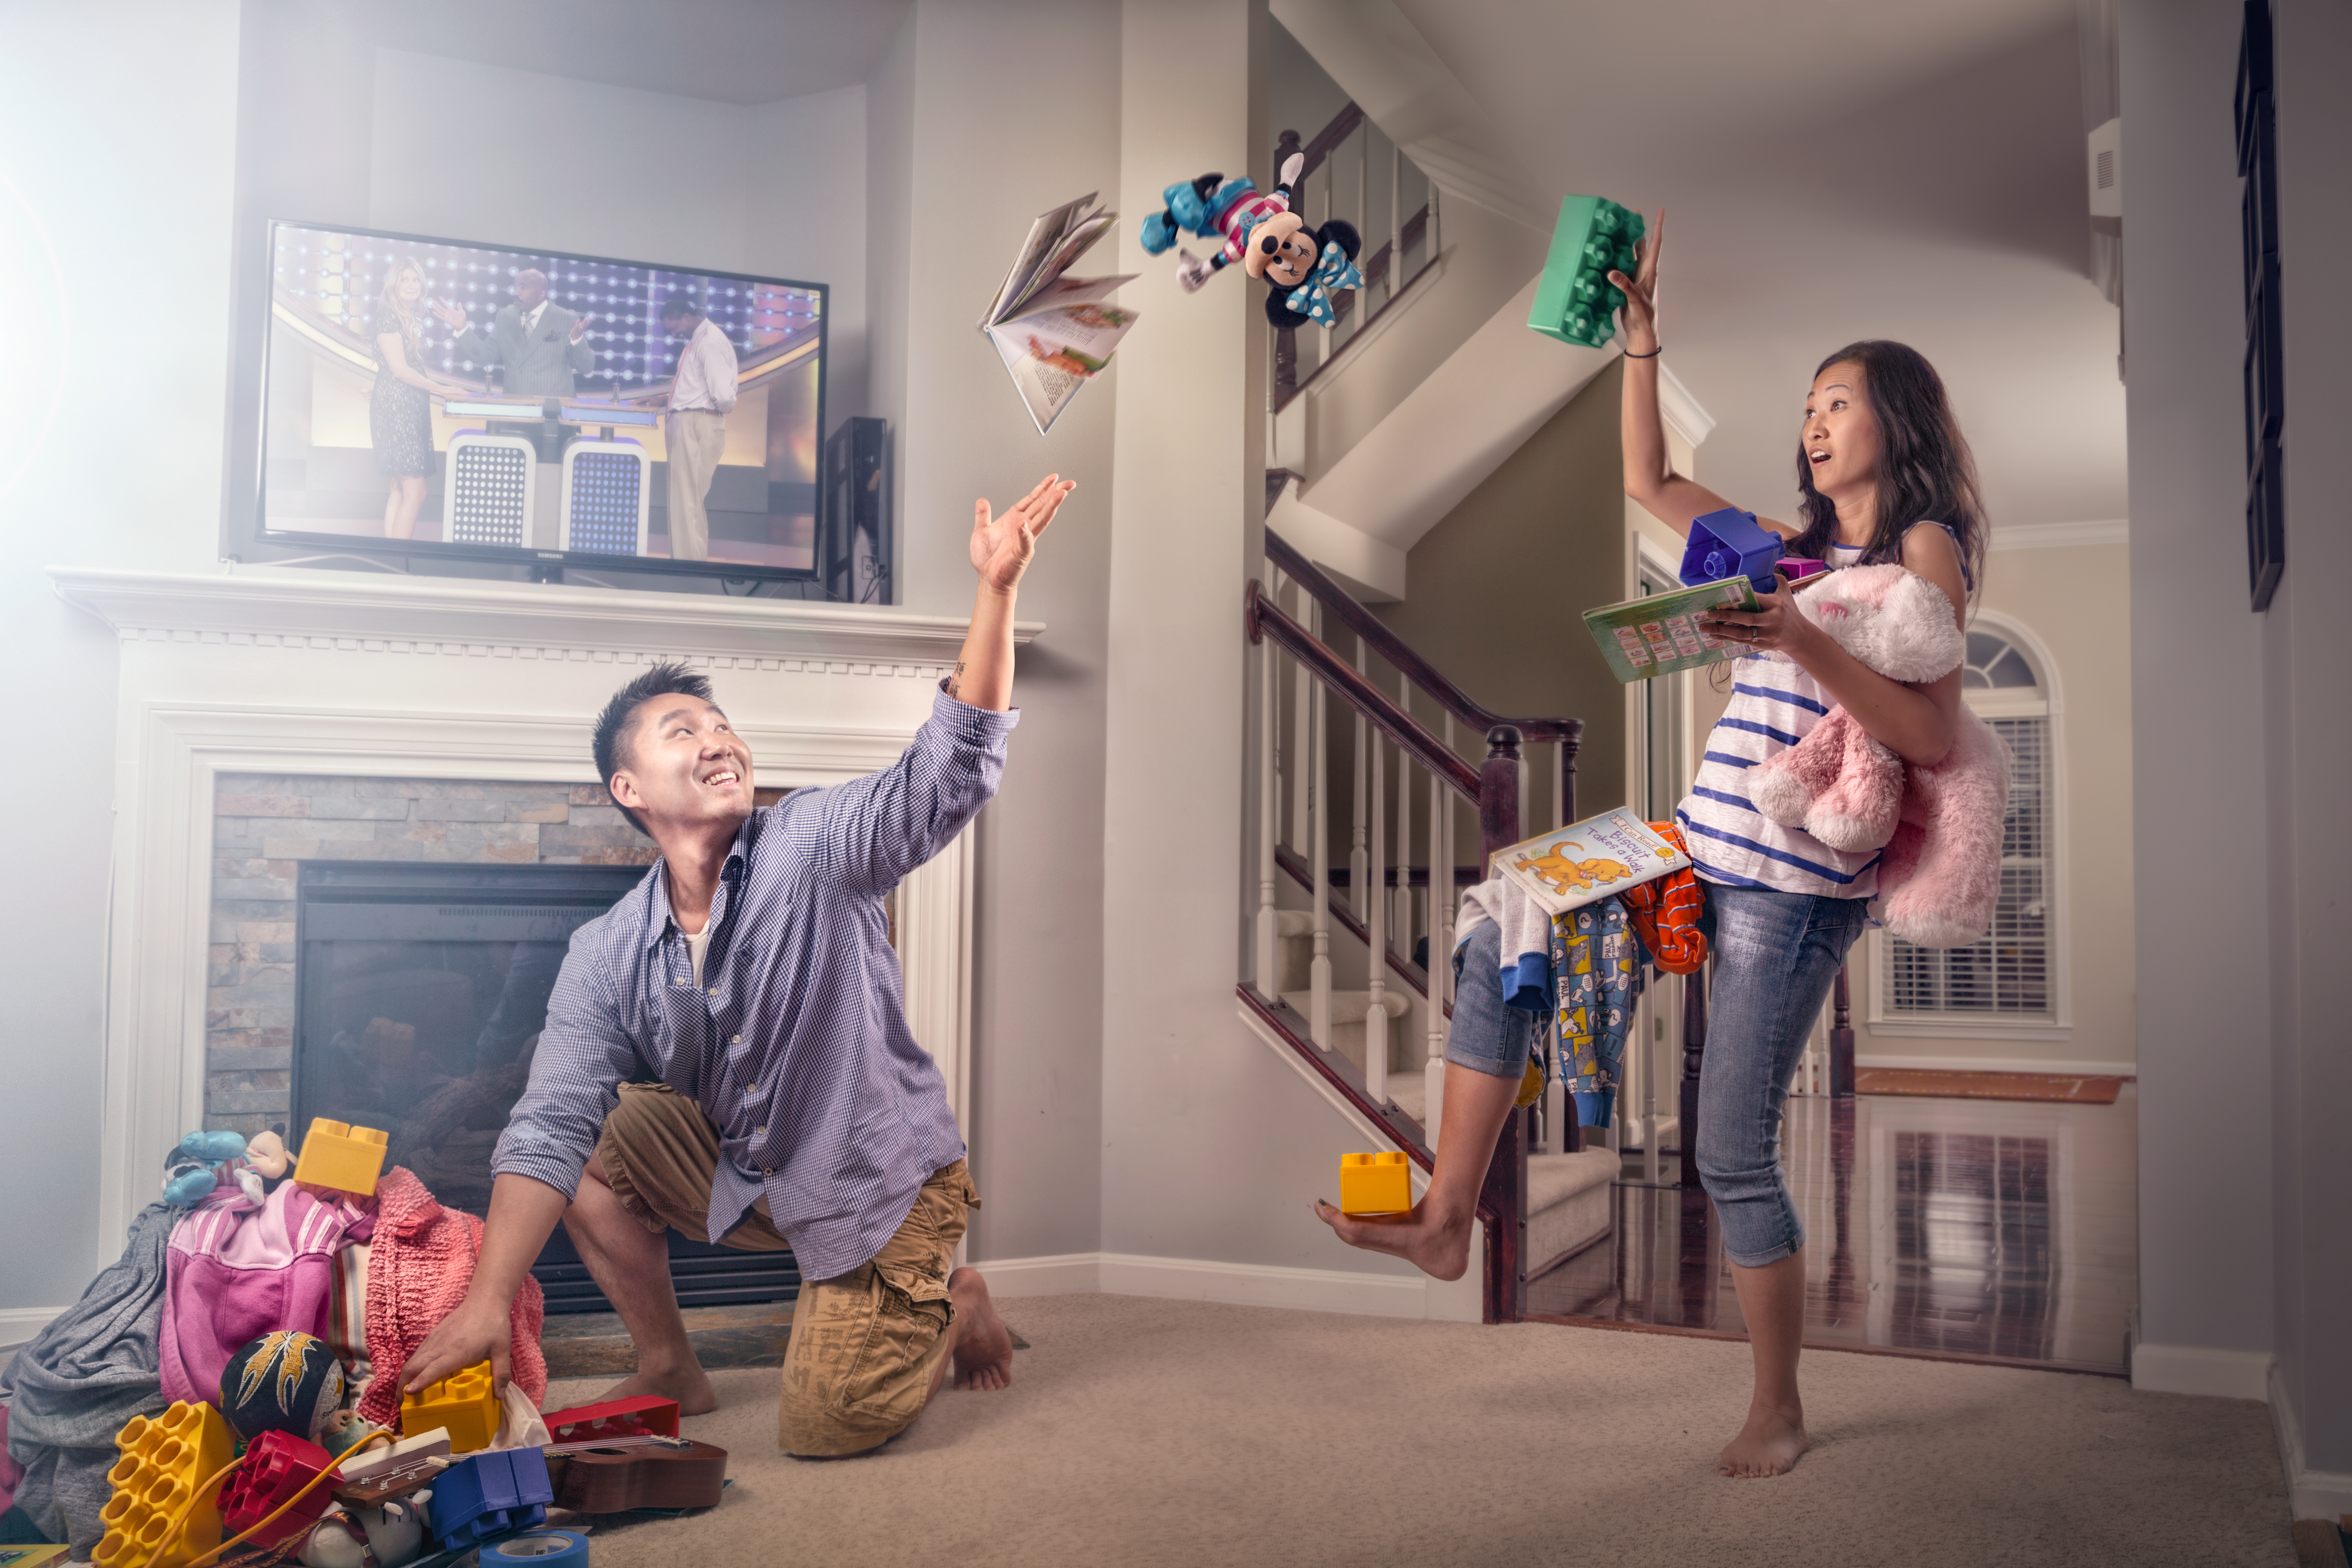
The majority of the work I create is fiction. In my personal imagery, I pull from my loose short stories and abstract them down to core ideas. This is the beginning to a process that translates into a world of make believe or absurd interpretations of reality. The majority of the shoots involve an aspect of self-portraiture, although I never really consider that “me” in the image. It’s always a character in some capacity. The combination of starting an image from a story helps keep this focus all the way through production and into the final stages of post. The end result is similar to pausing a movie, and then leaving it there forever. There’s an implied beginning and conclusion, but the viewer only receives this one glimpse and context for the story they’re witnessing.
I’ve been lucky enough to extend this type of imagemaking into other opportunities, whether it’s giving workshops on building photographic stories, or taking on commissions to create this type of work for companies and families. I recently relocated to DC. While getting settled and established, I met Paul Ahn, a videographer and owner of Rainbow Starfish Productions. We talked about doing some work together in that regard, but also about the idea of creating a photograph for him and his wife, Jenny. This is the image I’m going to be discussing here. Since Paul is a videographer, it was also an opportunity to finally create a true behind the scenes process video for how these images are made.
Even though I make both personal and commissioned work that share visual similarities, there is a distinct difference between the two of them: how they begin. Personal work may be coming from a number of lived experiences or wandering prose, but when making work of this nature for others, there’s a large blank slate of a story staring back at me. I have to dig into personalities and see what stories are rumbling to be told.
To achieve this, my favorite tool is a pen and paper, and a process that pulls from all the way back in elementary school during English class. I like to create word trees of the people I’ll be constructing a story around. I write down one person’s name and everyone else contributes descriptors. The paper ends up with a spiraling web of adjectives and verbs and whatever else randomly comes to whoevers’ minds. But the real trick to this exercise is making sure to listen not just to the responses, but the manner in which things are said. This context helps shapes the tone for the personalities involved and can help direct how the content in the scene will play out. The potential stories are being discussed freely, while the word tree is just an instigator to get people talking. For Paul and Jenny, the discussion led down a road that made it quite clear that they had two different opinions for what cleanliness and order is like within their household, and who plays which part. That little bit of personal story is all I needed to start expanding the idea in my head. I built a very rough storyboard for how this scene could play out, and from that it gave me a general idea on where to start for composition and lighting.
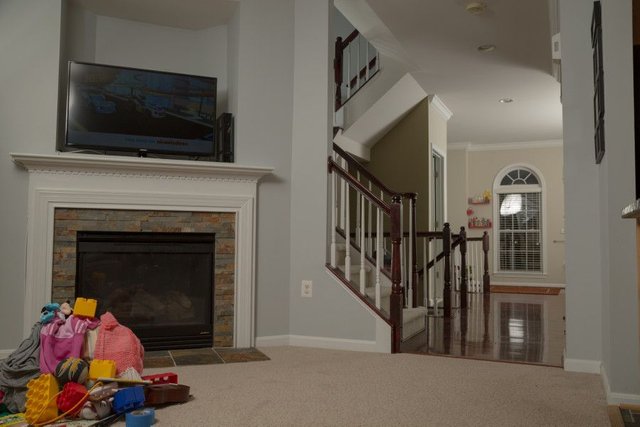
When making an image that is a composite of many, many different exposures and actions, it’s imperative to marry yourself to your camera composition. I spend a long time tinkering with perspective, height, and different focal lengths, but it’s absolutely critical. It is also probably the most boring and tedious part of this imagemaking process. Best advice I can give is to be a decent conversationalist and know how to multitask with chatting while also playing the small game of inches and millimeters until you’re perfectly content with the framing of your upcoming scene. It’s not much fun being a subject, sitting and watching a photographer fret over camera angle choices that seem like not that big of a deal. Keep people engaged during this process. Either have them hunting for props, or be able to discuss whichever random topic may be interesting.
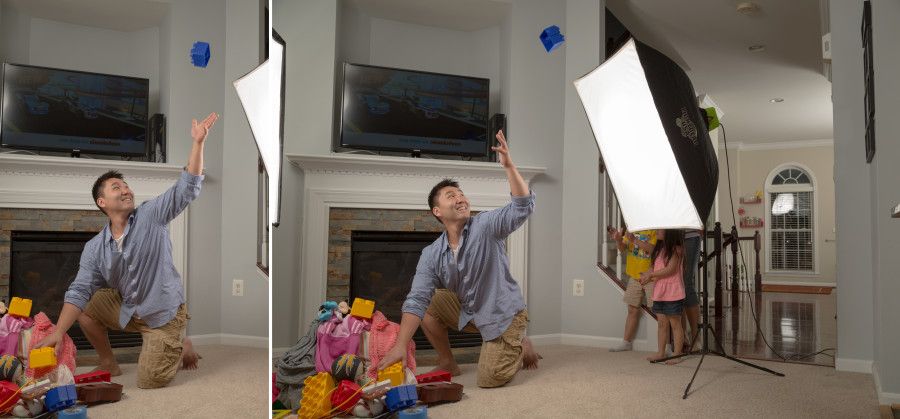
Once the composition is locked in, the next stage is lighting. I tend to run simultaneous lighting setups. To maintain overall lighting consistency across every frame, the key light(s) tend to stay just out of the composition and provide a base illumination for the scene itself. I also set up a lighting pattern that will move throughout the duration of the shoot. Where they move to is dependent upon who is being photographed. I stay aware of the direction from the main lights, but by moving additional lights directly into the frame to illuminate people, I’m able to also have more control over their unique brightness without compromising on the light intensity elsewhere. From the very beginning of the shoot, I know all of this will be composited together in post so I’m only concerned with how the moving light(s) actually looks in each particular section of the frame. The physical presence of stands and modifiers within the shots are going to be removed later anyway. My favorite modifier for people is a strip box. I call it a “Roman,” mainly because over the years I’ve roamed throughout the scene and placed it right beside subjects to give them dynamic light no matter how far from the key they may be. The term has just sort of stuck at this point, albeit not quite trending level.
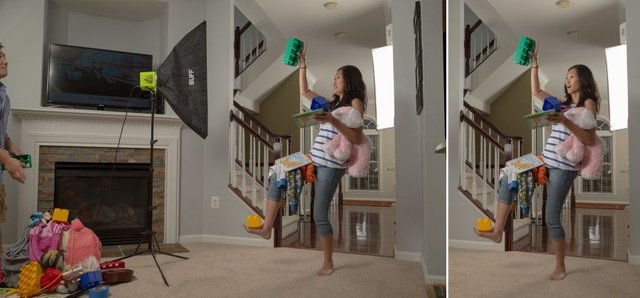
After the composition, lights, and everything else technical is configured, the most fun part of the production process is available: the action! I’ve tried having people hold still for positions, but found the most honest and realistic takes typically are when the subjects are actively doing what is being presented in the frame. And honestly, this makes for the most fun. I give people roles and character desires, but beyond that I don’t direct too much. I’m a believer in the organic process as people work through this repetitive action in front of the camera. It may take 10 takes, but realistically it’s probably closer to 60 or 100 before everything is clicking (pun not originally intended, but we’ll let it ride). I’ll look at frames as they’re coming into the camera or tethered computer, but more so I’m just watching for genuine action. I may not get it all in one click. The body may be perfect on one shot, but the head or expression may be better from another take. Not a deal breaker, because I know I can composite these aspects together later. It’s like being an editor for a movie, borrowing those perfect tiny moments from all of the footage to compile basically the “best of” from all performances.
In this photographic scene, Paul’s mission, as the instigator of messes in the house, was to be the disaster zone throughout the frame. Jenny’s mission, as the frantic cleaner, was to be the one trying to contain everything before it became a larger problem. I had Paul actively throwing objects over his head during his takes. Afterward, Jenny got to balance as many things as possible. We loaded her down with items, and then to induce legit difficulty, actually tossed more things for her to catch. Real reactions, real body tensions due to actually experiencing what’s in the photo.
Once production concluded with all of the people, I made a thorough series of varied exposures of the composition. Some with all of the main lights. Some powered up. Some powered down. Some turned off. Even some ambient room light exposures. It’s basically a hybrid of light painting and HDR image acquisition. I won’t use all or maybe even any of these frames from a shoot, but they’re there as background plates just in case I want to adjust the visual story or correct for odd shadows or highlights once in post.
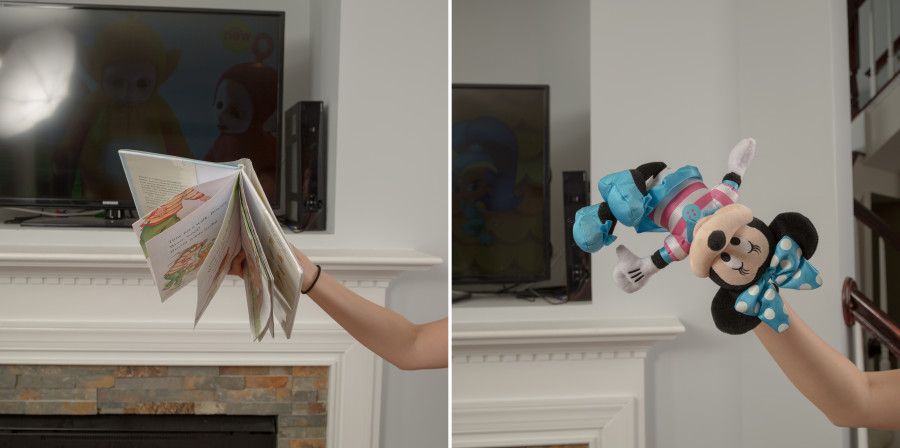
Lastly, I grabbed a few images of random items that could be flying through the frame. I know I just talked about getting real reactions in the composition, but there’s a balancing game. Sure, I can throw these things up within the composition and photograph them that way. But for me, every decision I make on set is based on visualizing through to what the post will be for it. Which decision will both be more efficient, and help direct the story more? By isolating these items for essentially “green screen” object sampling, it gave me more liberty to clip them out in post and place them wherever I wanted in the frame, and also control the way in which motion was presented in their appearance.
In post, I tend to follow a few general guidelines. Import the RAW files as flat, neutral files, no sharpening and with a chromatic aberration removal applied. Once the 10-30 potential frames are loaded into a Photoshop document, I run a general auto alignment on them just in case the tripod was bumped or the camera shifted during shutter presses. It happens, it’s hard to avoid, but it’s a super effective and easy fix in Photoshop. I should note that I don’t import these layers as Smart Objects. You can’t do an auto alignment on those types of files, so the starting point images are all rasterized.
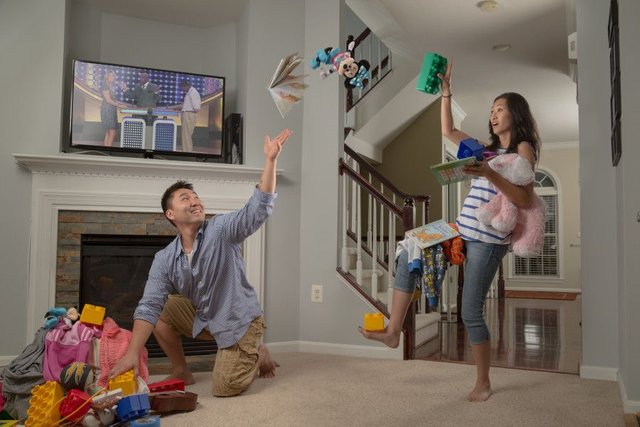
When I’m creating the frames during production, I basically equate it to building puzzle pieces. Once I’m in the computer, I’m putting the puzzle together. There’s no guide on what the finished project should exactly look like, so even within editing, I still consider it a form of storytelling. I like to break my layers down into folders for each person, plus a folder of background plates, and mask my way from the bottom up. I pick one frame as the foundation and mask the rest of the content into it. When dealing with smaller details, such as a hand or forearm from another frame, it’s a lot easier to just mask out the part you want while you can still see it, and then flip the mask to do touchups. The bulk of the masking can be pretty straightforward because everything is happening in front of a background that had consistent lighting no matter how the action scenes changed. In the instance where I swapped out Jenny’s face from a different frame, she became a combination of three separate takes for her (body, neck, face/head). The reason for this edit was because her body’s expression was fantastic, but the facial reaction didn’t match the story playing out. Same instance where Paul’s outstretched hand was sourced from a different take because it provided a continuous line from fingers to where the flying objects would go. I don’t believe getting everything absolutely in the camera is the perfect answer, nor do I believe doing everything in the computer is the perfect solution. The two approaches dance together to create a finished scene. It’s an interpretation of a pretend action trying to replicate an event that only transpired on a piece of paper earlier in the day.
I break post-production into three distinct stages. The first is the composite. Putting all of the pieces together to essentially have a fabricated, melded starting point. Second stage is moving pixels. Clone stamp, healing brush, whatever your method of choice is. I like to get rid of any “spots” in the frame that distract from the story. Is an outlet critical? No? Take it out. Same goes for any other various details that do nothing to progress the scene. I do all of this work on blank layers so they’re highly flexible and able to be masked. The reason I make sure to do this before adjusting any color or contrast is because the layers work from from top down. If I am cloning things after color work has been applied underneath, any adjustment in the prior color means I’ll have to reclone everything. Adding pointless extra work is pointless.
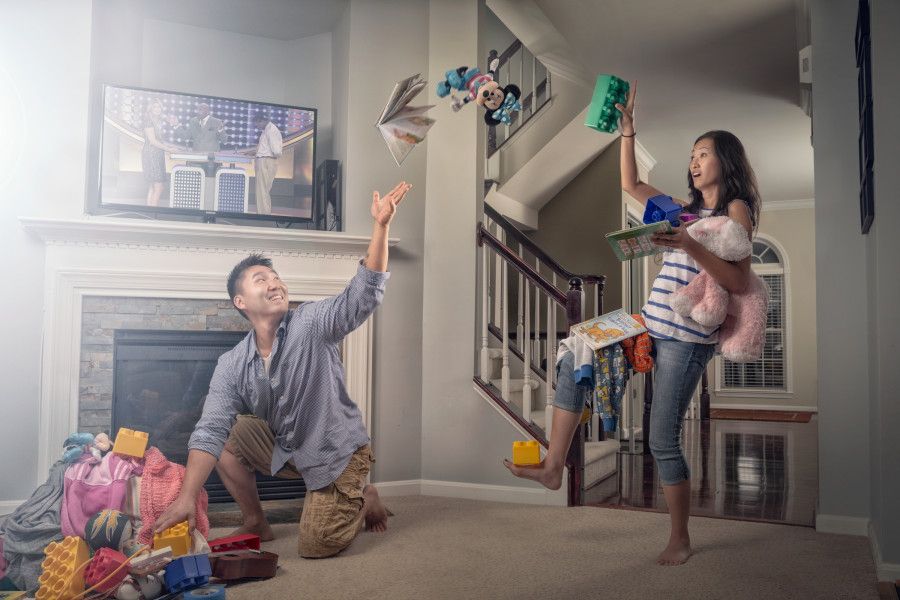
Lastly is the aesthetic edit. I have a few basic guidelines. Is something important? Make it brighter. Is it less important? Make it darker. Dodge and burn, broadly speaking. Because I imported all of the files as flat, neutral images, they have a lot of room to be pushed in either direction. Curves is the default tool I’m using the majority of time, whether I’m adjusting the value of the image, or dialing into the specific R, G, or B channel adjustments. Thinking about color itself is important, specifically warm vs. cool. I don’t mind introducing color shifts across an image. This can be a subtle way to inform viewers of a character’s role, playing into the psychology of cold and calculating, or warm and approachable. I’m also not afraid to just play. Open up an adjustment and slam it all the way in one direction, and then into the other. Somewhere in that range is an interesting addition to the frame, even if only masked into 5% of the photo. Very rarely do I make any global adjustment layers. Nearly every layer is used only as a very specific local adjustment. If I need to do anything like High Pass sharpening or etc, I create copy-merged layers and run everything on Smart Objects so I can maintain control of adjusting it later on. Another benefit to working this way is if, while doing color work at 200% you notice that you screwed up earlier on your initial compositing (I know it happens nearly every single time for me), it makes the rebuilding of the color work much easier. Turn everything off down to your composite mistake, fix it, then progress back up until your first Smart Object. Instead of turning it back on, replicate the copy-merge and Smart Object functionality, and then just drag the Smart Filter onto this new layer. Much better than trying to replicate a rasterized layer from memory.
Situated inside a constant need to tell stories, I’ve always been drawn to the assembly and organizing elements of different art forms. In filmmaking, my passion is in the editing. In writing, it’s constructing all of the character associations and interactions that play out in the prose. In photography, I’ve basically approached the whole medium as a constructing exercise, from pre-production to production to post. Walking around taking different pictures is a bit tricky for me. Other people do that much better, and I accept that. My aim is to create imagery, moments, and scenes that wouldn’t exist if I didn’t build them. My work is my imagination. Photography allows me to play inside of it.
Thanks to the great photography for you to share such beautiful photos among us
Thank you! I have lots of stories to tell from different shoots! If I feel like there's an audience on Steemit who'd dig this stuff, I'd certainly love to share more and more!
If I want to knock a story off the front page, I just change my hairstyle.
Congratulations @iamandy! You received a personal award!
Click here to view your Board of Honor
Congratulations @iamandy! You received a personal award!
You can view your badges on your Steem Board and compare to others on the Steem Ranking
Vote for @Steemitboard as a witness to get one more award and increased upvotes!