使用echarts创建柱状图框选图表/How to use echarts to make Bar Select Chart
Summary:
echarts is a very good pure Javascript open source chart library that runs smoothly on PC and mobile devices and is compatible with most current browsers including IE8 / 9/10/11, Chrome, Firefox, Safari and others.
echarts是一款非常优秀的纯 Javascript 的开源图表库,可以在 PC 和移动设备上运行的很流畅,兼容目前大部分浏览器包括IE8/9/10/11,Chrome,Firefox,Safari等。
您将从这个教程中学到什么
- 如何定义X轴数据&图例数据
- 如何定义高亮样式
- 如何定义背景色&标题&图例
- 如何定义区域选择组件
- 如何定义快捷工具
- 如何定义X轴&Y轴&网格
- 如何定义视觉映射组件
- 如何定义数据
- 如何定义选取数据
学习此教程的必备条件
- 你需要一个代码编辑器,比如Eclipse,EditPlus,EmEditor等等
- 你需要下载echarts.js,并在文件中调用
教程难度
- 中等
教程内容
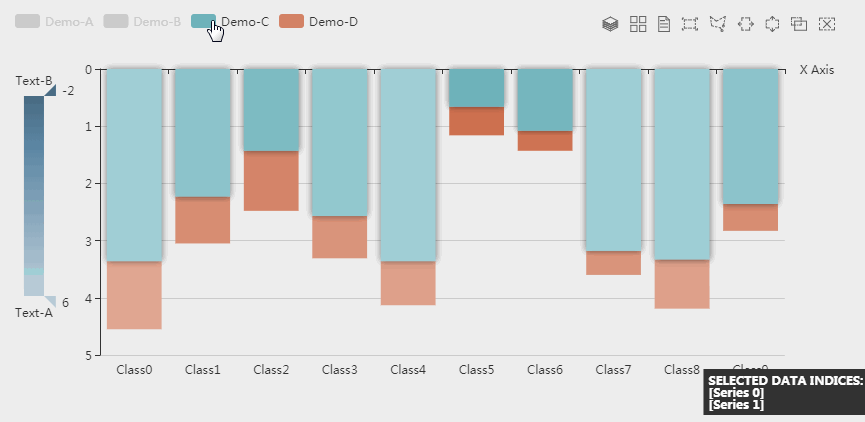
演示效果
1. 知识点A - 如何定义X轴数据&图例数据
var xAxisData = [];
var data1 = [];
var data2 = [];
var data3 = [];
var data4 = [];
for (var i = 0; i < 10; i++) {
    xAxisData.push('Class' + i);
    data1.push((Math.random() * 2).toFixed(2));
    data2.push(-Math.random().toFixed(2));
    data3.push((Math.random() * 5).toFixed(2));
    data4.push((Math.random() + 0.3).toFixed(2));
}
使用数组定义X轴&图例的数据,使用for循环语句创建。
2. 知识点B - 如何定义高亮样式
var itemStyle = {
    normal: {
    },
    emphasis: {
        barBorderWidth: 1,
        shadowBlur: 10,
        shadowOffsetX: 0,
        shadowOffsetY: 0,
        shadowColor: 'rgba(0,0,0,0.5)'
    }
};
- emphasis:定义高亮状态样式。
- barBorderWidth:定义柱状图边框宽度。
- shadowBlur:定义阴影的模糊度。
- shadowOffsetX:定义阴影X轴位移。
- shadowOffsetY:定义阴影Y轴位移。
- shadowColor:定义阴影颜色。
3. 知识点C - 如何定义背景色&标题&图例
    backgroundColor: '#eee',
    title: {
        text:'Demo By @hui.zhao',
        left: 10
    },
    legend: {
        data: ['Demo-A', 'Demo-B', 'Demo-C', 'Demo-D'],
        align: 'left',
        left: 10,
        top: 25
    },
- backgroundColor:定义背景色。
- title:定义标题组件。
- text:定义标题文字。
- legend:定义图例组件。
- align:定义图例对齐方式。
4. 知识点D - 如何定义区域选择组件
    brush: {
        toolbox: ['rect', 'polygon', 'lineX', 'lineY', 'keep', 'clear'],
        xAxisIndex: 0
    },
- brush:定义区域选择组件。
- rect:开启矩形选框选择功能。
- polygon:开启任意形状选框选择功能。
- lineX:开启横向选择功能。
- lineY:开启纵向选择功能。
- keep:切换『单选』和『多选』模式。后者可支持同时画多个选框。前者支持单击清除所有选框。
- clear:清空所有选框。
5. 知识点E - 如何定义快捷工具
    toolbox: {
        feature: {
            magicType: {
                type: ['stack', 'tiled']
            },
            dataView: {}
        }
    },
- toolbox:定义快捷工具组件。
- type:定义属性为堆叠 & 平铺。
6. 知识点F - 如何定义X轴&Y轴&网格
    xAxis: {
        data: xAxisData,
        name: 'X Axis',
        silent: false,
        axisLine: {onZero: true},
        splitLine: {show: false},
        splitArea: {show: false}
    },
    yAxis: {
        inverse: true,
        splitArea: {show: false}
    },
    grid: {
        left: 100
    },
- data:定义从xAxisData数组取值。
- silent:定义坐标轴是否是静态无法交互。
- axisLine:定义坐标轴轴线相关设置。
- splitLine:定义坐标轴在 grid 区域中的分隔线。
- splitArea:定义坐标轴在 grid 区域中的分隔区域,默认不显示。
- inverse:定义是否是反向坐标轴。
7. 知识点G - 如何定义视觉映射组件
    visualMap: {
        type: 'continuous',
        dimension: 1,
        text: ['Text-A', 'Text-B'],
        inverse: true,
        itemHeight: 200,
        calculable: true,
        min: -2,
        max: 6,
        top: 60,
        left: 10,
        inRange: {
            colorLightness: [0.4, 0.8]
        },
        outOfRange: {
            color: '#bbb'
        },
        controller: {
            inRange: {
                color: '#2f4554'
            }
        }
    },
- visualMap:定义视觉映射组件。
- dimension:指定用数据的『哪个维度』,映射到视觉元素上。
- text:定义两端的文本,如 ['High', 'Low']。
- inverse:定义是否反转 visualMap 组件。
- calculable:定义是否显示拖拽用的手柄(手柄能拖拽调整选中范围)。
- inRange:定义在选中范围中 的视觉元素。(用户可以和 visualMap 组件交互,用鼠标或触摸选择范围)
- outOfRange:定义在选中范围外 的视觉元素。(用户可以和 visualMap 组件交互,用鼠标或触摸选择范围)
- controller:visualMap组件中,控制器 的 inRange outOfRange 设置。如果没有这个 controller 设置,控制器 会使用外层的 inRange outOfRange 设置;如果有这个 controller 设置,则会采用这个设置。适用于一些控制器视觉效果需要特殊定制或调整的场景。
8. 知识点H - 如何定义数据
    series: [
        {
            name: 'Demo-A',
            type: 'bar',
            stack: 'stackOne',
            itemStyle: itemStyle,
            data: data1
        },
        {
            name: 'Demo-B',
            type: 'bar',
            stack: 'stackOne',
            itemStyle: itemStyle,
            data: data2
        },
        {
            name: 'Demo-C',
            type: 'bar',
            stack: 'stackTwo',
            itemStyle: itemStyle,
            data: data3
        },
        {
            name: 'Demo-D',
            type: 'bar',
            stack: 'stackTwo',
            itemStyle: itemStyle,
            data: data4
        }
    ]
- name:定义数据对于图例值。
- type:定义为柱状图。
9. 知识点I - 如何定义选取数据
myChart.on('brushSelected', renderBrushed);
function renderBrushed(params) {
    var brushed = [];
    var brushComponent = params.batch[0];
    for (var sIdx = 0; sIdx < brushComponent.selected.length; sIdx++) {
        var rawIndices = brushComponent.selected[sIdx].dataIndex;
        brushed.push('[Series ' + sIdx + '] ' + rawIndices.join(', '));
    }
    myChart.setOption({
        title: {
            backgroundColor: '#333',
            text: 'SELECTED DATA INDICES: \n' + brushed.join('\n'),
            bottom: 0,
            right: 0,
            width: 100,
            textStyle: {
                fontSize: 12,
                color: '#fff'
            }
        }
    });
}
完整代码
var xAxisData = [];
var data1 = [];
var data2 = [];
var data3 = [];
var data4 = [];
for (var i = 0; i < 10; i++) {
    xAxisData.push('Class' + i);
    data1.push((Math.random() * 2).toFixed(2));
    data2.push(-Math.random().toFixed(2));
    data3.push((Math.random() * 5).toFixed(2));
    data4.push((Math.random() + 0.3).toFixed(2));
}
var itemStyle = {
    normal: {
    },
    emphasis: {
        barBorderWidth: 1,
        shadowBlur: 10,
        shadowOffsetX: 0,
        shadowOffsetY: 0,
        shadowColor: 'rgba(0,0,0,0.5)'
    }
};
option = {
    backgroundColor: '#eee',
    title: {
        text:'Demo By @hui.zhao',
        left: 10
    },
    legend: {
        data: ['Demo-A', 'Demo-B', 'Demo-C', 'Demo-D'],
        align: 'left',
        left: 10,
        top: 25
    },
    brush: {
        toolbox: ['rect', 'polygon', 'lineX', 'lineY', 'keep', 'clear'],
        xAxisIndex: 0
    },
    toolbox: {
        feature: {
            magicType: {
                type: ['stack', 'tiled']
            },
            dataView: {}
        }
    },
    tooltip: {},
    xAxis: {
        data: xAxisData,
        name: 'X Axis',
        silent: false,
        axisLine: {onZero: true},
        splitLine: {show: false},
        splitArea: {show: false}
    },
    yAxis: {
        inverse: true,
        splitArea: {show: false}
    },
    grid: {
        left: 100
    },
    visualMap: {
        type: 'continuous',
        dimension: 1,
        text: ['Text-A', 'Text-B'],
        inverse: true,
        itemHeight: 200,
        calculable: true,
        min: -2,
        max: 6,
        top: 60,
        left: 10,
        inRange: {
            colorLightness: [0.4, 0.8]
        },
        outOfRange: {
            color: '#bbb'
        },
        controller: {
            inRange: {
                color: '#2f4554'
            }
        }
    },
    series: [
        {
            name: 'Demo-A',
            type: 'bar',
            stack: 'stackOne',
            itemStyle: itemStyle,
            data: data1
        },
        {
            name: 'Demo-B',
            type: 'bar',
            stack: 'stackOne',
            itemStyle: itemStyle,
            data: data2
        },
        {
            name: 'Demo-C',
            type: 'bar',
            stack: 'stackTwo',
            itemStyle: itemStyle,
            data: data3
        },
        {
            name: 'Demo-D',
            type: 'bar',
            stack: 'stackTwo',
            itemStyle: itemStyle,
            data: data4
        }
    ]
};
myChart.on('brushSelected', renderBrushed);
function renderBrushed(params) {
    var brushed = [];
    var brushComponent = params.batch[0];
    for (var sIdx = 0; sIdx < brushComponent.selected.length; sIdx++) {
        var rawIndices = brushComponent.selected[sIdx].dataIndex;
        brushed.push('[Series ' + sIdx + '] ' + rawIndices.join(', '));
    }
    myChart.setOption({
        title: {
            backgroundColor: '#333',
            text: 'SELECTED DATA INDICES: \n' + brushed.join('\n'),
            bottom: 0,
            right: 0,
            width: 100,
            textStyle: {
                fontSize: 12,
                color: '#fff'
            }
        }
    });
}
最终效果
系列课程
如果您喜欢我的教程,可以在我的个人档案页面,获取更多信息。
If you like my tutorial , You can check out your profile for more such tutorials.
您可以使用zqz-tutorial标签快速查看我发布的所有教程
You can use the "zqz-tutorial" tag to see all the tutorials I've posted.
Posted on Utopian.io - Rewarding Open Source Contributors
Thank you for the contribution. It has been approved.
You can contact us on Discord.
[utopian-moderator]
Thank you very much~
Today I will start sharing the new tutorial "G2".
This is an open source product developed by Alibaba.
https://github.com/antvis/g2/
Hope to be able to help everyone.
Looking forward to your review.
Copied from https://ecomfe.github.io/echarts-examples/public/editor.html?c=bar-brush
You can contact us on Discord.
[utopian-moderator]
Hey @hui.zhao I am @utopian-io. I have just upvoted you!
Achievements
Suggestions
Get Noticed!
Community-Driven Witness!
I am the first and only Steem Community-Driven Witness. Participate on Discord. Lets GROW TOGETHER!
Up-vote this comment to grow my power and help Open Source contributions like this one. Want to chat? Join me on Discord https://discord.gg/Pc8HG9x