Tutorial - How to add borders to your images with GIMP? - Club5050

Hello, Steemit friends, today I come to show you how you can add borders to your images, how to remove the background and keep our png, and many more things, using the Gimp app. To make it easy for everyone to learn, I have made a simple-to-follow step by step so that anyone can practice it at home. I hope you can join me and enjoy my content of the day.
GIMP (GNU Image Manipulation Program) is a free and open source program for editing digital images in bitmap form, both drawings and photographs. It is part of the GNU project and is available under the GNU General Public License and GNU Lesser General Public License. It is also known for being perhaps the first great free application for non-professional or expert users Wikipedia, GIMP
ADD BORDERS TO YOUR IMAGES WITH GIMP
(STEP BY STEP)
Before starting this tutorial, you should go to download this application from its Web Site: https://www.gimp.org.
-- STEP 1--
In this first step, you will learn from opening the application to opening the image you want to edit and getting it ready to start.
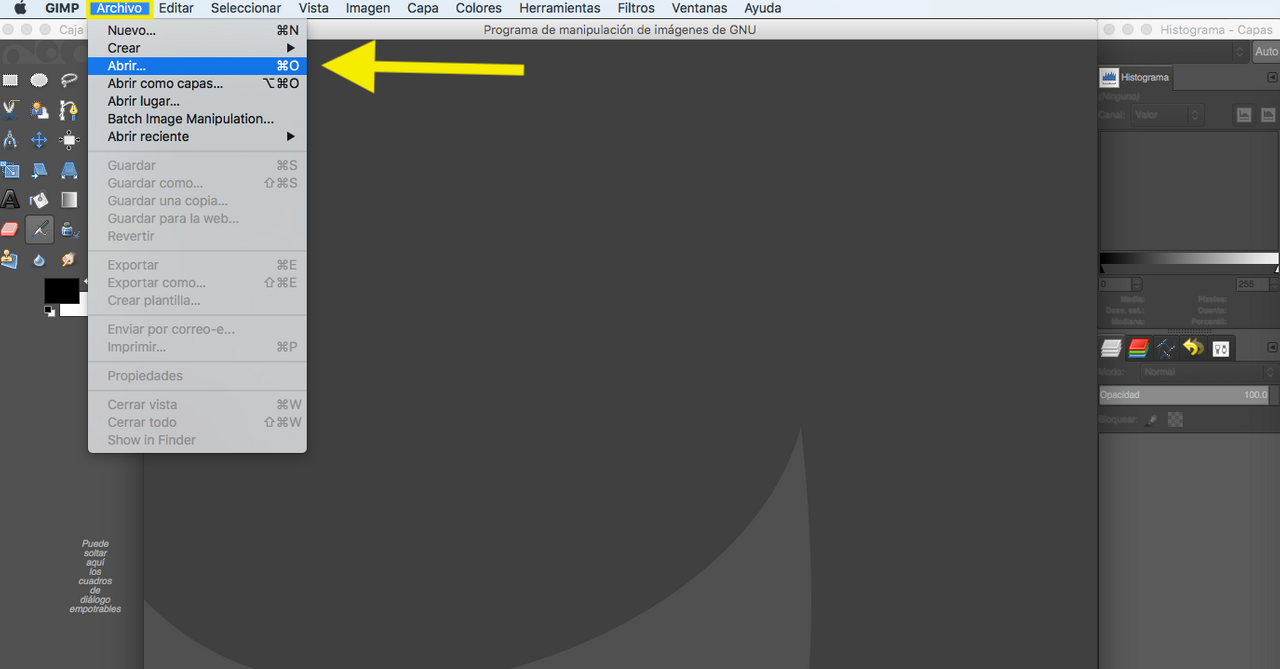
1.1. Open the GIMP application

1.2. Select the image you want to edit

-- Step 2 --
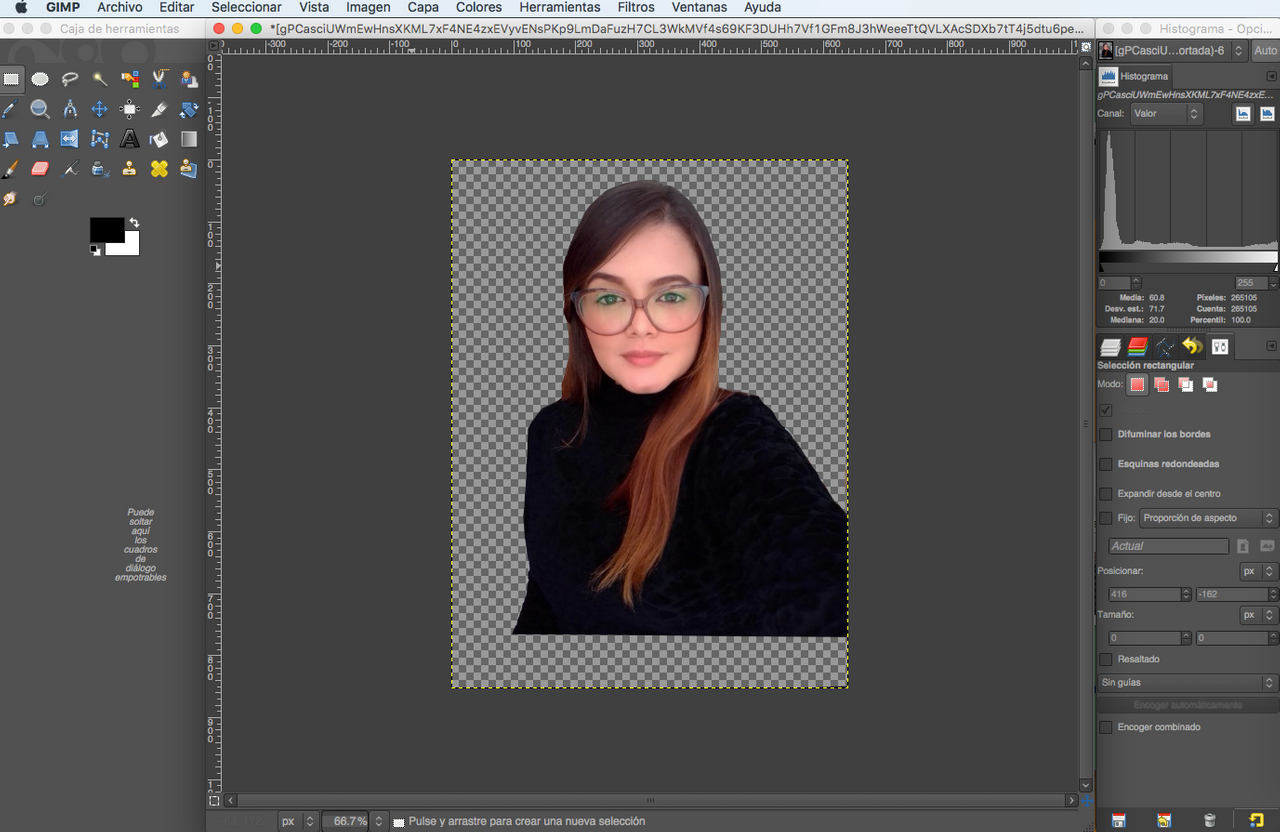
In this second step, you will learn how to extract or remove the background using the simple selection tool. You must border the part you want to extract or remove. When you have outlined the part of the image you want to extract or remove, you must "add the alpha channel" in the layers section, so that the background can be transparent, and you can use this image as a png. Then just hit clean or (ctrl + x) to cut that part (the background).
2.1. Select the area you want to extract or remove "example"

2.2. Add the alpha channel to have a transparent background

2.3. Clean or cut the selected area
-- Step 3 --
In this third step you will learn how to make a duplicate layer, that is, create a layer or copy of the same image, so you can work on it. The idea is to create what would be the border on layer 1 and then merge both layers.
3.1. Go to the Layers section

3.2. Right click and select "Duplicate Layers"


-- Step 4 --
In this fourth step, you will learn how to create what will be the border on layer #1. It's simple, just enlarge the image of the first layer and then paint it with the color you want the border to be. You must also remove the eye or unside layer #2 so that only the changes we will make in layer #1 will show.
4.1. Select the image to be enlarged (layer #1)

4.2. Right click, select, and zoom

4.3. Type how many pixels you want to enlarge the image (10 px)


-- Step 5 --
This is the last series of steps to finish adding the border to the image. In this step, you will learn how to color the border and make it look the way you want it to look. Just paint the entire image on layer #1 where the larger image is and then merge the layers to get the desired result.
5.1. Select the paint can and the desired color

5.2. Paint the whole image, including the enlarged area (L #1)

5.3. Merge the layers to get the bordered image

As you can see it is a very easy procedure, it is all a matter of practice. Once you have colored layer #1 you can change the color to the one you like for the border. If you want to add more border like a rainbow, just repeat the procedure of enlarging and painting (again and again), and then arrange the layers. Then just extract as".png" to be able to use this image inside any other image.


Thank you very much for coming and joining me in this new publication, I hope it has been useful, enjoyable, and that you get the best out of everything. Tambien, espero que puedan conocerme un poco mas, y que me inviten a formar parte de sus grupos de amigos y comunidades.
Greetings and may God bless you always🙏 BYE

cc - @milakz @lhorgic @zmoreno @daytona475
Translated with www.DeepL.com/Translator (free version)
Me encantó, gracias por compartir esa educativa información para embellecer nuestras publicaciones.
Que buen tutorial, se necesita asesoria para desarrollar nuevas aplicaciones.
Excelente post amiga,se ve muy buena la aplicación. Muchas gracias por compartirla con nosotros y por la explicación. Saludos!!!
Agradecida por la visita. Espero que este artículo sea de utilidad y lo puedas compartir con los demás.
Gracias por esta clase. 🖐😊
Agradecida por la visita.
Hola Gene! Esta muy cool este tutorial, me encanto, la portada esta bieeen pro, obvio, en comparación con otras. XD Lo estás haciendo muy bien, sigue asi, construyendo tu propio camino en esta maravillosa red social.
Agradecida por tus palabras, amiga. Con el favor de dios sera asi.
thanks for this interesting tutorial, please join our curation trail or/and delegate to us in order to get a constant support from our community
Hi I am planning to delegate, I only have 50 SP free, I can delegate you 25 now, but I wanted to start with 50, in a week or so I can delegate it.
About the trail, I have already given the authorization to digital.mine, and I have left it in a comment.
%2009.59.20.png)
Buena explicación, me encantaría saber como hacer una imagen gif con este programa.
Agradecida por la visita. Espero que este artículo sea de utilidad y lo puedas compartir con los demás. ¿Los gifs? Una muy buena idea para otra clase...
Que buena información y gracias por compartirla.
Agradecida por la visita. Espero que este artículo sea de utilidad y lo puedas compartir con los demás.
Gracias 🤗 y así lo haré.