Demonstrating how to create a droplet from a snapshot on DigitalOcean
Greeting Steemit Family
Today, I decided to share a section of what I do. It's going to be a particular task I carried out some days ago. It might be of help to some other person in my domain. I will try to be simple, because I know explaining some things might be difficult to understand.
Some days ago, I mentioned in a diary game that our client's servers were being compromised. Two clients, all caused by one person. I will not go into the depth of all but will call on us to apply some level of security when working online. I will be showing us the steps of creating a droplet from a snapshot.
Snapshot is all about creating an image of an existing state. When working on Servers, you need to be familiar with such terminology. So, in this post, I will be taking us on a step-by-step creation of a droplet from the snapshot.
My demonstration is from the DigitalOcean dashboard. Digital Ocean is an American cloud service company that offers simple virtual machines that you can prepare for web hosting. It is what we have been using for our clients. The whole concept is not different from other cloud services.
From the dashboard, you have the list of droplets in your project. For better understanding, the project is the same as the account. The reason for this post is to demonstrate how to create a droplet from a snapshot.
There are two options to take a snapshot. Turn off the droplet and take the snapshot, or take the snapshot while the droplet is running. While both options are possible, it is recommended to turn off the droplet first.
Turning off the droplet will help you take a better snapshot without losing any data. Taking a snapshot when the droplet is running, there will be a high probability of losing data.
Before taking the snapshot, You need to select the droplet. you have the toggle on the top right hand of your screen. Could you turn it off, by clicking on it? Name your snapshot and click snapshot.
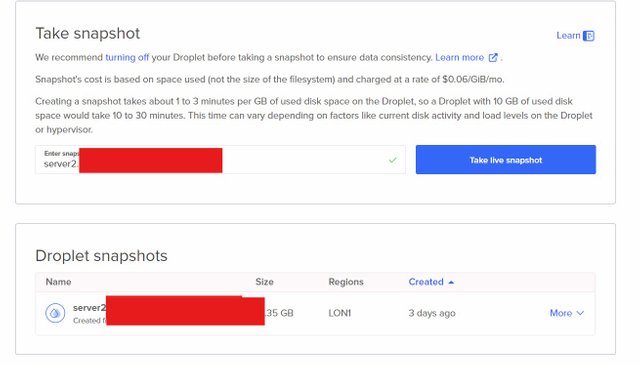
It takes about 3 minutes, depending on your internet speed. As the snapshot is complete, it will be listed below as seen in the image above. I’m working on server2 and will name it server2. It is okay to give the same name to more than one droplet because their unique identifier is their IP and not names.
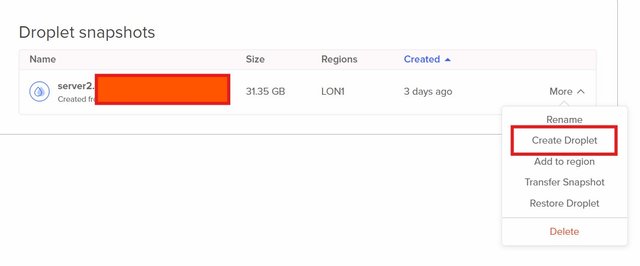
Our snapshot is created and ready for us to create a new droplet. At the right end, you had the dropdown (More). Click more and select Create a Droplet, as illustrated below.
This is a shortcut, as we also create a droplet from the create button at the top of the dashboard. As will follow, I will mention while I said the option on the image is a shortcut.

Create a droplet page load, and we start with the region. As we can see our region is already selected. This is because we click the create droplet button from a snapshot. When creating a droplet from a snapshot, the region is respected. so if you want to create a droplet from a snapshot, the region must be the same as the original droplet.
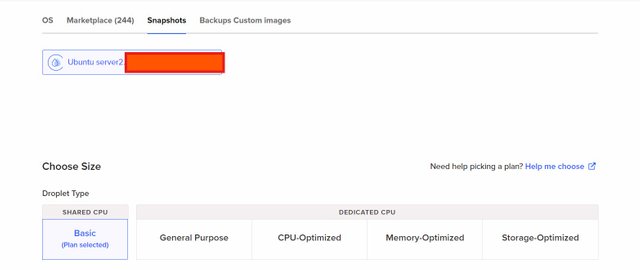
This is the reason I said, the option above is a shortcut. If I had used the second option, we would have had to look for the specific region of the original droplet to be able to find the snapshot. Since we used the shortcut, we have our region auto-selected and snapshot visible.
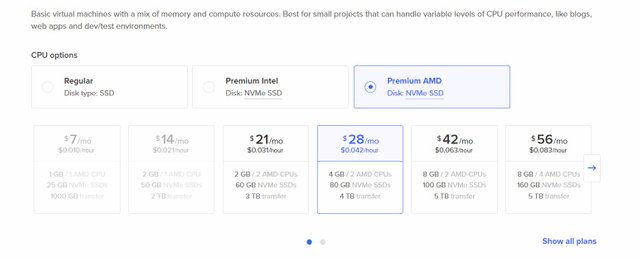
Next, the size of the droplet. It is recommended to select the same specification as the origin droplet, or a higher specification.
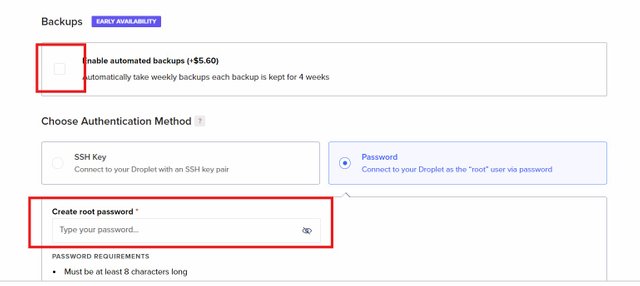
Next, it is encouraging to enable automated backups. It is an additional cost, but it is important when running cloud services. Select your method of authentication, that is how you will have access to your virtual machine. If you are familiar with Linux, you will prefer using a password like me.


Lastly, before clicking the Finally button. Check your server name and project name. That is to make sure you are creating the droplet on the right full account. Don't be too disturbed if you create the droplet on another project. There is an option to move droplets between projects, but attention is important.

From the image, you will notice two droplets all names starting with server2. They may have the same names, but you can see. They have different IPV4 addresses, which is their unique identifier.
At this point, I have successfully created a snapshot from droplet server2 with IPV4 ending 116. Created a droplet server2 with IPV4 ending 90 from the snapshot.
Thanks, I'm hoping we pick something and I promise we will be getting short tutorials on server management. I am open to questions and opinions.
Cheers
Thanks for dropping by
@fombae
Thank you, friend!


I'm @steem.history, who is steem witness.
Thank you for witnessvoting for me.
please click it!
(Go to https://steemit.com/~witnesses and type fbslo at the bottom of the page)
The weight is reduced because of the lack of Voting Power. If you vote for me as a witness, you can get my little vote.
Congratulations, your post has been successfully curated by Team 7 via @𝐢𝐫𝐚𝐰𝐚𝐧𝐝𝐞𝐝𝐲