[DreamChain DApp] #23 Story Details 페이지 구현 2
이전글에 이어서 story_details 페이지를 구현해 봅니다.
이전글 - [DreamChain DApp] #22 Story Details 페이지 구현 1
본 내용은 Ethereum and Solidity: The Complete Developer's Guide을 참고해서 작성되었습니다.
이번에는 아래 그림과 같이 버튼을 만들고, 버튼이 눌렸을 때 트랜잭션 처리 및 페이지 이동을 해보겠습니다.
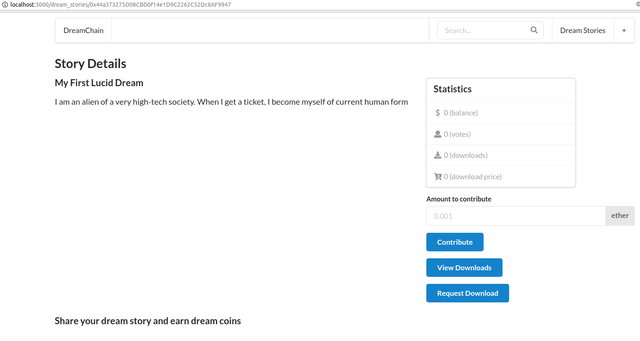
버튼 컴포넌트 추가
먼저 버튼 먼저 만들어야 겠죠? 버튼 만드는거야 매우 간단한데, 버튼 눌렀을 때 이벤트 처리하는 것이 좀 복잡합니다. 그런데 이 작업은 new_story 페이지 만들 때 해봤었습니다. 그렇죠? 그래서 다 하실 수 있습니다!
우선 버튼 컴포넌트를 화면에 표시하기 위해 아래와 같이 별도의 함수 'renderActionButtons`를 만듭니다. Contribute 버튼뿐만 아니라, View Download, Request Download 버튼도 같이 만듭니다. 그런데 이벤트 핸들링 하는 부분과 에러 상태를 체크하는 부분, 트랜잭션이 진행 중이면 버튼이 스피닝하는 것 등이 이미 들어가 있습니다. 이 내용들은 이미 앞에서 다뤄 본 내용이라 설명없이 추가했습니다.
  renderActionButtons() {
    return (
      <Form onSubmit={this.onContribute} error={!!this.state.error_msg}>
        <Form.Field>
          <label>Amount to contribute</label>
          <Input
            label="ether"
            labelPosition="right"
            placeholder='0.001'
            value={ this.state.contribute_price }
            onChange={ event => this.setState( { contribute_price: event.target.value } ) }
          />
        </Form.Field>
        <Message error header="Failed!" content={ this.state.error_msg } />
        <Button loading={this.state.loading} primary>Contribute</Button>
        <p></p>
        <Link route={`/dream_stories/${this.props.address}/downloads_list`}>
          <a>
            <Button primary>View Downloads</Button>
          </a>
        </Link>
        <p></p>
        <Link route={`/dream_stories/${this.props.address}/request_download`}>
          <a>
            <Button primary>Request Download</Button>
          </a>
        </Link>
      </Form>
    );
  }
라우트 맵핑 추가
한가지 눈여겨 볼 것은 Link 태그입니다.
<Link route={/dream_stories/${this.props.address}/downloads_list}><Link route={/dream_stories/${this.props.address}/request_download}>
getInitialProps에서 저장한 address를 이용하여 새롭운 페이지들에 접속하는 라우트입니다. 그러나 지금 이를 나타내기 위한 페이지가 없습니다. 따라서 먼저 이 두 페이지를 다음과 같이 간단히 만듭니다. 아래 코드는 downloads_list.js 파일입니다. 위치는 pages/dream_stories 밑입니다.
import React, {Component } from 'react';
import Layout from '../../components/layout';

class DownloadsList extends Component {
  render() {
    return (
      <Layout>
        <h3>Downloads List</h3>
      </Layout>
    );
  }
}

export default DownloadsList;
request_download.js 파일도 이와 유사하게 만들얼 줍니다. 여기서는 별도로 표현하지 않겠습니다. 이 두 파일은 나중에 추가적으로 구현되어야 하는 부분입니다.
페이지를 만들었다고 끝이 아닙니다. 위 페에지들은 동적 라우팅을 사용하고 있습니다. 왜냐하면 url에 컨트랙트 주소가 들어가기 때문입니다. 동적 라우팅을 어디서 관리한다구요? 이전에 만들었던 routes.js 파일에서 합니다! 네 그곳을 수정해 줘야 비로소 링크가 동작할 것입니다.
routes
  .add( '/dream_stories/new_story', '/dream_stories/new_story' )
  .add( '/dream_stories/:address', '/dream_stories/story_details' )
  .add( '/dream_stories/:address/downloads_list', '/dream_stories/downloads_list')
  .add( '/dream_stories/:address/request_download', '/dream_stories/request_download');
위 routes.js 코드를 보면 하단에 2개의 라우트 맵핑이 추가되었습니다.
"renderActionButtons" 함수를 만들기는 했는데, 호출은 하지 않았습니다. 호출은 아래와 같은 위치로 해줍니다.
(생략)
              </Card.Content>
            </Card>
            { this.renderActionButtons() }
          </Grid.Column>
        </Grid>
      </Layout>
(생략)
페이지 이동은 테스트 하지 않겠습니다. 잘 이동할 것입니다.
버튼 이벤트 핸들러
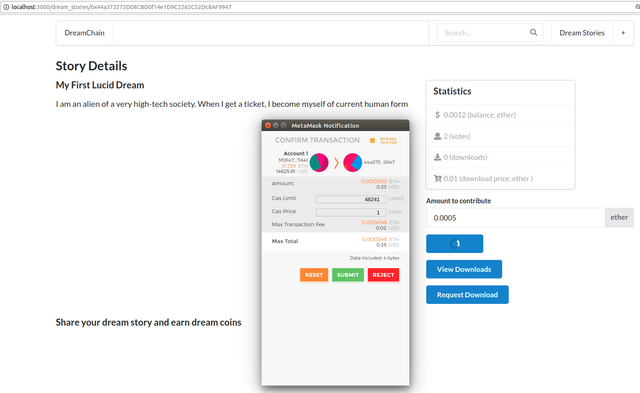
남은 건 "Contribute" 버튼을 눌렀을 때 트랜잭션을 생성하고, 처리하는 내용 뿐입니다. 이것도 앞에서 다뤄봤기 때문에 어렵지 않습니다. 먼저 코드부터 보시죠.
  // event handler for contribute button
  onContribute = async () => {
    // block default submitting the form
    event.preventDefault();
    // set button loading and clear error message
    this.setState({ loading: true, error_msg: '' });
    // catch any error while executing the following
    try {
      // get all accounts of a user and use the accounts[0] to contribute
      const accounts= await web3.eth.getAccounts();
      // get the DreamStory instance of the address
      const story= dream_story( this.props.address );
      // convert contribute price to wei
      const contribute_price_wei= web3.utils.toWei( this.state.contribute_price, 'ether' );
      // call contribute function using the user's first account
      // use metamask's functinality to estimate the gas limit
      await story.methods.contribute()
      .send({
        from: accounts[0],
        value: contribute_price_wei
      });
      // refresh the current page, so the getInitialProps re-runs
      Router.replaceRoute(`/dream_stories/${this.props.address}`);
    } catch (error) {
      this.setState( { error_msg: error.message } );
    }
    // clear loading
    this.setState({ loading: false });
  };
중요 부분은 다음과 같습니다.
const story= dream_story( this.props.address );를 통해서 컨트랙트의 인스턴스를 얻음await story.methods.contribute().send({ from: accounts[0], value: min_down_price_wei });를 이용하여 contribute 실행. 이 때, contribution 금액을 value에 넣어서 트랜잭션 보냄. 여기서 주의할 점은 accounts[0]은 브라우저에 접속한 유저의 첫번째 계정임. DreamFactory 계정이 아님.- 트랜잭션이 완료될 때까지 버튼은 대기 상태를 의미하도록 스피닝 함.
- 트랜잭션이 종료되면 페이지를 새로고침
라우트를 이용한 페이지 새로고침
다른 부분은 이미 다뤄서 대충 알겠는데, 마지막 부분은 설명이 필요해 보입니다. "Contribute" 버튼을 눌러서 트랜잭션이 완료되면(마이닝 되면), 페이지가 자동으로 새로고침되어 컨트랙트의 내용들이 업데이트 되면 좋습니다. 바로 이를 위한 코드가 Router.replaceRoute(/dream_stories/${this.props.address});입니다.
이것의 동작원리는 현재의 url을 함수의 인자로 바꾸는 것입니다. 즉 페이지를 다른 것으로 바꾸는 함수인데, 자기 자신으로 바꾸면 새로고침이 되는 원리입니다.
페이지가 새로고침이 되면 어떻게 컨트랙트의 내용들이 바뀌는 것일까요? 페이지가 새로고침 되기 전에 getInitialProps 함수가 호출되기 때문입니다. 그래서 페이지의 컴포넌트들은 컨트랙트의 최신값으로 업데이트 되어 있는 상태가 됩니다.
이렇게 코딩하고 나면 Contribute 버튼이 잘 동작도 하고, 트랜잭션이 완료되면, 컨트랙트 정보도 자동으로 업데이트 됩니다.
Contribute 테스트 하다 보니, contribute 함수는 이미 contribute 한 사용자가 또 눌러도 에러 없이 동작하게 되어 있는 걸 알아챘습니다. 뭐 contribution은 한번만 하는 것보다 여러 번 하는게 좋을 수도 있으니 그냥 놔두겠습니다. 허나 동일한 사용자가 contribution을 여러 번 하면 votes_count는 증가하는 문제가 있습니다. 이것은 손을 봐야 겠네요. 그러나 지금 컨트랙트를 재배포 하지는 않겠습니다. 나중에 다 정리되면 그 때 재배포 하려고 합니다. 컨트랙트의 contribute 함수 수정은 이렇게 하면 됩니다.
    function contribute() public payable {
        // check if the money is greater than zero
        require( msg.value > 0 );
        // increase the vote counts only if the sender is in the contributor list
        if( !contributors[msg.sender] )
        {
           votes_count++;
           // set contributor address to true
           contributors[ msg.sender ]= true;
        }
    }
사용자가 이미 contributor라면 votes_count는 증가하지 않고, contribution을 처음할 때만 증가하도록 했습니다.
이것으로 story_details 페이지 구현이 완료되었습니다. 몇가지 부족한 부분이 있지만 그럭저럭 괜찮은 페이지가 만들어 졌습니다. 신기한 건 웹지식이 많지 않아도 이렇게 예쁜 페이지를 만들 수 있다는 것입니다.
오늘의 실습: 웹지식이 많지도 않은 사람들을 위해 누가 이렇게 고생해서 예쁜 라이브러리, 툴들을 만든 것일까요?