Let's Talk About Headers - Tutorial for Beginners
Writing GIF from Dribbble
I have already discussed about headers in my previous blog post: Markdown Tutorials for Steemit Beginners. This is what I've discussed there:
There are 6 header sizes, numbered from 1 to 6 where 1 is the largest:
# You can <h1>
## Just Add <h2>
### Your Chosen <h3>
#### Words For <h4>
##### Your Header <h5>
###### Like this <h6>
Make sure there's a space after the # (hashes) and before the <h+#> (closing header tag).
If you want to make the header centered just do this:
# <center> Your header goes here! </center> <h1>
Again, make sure the spacing is proper because if not it will mess up your code.
For today's blog, we will take it up a notch. Instead of plain text headers with different sizes only, I'm gonna teach you how you can use fancier headers the easy way.

The above header is a sample of a header I made using this method I'm talking about. It's actually very simple and can be done in a few easy steps.

Head over to a font website. I suggest use 1001Fonts.


Choose from the font characteristics and highlight the ones that you need. Then, enter the desired header text on the text box.
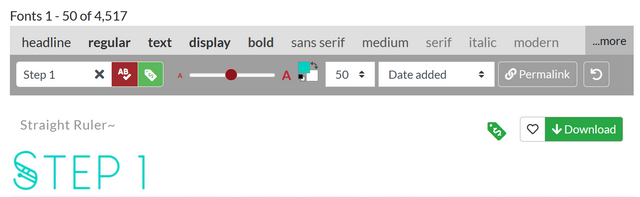
I suggest highlight the price tag button so you will only use the ones free for commercial use. You can also change the size of your header here, as well as the font and the background colors.

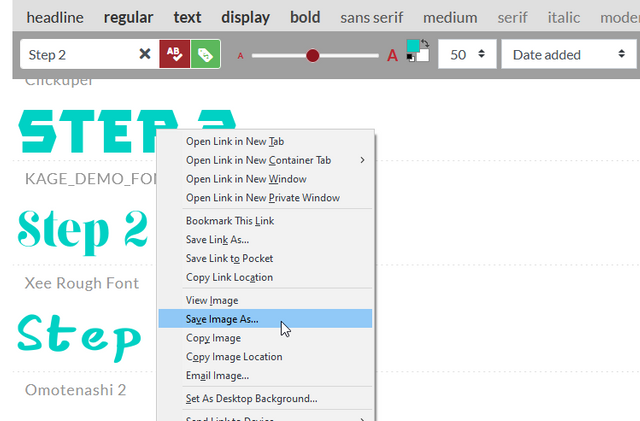
Once you found a font you like, simply right click on the text then click on Save Image or Save Image As.

After saving the image, just head over to your Post Submission screen on Steemit then upload the image that you saved.
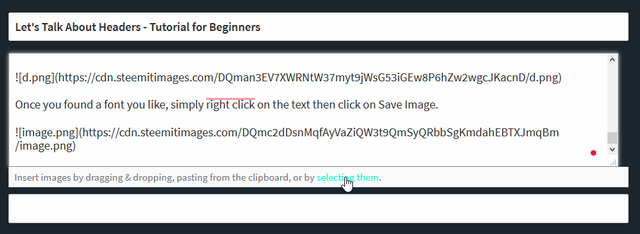

Lastly, format your header properly if needed. Like putting in centered by using the center markdown:  . You can also try different colors as mentioned before like on this "Step 5" header. You can also add a hyperlink to the header if needed using the markdown:
  .
.
Markdown Headers are Good


I hope that you learned something from this blog. Most articles are very plain or can be too cluttered when they use headers that are too fancy. This easy way of making simple but effective headers can really make your blog posts stand out.
If ever you followed this tutorial on how to make headers, tag me on it, so I can see how good you've done!
I myself will be using this way to design my blog post's headers moving forward because I think it adds a lot to the article.

This is my second tutorial contribution to the Steemit Philippines Community. Thanks, @steemitphcurator, @steemcurator01, @steemcurator02, @steemcurator08.
Sobrang ang laking tulong po nito. Salamat sa iyong suporta.😇
Walang anuman sir!
Was looking for some tutorial on this a while ago..will definitely take note on this...thank you for sharing
You're welcome! Hope it helps!
It's very valuable @deveerie. Very helpful. Thanks!
Thanks and you're welcome!
Thanks for sharing this Kuya!
this tutorial looks great and easy to understand
Thanks dude!
maraming salamat po nito.
walang anuman!
Thanks for sharing Dev this is very helpful especially for the newbies.
You're welcome Gini!