Using EntityFramework Code First to Create Database in Asp.net
What Will I Learn?
Using SQL in Microsoft SQL server to create database for your app can be challenging for people who don't have full grasp of SQL . Thanks to EntityFramework, with a little knowledge of C# you can create databases for your apps directly from your C# classes. In this tutorial you will learn the following;
- You will learn how to write model classes for your code first project which create tables in your data base.
- You will learn how to assign navigation properties to create relationships between data tables.
- You will learn how to set properties for your table using a configuration class.
- You will learn how to implement your model classes in database using EntityFramework migrations.
Requirements
You will need the following for this tutorial
- Visual Studio 2013 and above
- Microsoft SQL Server 2012 and above
- EntityFramework nuget package
Difficulty
- Intermediate
Tutorial Contents
For the sake of this tutorial, we will be building a simple BookApp using C# class library project.
Step 1 : Creating the class library project
- Create a C# class library project in Visual studio with the name BookApp
- Using Nuget package, search and install the latest version of EntityFramework to your class libray project by right clicking on the project, navigate to nuget package manager then select it, do a search on the browse tab of the nuget manager for EntityFramwork, follow the prompts to install and you are all set.
Step 2 : Creation of Model Classes
Our app will be made up of two tables, a book category table and a book table. A book category table can contain one or many books which means we need to have a one to many relationship between book category and book. So create a Book Category class as shown below.
BookCategory Class
 public class BookCategory
        {
            public BookCategory()
            {
                Books = new List<Book>();
            }
            public int ID { get; set; }
            public string CategoryName { get; set; }

            public virtual ICollection<Book> Books { get; set; }
        }
The last line which is a navigation property creates a one to many relationship with book and the BookCategory constructor is used to initialize a new list of books in this relationship. Up next we create our book class.
Book Class
 public class Book
    {
        public int ID { get; set; }
        public string BookName { get; set; }
        public string Author { get; set; }
        public DateTime DatePublished { get; set; }

        public int BookCategoryId { get; set; }
        public virtual BookCategory BookCategory { get; set; }
    }
Last two lines represent a navigation property which shows that BookCategory has a foriegn key BookCategoryId with required BookCategory in the Book table.
Step 3 : Creating the Configuration Class
In this class, we will be setting properties of our classes(tables) such as, maxlegnth, nullability, navigational properties etc. Create the following classes.
N/B This can be done using data annotations in the model classes, but I prefer configuration classes since they help keep projects neat and tidy.
BookCategoryConfiguration Class
public class BookCategoryConfiguration : EntityTypeConfiguration<BookCategory>
    {
        public BookCategoryConfiguration()
        {
            Property(g => g.CategoryName).IsRequired().HasMaxLength(50);
            Property(g => g.ID).IsRequired();

            HasMany(a => a.Books)
         .WithRequired(r => r.BookCategory)
         .HasForeignKey(r => r.BookCategoryId);
        }
    }
BookConfiguration Class
 public class BookConfiguration : EntityTypeConfiguration<Book>
    {
        public BookConfiguration()
        {
            Property(g => g.BookName).IsRequired().HasMaxLength(50);
            Property(g => g.BookCategoryId).IsRequired();
            Property(g => g.Author).IsRequired().HasMaxLength(50);
            Property(g => g.DatePublished).IsRequired();
            Property(g => g.ID).IsRequired();
        }
    }
Those configurations will affect how the database tables will be created.
Step 4 : Creating our contex class
This class is responsible for accessing data from the data base and will inherit from DbContext. So create a class as shown below.
BookShelfContext Class
public class BookShelfContext : DbContext
    {
        public BookShelfContext()
            : base("BookShelf")
        {
            Database.SetInitializer<BookShelfContext>(null);
        }

        #region Entity Sets
        public IDbSet<Book> Books { get; set; }
        public IDbSet<BookCategory> BookCategory { get; set; }
        #endregion

        public virtual void Commit()
        {
            base.SaveChanges();
        }

        protected override void OnModelCreating(DbModelBuilder modelBuilder)
        {
            modelBuilder.Conventions.Remove<PluralizingTableNameConvention>();

            modelBuilder.Configurations.Add(new BookConfiguration());
            modelBuilder.Configurations.Add(new BookCategoryConfiguration());

        }
    }
Step 5 : EntityFramwork Migration
Here we will be migrating our model classes to create a data base containing our tables. The first thing to do is, head over to your Microsoft SQL server and create an empty database called BookShelf as shown in our context class base(they must match). After which you launch nuget package manager console and type the following commands. Ensure that the target project is our BookApp class library project.
enable-migrations
add-migration InitialBookApp
N/B "InitialbookApp" simply represents the name of the migration created and can be any name.
- update-database
After this, your database will be created. You can head over to your sql server to see your database has been created and confirm if its exactly what you need for your project which should be if you followed all the steps outlined.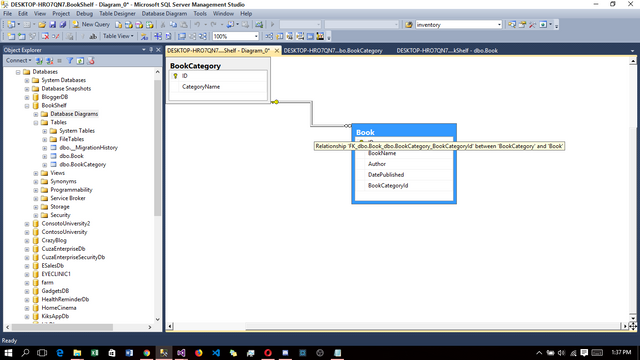
screenshot showing database design, table and relationship created
Thanks for reading and questions are welcome in the comment section. Want to know more about EntitiyFramework, please visit http://www.entityframeworktutorial.net.
Posted on Utopian.io - Rewarding Open Source Contributors
Congratulations, you were selected for a random upvote! Follow @resteemy and upvote this post to increase your chance of being upvoted again!
Read more about @resteemy here.
Congratulations @davidekpin! You have completed some achievement on Steemit and have been rewarded with new badge(s) :
Click on any badge to view your own Board of Honor on SteemitBoard.
To support your work, I also upvoted your post!
For more information about SteemitBoard, click here
If you no longer want to receive notifications, reply to this comment with the word
STOPThank you for the contribution. It has been approved.
You can contact us on Discord.
[utopian-moderator]
Hey @davidekpin I am @utopian-io. I have just upvoted you!
Achievements
Suggestions
Get Noticed!
Community-Driven Witness!
I am the first and only Steem Community-Driven Witness. Participate on Discord. Lets GROW TOGETHER!
Up-vote this comment to grow my power and help Open Source contributions like this one. Want to chat? Join me on Discord https://discord.gg/Pc8HG9x