#INK-TOBER - 24 - *.*TUTORIAL*.* - WORD: CRAFTS - TITLE: BUILDING A HEART /// PALABRA CLAVE: MANUALIDADES - TITULO: CONSTRUYENDO UN CORAZÓN
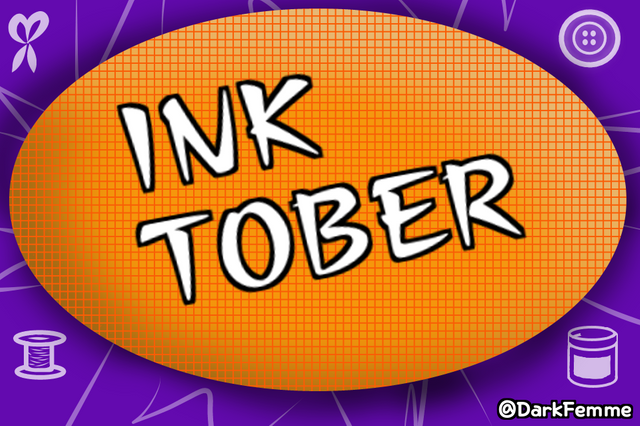
An interesting initiative as a way to get out of the comfort of drawing what we want. This is day 24 of 30 and this is my participation.
Una iniciativa interesante como un modo de salir de la comodidad de dibujar lo que nos apetece. Este es el día 24 de 30 y he aquí mi participación.

This topic for me is very personal, part of my life I have dedicated to crafts, either by obligation when my daughter was sent some task or by pleasure when I start creating necklaces or a costume for my nieces. That is why I decided to make this heart with a little sewing and other repairs as if it were a collage of materials.
Este tema para mi es muy personal, parte de mi vida la he dedicado a las manualidades, ya sea por obligación cuando a mi hija le mandaban alguna tarea o por gusto cuando me pongo a crear collares o algún disfraz para mis sobrinas. Por ello decidí realizar este corazón con un poco de costura y otro tanto de reparaciones como si fuera un collage de materiales.
STEP 1: PRINCIPAL IMAGE /// PASO 1: IMAGEN PRINCIPAL
With Medibang, I started outlining the heart with the Ink brush, applying a unicolor background to the heart filling.
Con Medibang comencé realizando el delineado del corazón con el pincel Tinta, aplicando un fondo unicolor al relleno del corazón.
STEP 2: BACKGROUND WITH SQUARES AS CLOTH /// PASO 2: FONDO DE TELA A CUADROS
Using the same range of earth colors, I began to weave with the design adding in a certain order the lines in different shades with the same size of round brush and in a vertical and horizontal direction. Then I had to reduce the size of the brush to finish giving the effect with an orange color and apply a decrease in opacity to all layers. so that they seem intertwined.
Utilizando una misma gama de colores tierra, comencé a tejer con el diseño añadiendo con cierto orden las líneas en diferentes tonos con un mismo tamaño de pincel redondo y en sentido vertical y horizontal. Luego tuve que disminuir el tamaño del pincel para terminar de dar el efecto con un color naranja y aplicar a todas las capas una disminución de la opacidad. para que parecieran entrelazadas.
STEP 3: PRINCIPAL BACKGROUND /// PASO 3: FONDO PRINCIPAL

First I applied a purple unicolor background, placing a superimposed layer of fine lines with the Ink brush in a messy way in zigzag with white color, lowering the opacity so that it adapted a little to the background color.
I proceeded to make drawings in white that will symbolize a little implements used in sewing and painting because they went hand in hand with the theme.
Then I added an orange oval and applied both internal and external lights and shadows. I added with the red Grid brush, this so that the grid formed as a clipping layer on this oval.
Primero apliqué un fondo unicolor morado, colocando una capa superpuesta de líneas finas con el pincel Tinta de manera desordenada en zigzag con color blanco, bajando la opacidad para que se adaptara un poco al color del fondo.
Procedí a realizar dibujos en color blanco que simbolizarán un poco implementos usados en la costura y la pintura porque iban de la mano con el tema.
Luego añadí un ovalo naranja y le apliqué luces y sombras tanto internas como externas. Agregué con el pincel Grid en color rojo, esto para que se formara la cuadrícula como una capa de recorte sobre este óvalo.
STEP 4: ADITIONALS DETAILS /// PASO 4: DETALLES ADICIONALES
As in any design, the details are what make the difference, in this case I placed a needle on the unicolor bottom of the right half of the heart and simulated the seam on the edge with the black brush with the round brush , placing shadows and lights for dimensionality.
Another of the details that I added, was the adhesive band that is used in cases of simple wounds, pretending to have a staple on each end.
Como en todo diseño, los detalles son los que terminan de hacer la diferencia, en este caso coloqué una aguja en el fondo unicolor de la mitad derecha del corazón y simulé con el trazado con el pincel redondo la costura en el borde con el color negro, colocando sombras y luces para la dimensionalidad.
Otro de los detalles que añadí, fue la banda adhesiva que se utiliza en casos de heridas sencillas, simulando que tiene una grapa en cada extremo.
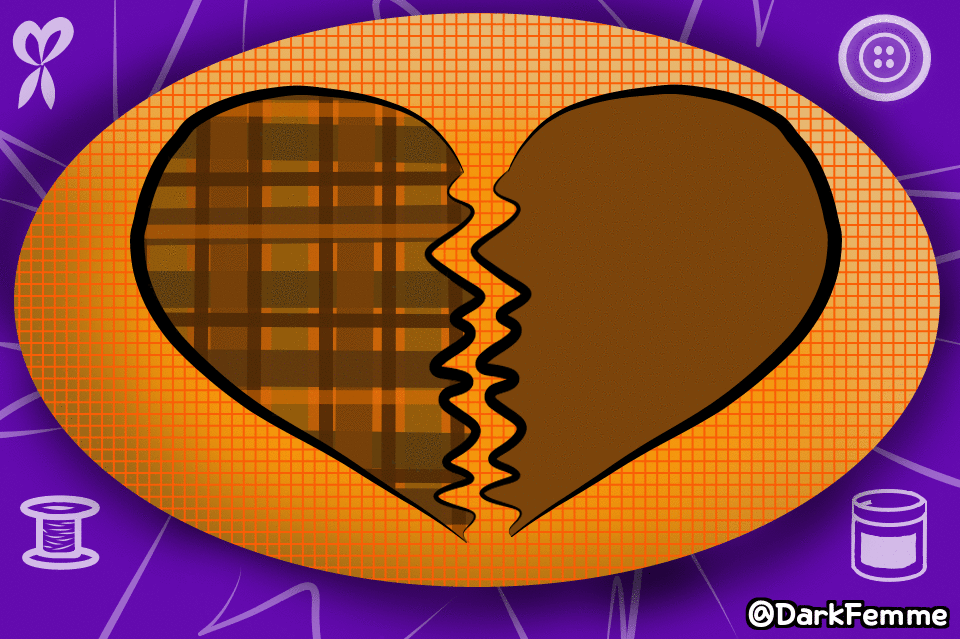
FINAL ART /// ARTE DEFINITIVO
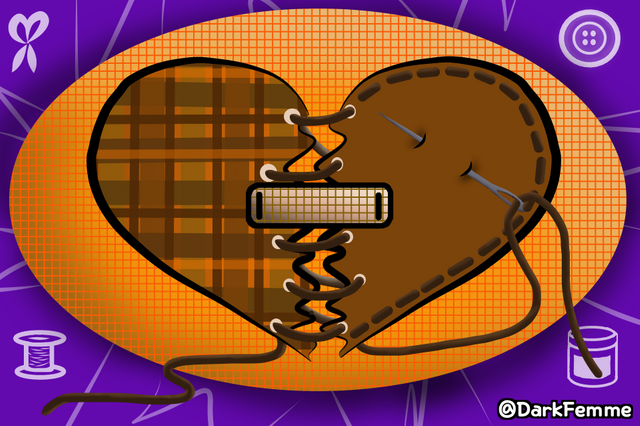
This is the design that I managed to make after combining all these steps, I hope you liked it too.
Este es el diseño que logré realizar luego de combinar todos estos pasos, espero que a ustedes también les haya gustado.
THANKS FOR YOUR TIME
GRACIAS POR VISUALIZAR ESTO

Twitter: https://twitter.com/FemmeDark
Instagram: https://www.instagram.com/dark.femme.box
Discord: DarkFemme#3243
Telegram: @DarkFemme
All sepharadors, Images and the sign are my owner.
Original Content posted in other networks with the same username.
You post has been manually curated by BDvoter Team! To know more about us please visit our website or join our Discord.
BDvoter Team
Oh, tks... is a honor your upvote...
I will visit your server in discord to see your project.
Publicación votalas al 20% de forma aleatoria, síguenos para recibir más votos aleatorios.
Posted using Partiko Android
Gracias por su voto...
Muy bien explicado, ya que se ve que es todo un proceso. pero detallaste muy bien la realización.
Cuando hago un tutorial intento esmerarme para que cualquiera pueda entenderlo, así que me alegra que pienses así.
Este post ha sido votado manualmente por Spanish-Tribe: "Temática Arte"
Gracias... me alegra que les haya gustado, haré todo lo posible por seguir haciendo un buen trabajo.
Este post ha sido votado manualmente por Spanish-Tribe: "Temática Arte"
Gracias por compartir tu contenido con la comunidad de El Arca (@elarca), el mismo ha sido votado por nuestra iniciativa de curación artística @stellae. Si deseas puedes delegar SP al proyecto: Delegate 25 SP Delegate 50 SP Delegate 100 SP Delegate 250SP Delegate 500SP o seguir nuestro trail de curación en Steem Auto. Recuerda usar los tags palnet y creativecoin para obtener mayores recompensas.
Gracias por su apoyo...
me gusto mucho, es una nueva forma de crear cosas, buen color
Bueno, cada color es psicológicamente adaptado según lo que se desee proyectar, es divertido ver cómo funcionan esas técnicas.
Gracias por comentar.
Have a nice day, @darkfemme.Your post was selected to win some extra TLNT tokens, powered by The Talent Club.That means you got talent!Enjoy it!Wow... so nice...
Tks for your support.