Use powershell to create a excel workbook
What Will I Learn?
Learn more about Excel.Application object
How to use powershell to create a excel workbook
Requirements
Windows or other system like linux,macos
Powershell

Coding IDE
.NET framework
Difficulty
- Intermediate
Tutorial Contents
Before contents:
If you do not know any about powershell ,you had better reading this post firstly as well as consulting more from the books
What is Excel.Application object
Application object is the highest level in the Excel object model, on behalf of Excel Application itself, also includes many parts of the workbook, including workbook, work table, cell collection and the data they contain.
The Application object contains:
- Application Settings
- Application options, many of the options are the same as the options in the options dialog box.
- Methods to return top-level objects, such as ActiveCell, ActiveSheet, and so on.
- So on
How hard is it to automate Excel?
It's actually quite simple, because Microsoft has created an automated model for dealing with Excel. The program ID is Excel.Application, which is a COM object. When you create an instance of the Excel.Application object, Excel starts and runs by default, but you can't see it. However, the visible property can be used to display the Excel.
Use powershell to create a excel workbook
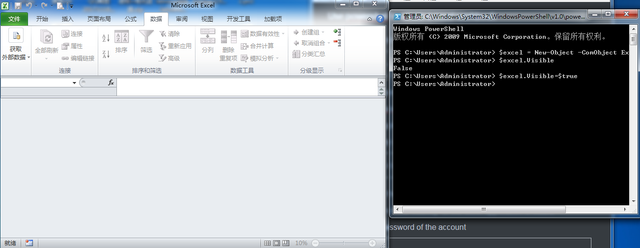
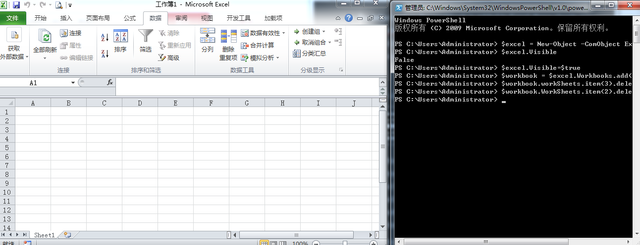
Create a COM object for the excel application.
$excel = New-Object -ComObject Excel.Application- New-Object:create a new object
- -ComObject: the type of new object is COM
- Excel.Application : the COM object name is Excel.Application
Show visibility of the Excel.Application
$excel.Visible = $TrueVisible : the new excel application view is not displayed by default
$True : set the visibility of the excel application is visible
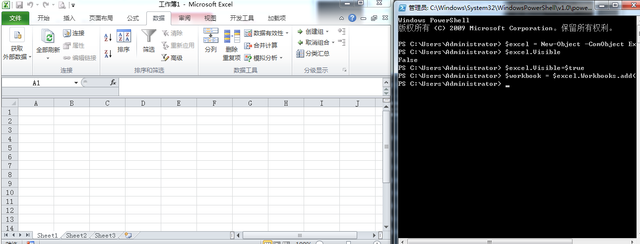
Create a workbook adding to excel application
$workbook = $excel.Workbooks.add()Workbooks.add() : create a workbook container
However, without creating a workbook this can not be used, but it should create workbook firstly , which is the container for the excel work. Now we need to add a workbook to the application. To do this, we need to add method of the workbook object. The workbook object is accessed from the main Excel.Application object. As you can see, we store the workbook object in a variable named $workbook:
Choose which sheet in the workbook we use
$sheet = $workbook.worksheets.Item(1)By default, when the workbook is added to Excel, three sheets are added (sheet1,sheet2,sheeet3). These spreadsheets can be identified by Numbers. In the code, connect the first sheet and store the returned spreadsheet object in a variable named $sheet

Delete other sheets which we will not use
$workbook.workSheets.item(3).delete()
$workbook.WorkSheets.item(2).delete()
One of the shortcomings of Excel is that the workbook will always create three spreadsheets, which is a bit wasteful, because I now only need the first sheet for this test. Fortunately, we can use the worksheet collection to connect to the third sheet and call the delete method. Perform the same operation to delete the second spreadsheet.
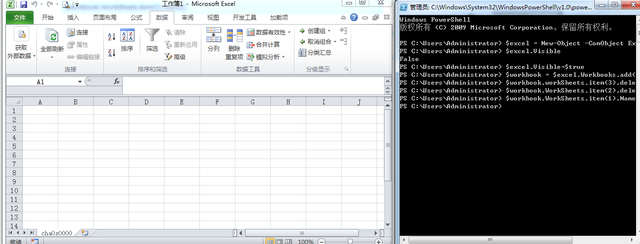
Rename the first sheet of the workbook
$workbook.WorkSheets.item(1).Name = "cha0s0000"After step 5,it leaves only sheet1, and then rename the remaining sheet. This is important because if you decide to use the ActiveX data object (ADO) to query the Excel sheet, you will use this sheet name in the connection string. Therefore, to make the code readable and intuitive, the sheet should have a logical name. To rename the spreadsheet, simply assign a value to the name attribute of the particular sheet. The code names the first sheet as "cha0s0000"
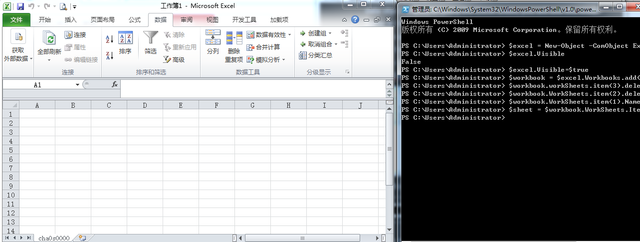
Connect to the sheet by using the name
$sheet = $workbook.WorkSheets.Item("cha0s0000")
Use the Item method of the worksheet object and specify the name of the sheet .
8.The whole program
$excelobject = New-Object -ComObject Excel.Application
$workbook = $excelobject.Workbooks.add()
$workbook.workSheets.item(3).delete()
$workbook.WorkSheets.item(2).delete()
$workbook.WorkSheets.item(1).Name = "cha0s000"
$excelobject.Visible = $true
Check the effect of the program
Posted on Utopian.io - Rewarding Open Source Contributors
@cha0s0000, Contribution to open source project, I like you and upvote.
Thank you for the contribution. It has been approved.
You can contact us on Discord.
[utopian-moderator]
Hey @cha0s0000 I am @utopian-io. I have just upvoted you!
Achievements
Suggestions
Get Noticed!
Community-Driven Witness!
I am the first and only Steem Community-Driven Witness. Participate on Discord. Lets GROW TOGETHER!
Up-vote this comment to grow my power and help Open Source contributions like this one. Want to chat? Join me on Discord https://discord.gg/Pc8HG9x