Django (RESTful API) plus ReactJS (with Redux) Tutorial: Authorization via Permissions / Django REST Swagger (Part 7)
Source: assertible.com
Our previous discussion was focused on implementing OAuth2.0 and thus providing security by authenticating the clients that want to use our API. Today, we will bring attention to the handling of authorization and restricting access to what verified users can and can't do by using Permission classes. Also, we will be introducing Swagger that would allow us to easily test our API and provide awesome documentation.
What Will I Learn?
At the end of this tutorial, you are going to be able to:
- Differentiate between authentication and authorization
- Apply authorization using Django Permission classes
- Install django rest swagger and test out API
Requirements
- Python (latest version)
- Pip (included in the Python installer)
- Any text editor or Integrated Development Environment (IDE) of your choice
- Advanced Rest Client (If not using Chrome, use any Rest Client available in your browser)
Difficulty
This tutorial is intermediate in level. You should already know how to code in python and what classes are and how it can be inherited. This tutorial assumes that you were following this tutorial from the very start. If you have not, check the curriculum below to go to the beginning of this lesson.
Tutorial Contents
What is authorization?
The process of granting or denying access to a network resource. Most computer security systems are based on a two-step process. The first stage is authentication, which ensures that a user is who he or she claims to be. The second stage is authorization, which allows the user access to various resources based on the user's identity.
Source: webopedia.com
Previously, we discussed about authentication wherein a web client sends credentials to the server and then receives an access token if the identity is verified or not. The next step in security is restricting access to those verified users. Lets use the previous example (from the previous lesson) of thinking about our application as an office or a school. Each individual in these institutions has a role to play and have their appropriate authority assigned to them. For example, an employee involved in production should never have access to human resource records. Or, a student should never be allowed to see the records of other students which teachers have access to. This is the same with our app. All users should have roles and should be restricted to what resources they have access to. An end user should not have access to the records of other users while admin users can have access to the records of end users and also their data. Bottomline, authorization defines what a user has access to.
How do I implement authorization to a django project?
Luckily, we don't have to do much (always remember the DRY princile). Since we are using Django rest framework, there are already built classes that we can use to apply the kind of authorization we want for our models.
Before we start coding, we need to define what models we want to apply these authorizations to and who can access it. Below is diagram of what we are planning to do.
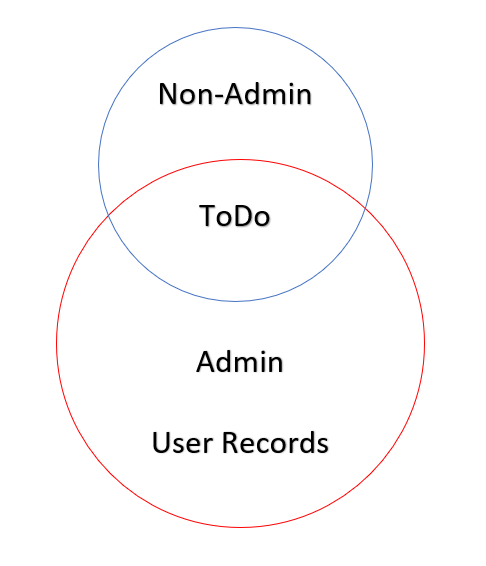
We shall need 2 types of users. A non-admin or the end user and the admin. In our scenario, the non-admin users are only allowed to operate on the ToDo model. The admin on the other hand is allowed to handle both. Now, we need to update our code.
Please note that we don't need to create a user model since Django already has an existing one.
First, we need to create a new API for the user records. First, we need to create a serializer class for the user model. Open serializers.py in the app folder and update the code to the one below.
from rest_framework import serializers
from app.models import ToDo
from django.contrib.auth.models import User

"""Serializer for ToDos"""
class ToDoSerializer(serializers.ModelSerializer):

  class Meta:
    model = ToDo
    fields = '__all__'


"""Serializer for Userr"""
class UserSerializer(serializers.ModelSerializer):

  class Meta:
    model = User
    fields = 'id', 'username', 'first_name', 'last_name'
Note that in the fields variable, we did not assign '__all__' since the user model has sensitive data that we do not want to expose to others (like password etc.). We only need the id, username, first name, and last name.
Next, open viewsets.py and update the code to the one below.
from rest_framework import viewsets
from app.serializers import ToDoSerializer, UserSerializer
from app.models import ToDo
from django.contrib.auth.models import User

class ToDoViewSet(viewsets.ModelViewSet):
    queryset = ToDo.objects.all()
    serializer_class = ToDoSerializer

class UserViewSet(viewsets.ModelViewSet):
    queryset = User.objects.all()
    serializer_class = UserSerializer
Just like last time, we create a viewset by assigning the queryset and serializer class. Lastly, register the viewset to a url. Open urls.py in the project folder (same directory as settings.py and update the code like the one below).
from django.conf.urls import url, include
from django.contrib import admin
from rest_framework import routers
from app import viewsets

router = routers.DefaultRouter()
router.register(r'to-do', viewsets.ToDoViewSet)
router.register(r'user', viewsets.UserViewSet)

urlpatterns = [
    url('admin/', admin.site.urls),
    url(r'^api/', include(router.urls)),
    url(r'^o/', include('oauth2_provider.urls', namespace='oauth2_provider')),
]
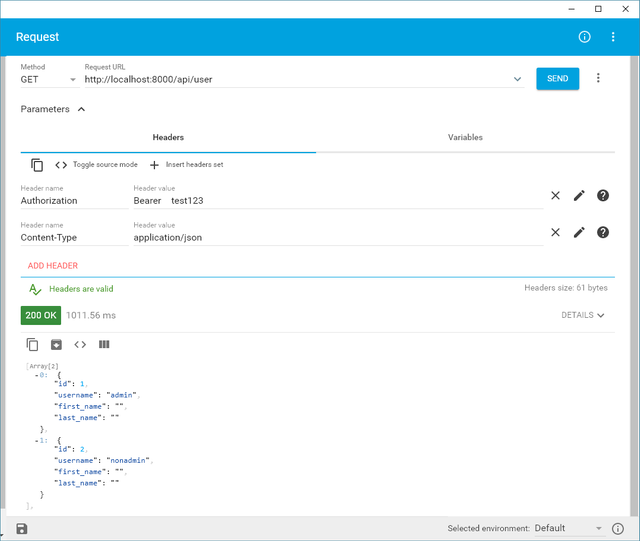
If all went well, you should successfully access the API via a Rest client like the one below. Test it out by sending a GET request. Please do update the access token that you will be attaching to the header. If the access token already expired, request it again using the instructions from the previous lesson.
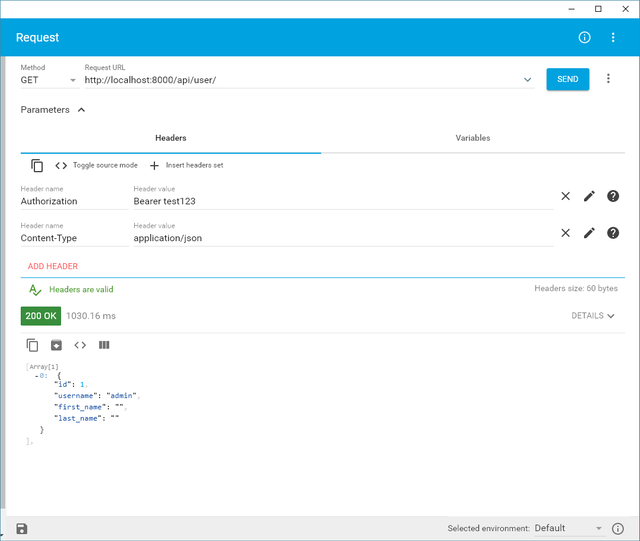
To create an authorization on who can access the user API, we just need to use the already made IsAdminUser class from django rest framework. Update the UserViewSet class and assign the IsAdminUser as the permission class. Update the viewsets.py and it should looke like the code below.
from rest_framework import viewsets
from app.serializers import ToDoSerializer, UserSerializer
from app.models import ToDo
from django.contrib.auth.models import User
from rest_framework.permissions import IsAdminUser

class ToDoViewSet(viewsets.ModelViewSet):
    queryset = ToDo.objects.all()
    serializer_class = ToDoSerializer

class UserViewSet(viewsets.ModelViewSet):
    queryset = User.objects.all()
    serializer_class = UserSerializer
    permission_classes = (IsAdminUser,)
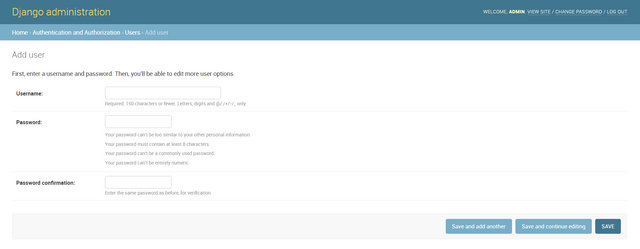
To test if this worked or not, we need to create a non-admin account. To do this, visit the admin page of the application and click on users.

Click the Add User button and enter a username and corresponding passwords. Please take note of the user name and password as we will use these later.
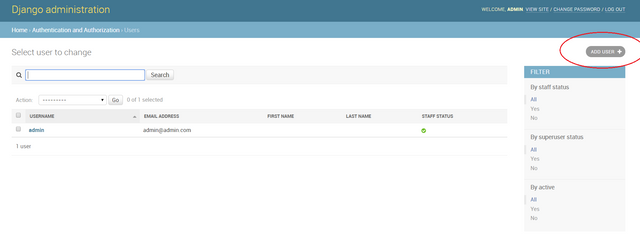
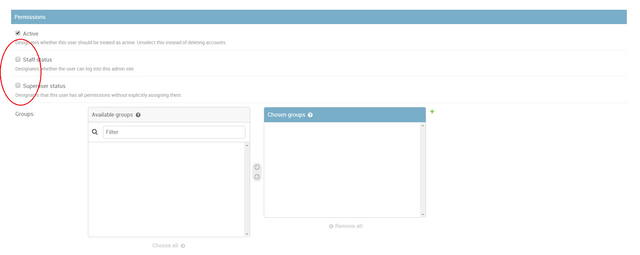
Before saving, please take note of the Permissions area. Please leave the Staff status and Superuser status checkboxes unchecked. The Staff status checkbox indicates if the user would be an admin or not. The Superuser status checkbox assigns the user as a superadmin (has more access than the admin). We want a non-admin account so leave both checkboxes unchecked.
After saving, we can now check if the authorization has worked or not. To check, request an access token as an admin (for instructions on how to do it, view the previous tutorial). You should receive a 200 OK response from the server.
Now, we will try accessing the user record API using a non-admin account. Request for an access token using the credentials of the non-admin user we just created. If everything went alright, you should see 403 Forbidden response because the non-admin user is not authorized to access this API.

For records that you will allow anyone to access, we can assign the AllowAny permission class like the one below.
from rest_framework import viewsets
from app.serializers import ToDoSerializer, UserSerializer
from app.models import ToDo
from django.contrib.auth.models import User
from rest_framework.permissions import IsAdminUser, AllowAny

class ToDoViewSet(viewsets.ModelViewSet):
    queryset = ToDo.objects.all()
    serializer_class = ToDoSerializer

class UserViewSet(viewsets.ModelViewSet):
    queryset = User.objects.all()
    serializer_class = UserSerializer
    permission_classes = (AllowAny,)
Using the nonadmin user, we can now access the user record API.

To read more about other Permission classes, you can read the official documentation.
What is Swagger?
To create great software, a great and reliable documentation is essential. Documentation provides a lot of purpose ranging from development, maintenance and most specially knowledge transfer. An outstanding documentation will increase an applications' usability, will make information of its use accessible, and decrease the barrier to entry helping new users learn quicky. Helping developers create reliable documentation is intention of Swagger.
The goal of Swagger™ is to define a standard, language-agnostic interface to REST APIs which allows both humans and computers to discover and understand the capabilities of the service without access to source code, documentation, or through network traffic inspection. When properly defined via Swagger, a consumer can understand and interact with the remote service with a minimal amount of implementation logic. Similar to what interfaces have done for lower-level programming, Swagger removes the guesswork in calling the service.
Technically speaking - Swagger is a formal specification surrounded by a large ecosystem of tools, which includes everything from front-end user interfaces, low-level code libraries and commercial API management solutions.
Source: swagger.io
Swagger is very broad for us to discuss in this tutorial. To keep it simple, Swagger is a set of instructions for describing our app's API using a common language that others can comprehend. It standardizes the documentation of our API so that others can easily consume and use it for their systems as well.
How can I implement Swagger in a django project?
Django rest swagger is a Swagger/OpenAPI documentation generator for Django REST Framework. This meant that we don't need really need to do anything other than install this library. After installation, it would do the rest and create the documentation for us.
To install swagger, activate virtualenv and install django rest swagger by entering the command below.
$ pip install django-rest-swagger
Open settings.py and add 'rest_framework_swagger' in the INSTALLED_APPS.
INSTALLED_APPS = [
    ...
    'rest_framework_swagger',
    ...
]
Open the urls.py file (same directory as settings.py) and register the swag url to the swagger schema view. Update the code like the one below.
from django.conf.urls import url, include
from django.contrib import admin
from rest_framework import routers
from rest_framework_swagger.views import get_swagger_view
from app import viewsets


schema_view = get_swagger_view(title='ToDo API')
router = routers.DefaultRouter()
router.register(r'to-do', viewsets.ToDoViewSet)
router.register(r'user', viewsets.UserViewSet)

urlpatterns = [
    url('admin/', admin.site.urls),
    url(r'^api/', include(router.urls)),
    url(r'^o/', include('oauth2_provider.urls', namespace='oauth2_provider')),
    url(r'^swag/', schema_view),
]
Go to the 'http://127.0.0.1:8000/swag/#/' url and you should see something like the one below.

To view the details of the api, click the exposed api like the 'user' example.
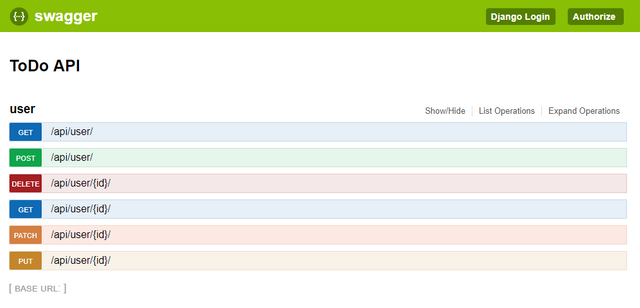
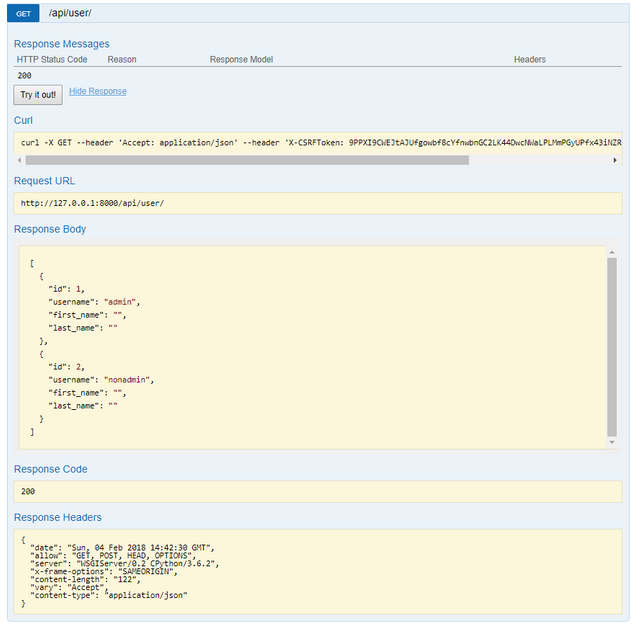
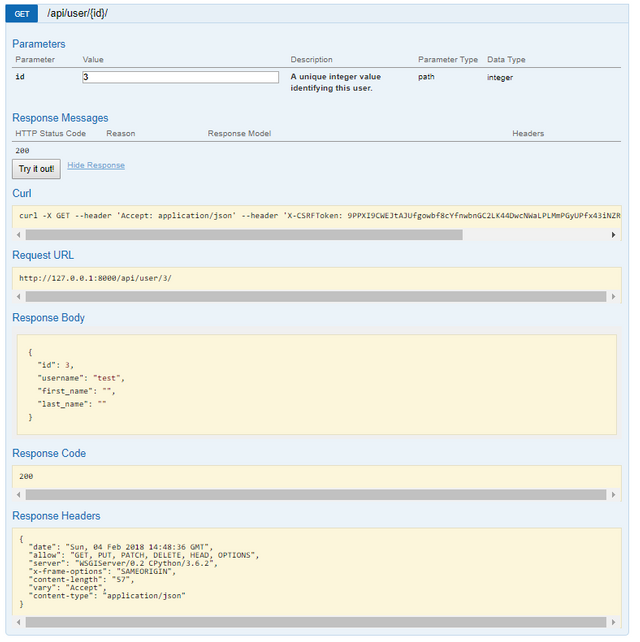
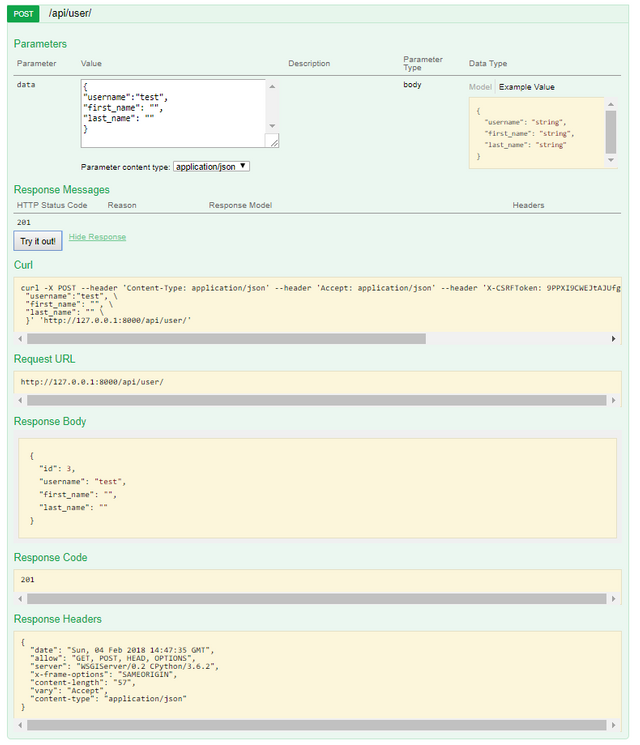
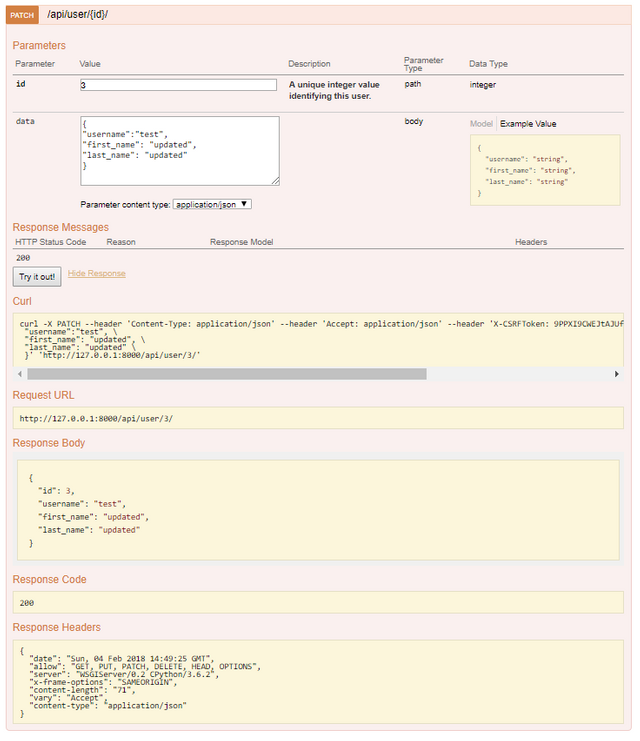
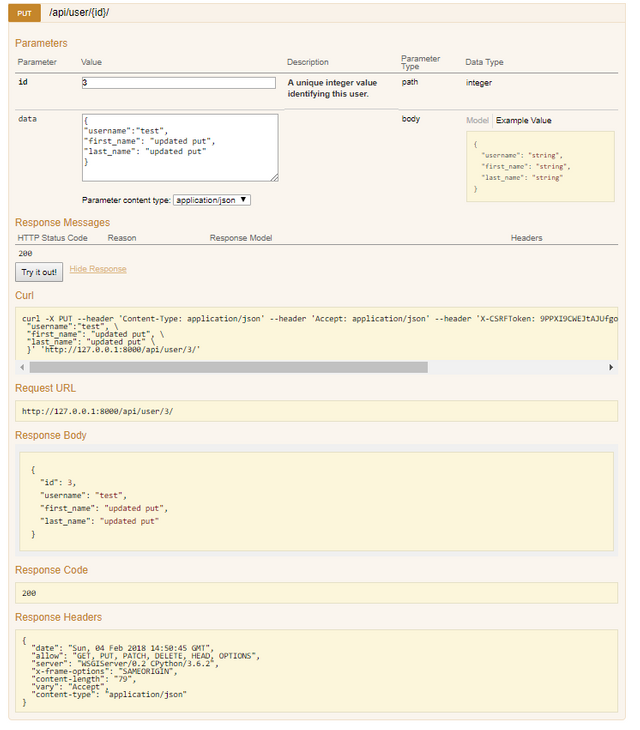
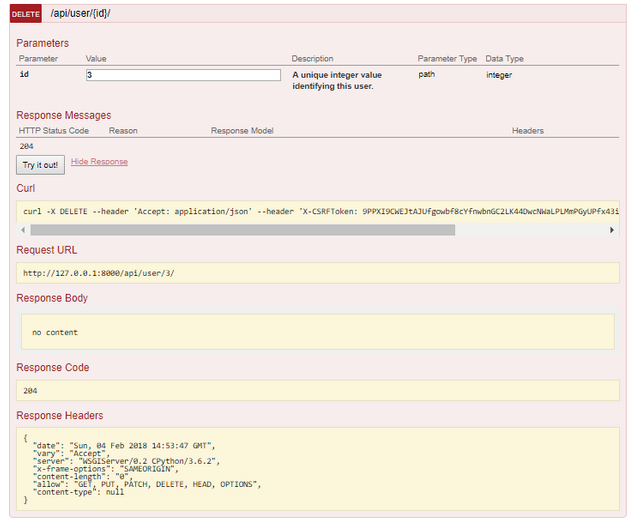
Swagger can also be used to test out the API. See examples for each request type below.
HTTP Get (All)
HTTP Get (Specific)
HTTP POST
HTTP PATCH
HTTP PUT
HTTP DELETE
Curriculum
This is part 7 of the ongoing tutorial of building a single page application by using both Django and ReactJS. Next time, we will now do the part of the app that the end users will see. We will officially start building our UI using ReactJS.
Part 1: Installing Django with Virtual Env
Part 2: Django Deployment to Heroku Cloud
Part 3: Using the Django Admin + PostgreSQL
Part 4: Handling of Static Assets in Heroku
Part 5: Implementing RESTful API
Part 6: Implementing OAuth2.0 with Django Oauth Toolkit
Posted on Utopian.io - Rewarding Open Source Contributors
@burdagay, Approve is not my ability, but I can upvote you.
Thank you for the contribution. It has been approved.
You can contact us on Discord.
[utopian-moderator]
Hey @burdagay I am @utopian-io. I have just upvoted you!
Achievements
Suggestions
Get Noticed!
Community-Driven Witness!
I am the first and only Steem Community-Driven Witness. Participate on Discord. Lets GROW TOGETHER!
Up-vote this comment to grow my power and help Open Source contributions like this one. Want to chat? Join me on Discord https://discord.gg/Pc8HG9x