The best methods for shooting and processing panoramas

I have been doing panoramas for a while now, since before they implemented the feature in the iPhone. I was honestly a bit upset when they did, because I would spend hours shooting and processing panoramas, and now you could just pan your phone around and do the same thing... Well, with a lot less quality of course.
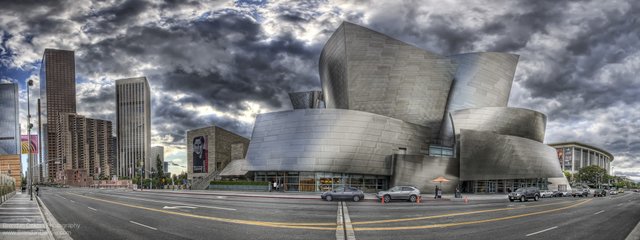
This photo above is one of my favorites, I even got it printed 5 feet long! The resolution of these gets to be a bit absurd, because it is so many images stitched together. In fact, because most of my work is HDR, it ends up being quite a lot of individual photos, sometimes 70 or more for double row panos!
A few tips on taking panoramas:
1. Tripods obviously work best, panorama tripod heads work even better, but neither are required. The shot above I took handheld. The key is overlap, make sure you have plenty of overlap between shots, I would say at least 20-25%. When shooting handheld or without a pano tripod head there will be parallax errors, things won't line up and there will be mis-aligned parts of the image. All of these can be fixed with photoshop, by grabbing the areas and stretching them around and masking, but it can sometimes take a very long time to do this. The key is that only things that are close to the camera will have parallax errors. So if you're taking a pano indoors for example, use a pano head to save yourself lots of work and headache later.
2. Shoot vertically. Always shoot with your camera vertical or portrait, this way the final pano is taller, instead of very long and short. For the really huge ones you can do a double row pano.
3. Wide angle. Always use the widest lens you have, for a while I only had the 24-70 f/2.8 so my widest was 24mm. I had to take a lot of shots to get the width I wanted. Now I use the 14-24mm f/2.8, and I can shoot the same width with 4-5 images instead of 7-8. There is less resolution of course, but because there are so many shots involved, it is still plenty unless you want to print it 20 feet long or something absurd.
3. Software. I personally use PTGui Pro, but mainly because of the HDR features. It has the ability to process HDR panos, to align every layer exactly the same and output each individual exposure layer. I do this and then process the HDR as normal using my preferred HDR software (more on HDR processing later). Photoshop and even Lightroom now have the ability to create panos, but PTGui Pro is amazing, the feature set is unmatched. (no I am not a rep for them)
4. Exposure. This should be obvious to anyone that has experimented with panos before, but you should always shoot in manual mode, so every frame of the pano is the same exposure. That way when you stitch it everything will match, even if the individual shote are under or over exposed. This is a big reason why I love HDR panos, because you can blend everything and get the best exposure for every area of the shot.
5. Inspection. I have learned that it is imperative to zoom to 100% and pan around the entire image to look for errors. As I said above, I have printed these very large and when you do everything you never saw on screen becomes obvious. Even images that aren't panos, when you starting printing large prints, you'll regret that you didn't throughly inspect the image.
6. Patience. Shooting and processing panos takes a lots of work. On location you have to sort of imagine what it will look like, how to compose the shot in a way where interesting things will be where you want them. Often I take shots that are over 180º wide, and you have to sort of guess as to where to begin and end the shot. The Processing can be very long and tedious, especially if you are shooting HDR panos and you have a slow computer. When I first started I only had a laptop, and it would take hours for PTGui to render the images. Only to find out that I had missed something and had to render it all over again. Fortunately computers have sped up, and it is much faster now. Camera resolution has also increased, so the files can be massive, sometimes multiple GBs for one photoshop file.
Hope you enjoyed the tips, panos can be very fun and rewarding for the work that goes into them. Enjoy!
Panos with iPhone really fail on the 4th step. :->
Still, it is really nice feature, because it allows me to travel light.
And while the quality is much lower than on your breathtaking manual pano above... It is good enough & hassle free, which is big in my book.
Still, thanks for sharing the tips.