Dimensional Lumber Garden Bench
While I was looking through some old stuff on my computer today I came across some plans for a garden bench I had designed way back in 2006 for a woodworking blog I used to run. It can be built using standard pressure treated dimensional lumber available at Lowe's/Depot stores. To be honest up front, I never did get a chance to build this bench. If you decide to try and build it for yourself I'd love to hear about how it went.
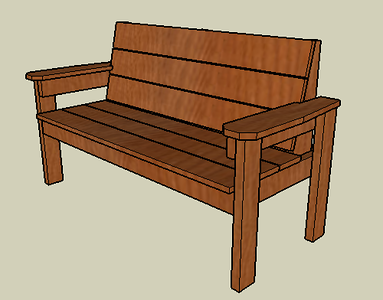
For materials you will need the following:
- (1) 5/4 x 6 x 8' deck board (for the arms)
- (3) 5/4 x 6 x 10' deck boards (for the slats)
- (5) 2 x 4 x 8' (for the legs, arm support, and frame)
- (1) 2 x 6 x 8' (for the back support)
- #8 X 2" stainless-steel deck screws
- #8 X 2-1/2" stainless-steel deck screws
- #8 X 3" stainless-steel deck screws
Crosscut all the lumber to length according to the cutting list.
| Part | Description | Qty. | Material | Dimensions |
|---|---|---|---|---|
| A | Leg | 4 | Cedar 2x4 | 23-1/8" long |
| B | Arm support | 2 | Cedar 2x4 | 23" long |
| C | Arm | 2 | Cedar 1x6 | 24-1/2" long |
| D | Seat frame front/back | 2 | Cedar 2x4 | 52" long |
| E | Seat frame end/stretcher | 4 | Cedar 2x4 | 20" long |
| F | Seat slat | 3 | Cedar 1x6 | 52" long |
| G | Back support | 3 | Cedar 2x6 | 21-3/8" long |
| H | Back slat | 3 | Cedar 1x6 | 49" long |
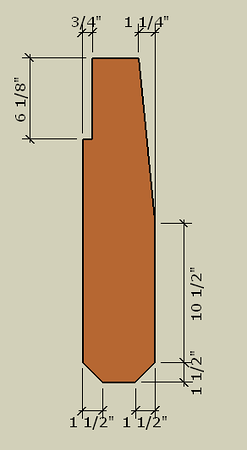
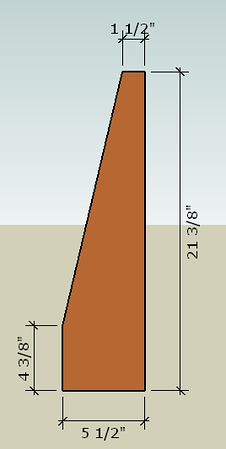
Cut the two arms (C) and the three back supports (G) according to the layout dimensions.
 |
 |
Seat Assembly
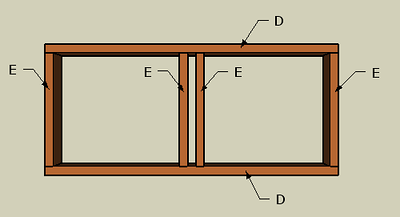
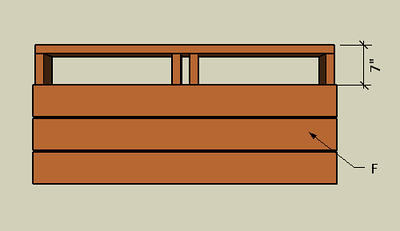
Assemble the seat front/back (D) and ends (E) as shown in the illustration above using 3" stainless-steel deck screws. Install the two seat stretchers (E) so that they are centered on the width of the frame and 1-1/2" apart using 3" stainless-steel deck screws. Next, fasten the seat slats (F) to the frame using 2" stainless-steel deck screws. Position the first slat 7" from the rear of the frame as illustrated below. Be sure to leave 1/4" spacing between the slats.
Seat Back Assembly
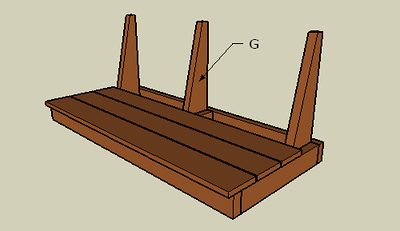
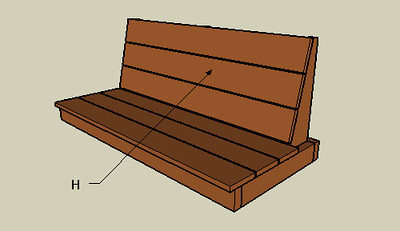
Install two seat back supports (G) on the inside of the seat frame ends and the third back support in between the two seat frame stretchers as show above using 2-1/2" stainless-steel deck screws. Attach the seat back slats (H) to the back supports as shown below using 2" stainless-steel deck screws. Once again, be sure to leave 1/4" spacing between the slats.
Leg and Arm Assembly

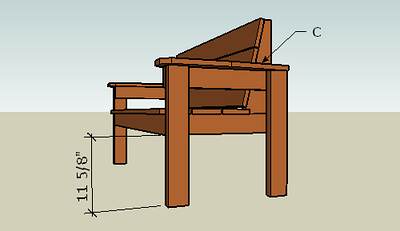
Assemble the legs (A) and arm support (B) as illustrated above using 2-1/2" stainless-steel deck screws. Attach this assembly to the seat using 3" stainless-steel deck screws as illustrated below. Finally, using 2" stainless-steel deck screws, attach the arms (C) to the tops of the arm supports as shown.
And that is it. If you constructed this out of pressure treated lumber then you don't really need to finish it, but it can be painted if you'd like.

hello I am brand new to Steemit and an avid woodworker and homesteader. I love this set of plans. Thanks for sharing the project with us. I have made many of these over the years.
Welcome to Steemit, but to be honest I’m rather brand new myself.
Wooooooow!!!!!!
Really cool stuff
Thanks for sharing this
Will like you to see my blog and upvote me too