Using blender to create a time-lapse video from your photo series or animation sequence.
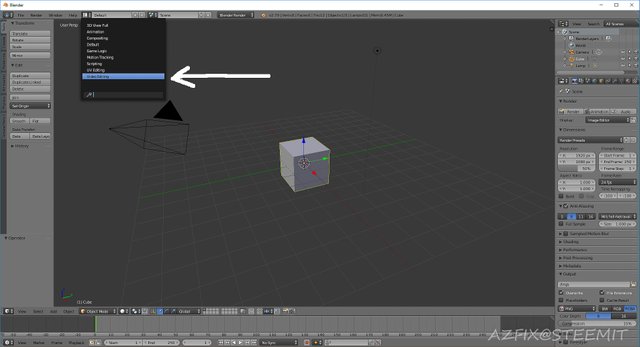
First you want to open blender and select the video editing option from the top of the drop down menu. Many people do not think of blender for use as a video editing tool since its primary use is to develop 3D animation. I personally enjoy the fact that it is open source and has all the features I need for video editing. It also works with both windows and Linux gaining even more love from me.

Once you get into the video editing view select the add menu towards the bottom and select image. This will allow you to navigate to the folder you stored your time-lapse or animation images in.

Select the images for your time-lapse sequence and use Ctrl+Shift on your keyboard to select all the images.


Next you will want to go properties and select the type of movie output in this case I am using .avi file format.
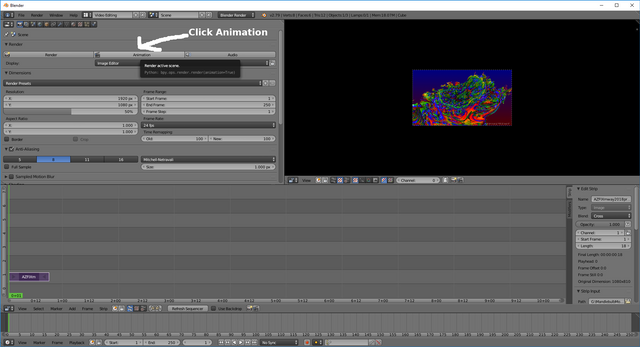
Finally choose the destination location for the video file output and then select animation to process the files into a video file.

Thanks @azfix for this awesome post like a great tutorial
Posted using Partiko Android
Thanks, I hope its something that you will find useful.
Definitely sir
Oh yeah Blender is great! Although I still use YouTube for tutorials, I was able to do some pretty cool short intros for my channel. Good stuff!
It has so many features its hard to learn them all
@azfix You have received a 100% upvote from @botreporter because this post did not use any bidbots and you have not used bidbots in the last 30 days!
Upvoting this comment will help keep this service running.
Thanks @verifyme
Welcome back to Steemit! It’s great that you started posting again after very long time. ;)
p.s. Sorry, but I just noticed your posts....
scash!balance
You have
⚡468 SWIFT(unconfirmed:⚡0 SWIFT).